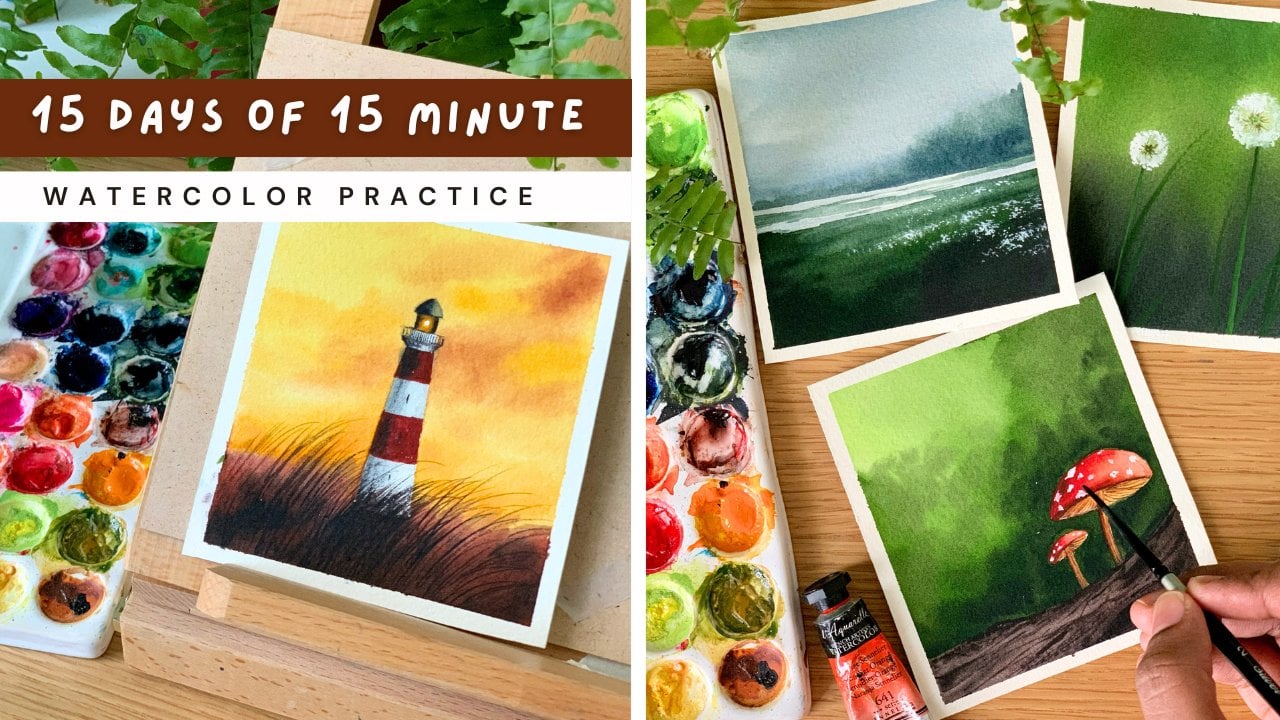
Transcripts
1. Welcome to the Class: I'm someone who find
joy in making small, deeply satisfying pieces
over complex big artworks. As a homemaker and mom, squeezing in time for
art as a Rhal struggle. I focus on smaller pieces. This way, I can
finish them in one go without losing
the connection with the artwork and the
process. Hello, friends. My name is aninapel. I'm an artist, an art
instructor, and an author. My first encounter with vertcla happened when I
was at the age of five, and I vividly remember those circular shaped
vertcla cakes. Ever since that first
moment of discovery, I have loud indulging
in quick art escapes. Sometimes I whip up a
quick monochrome painting, a vibrant sunset, or a scape with a few
splashes of paint. Even though these art
sessions are short, they truly satisfy the soul. If you love creating art daily, but have limited time, I have got your next
30 days covered. I'm super thrilled to invite you all to a 30 day vertical talent, where together, we are going to craft 30 menial landscapes. This challenge is
designed to fit into the smallest
pockets of free time, allowing you all to create beautiful vibrant
artworks without committing to long sessions. Before we start, I'll explain about the watercolor
supplies in detail. At the beginning
of every painting, I will talk about the
colors you will need. Then we'll also try some
alternate color options if you don't have the
same color I'm using. Each painting is
crafted to inspire quick yet satisfying
burst of creativity, encouraging students to
explore new techniques, color palettes and styles
in a manageable way. Whether you're a seasoned
artist or a beginner, this challenge
offers a refreshing, time efficient way to indulge in your passion for watercolor. These artworks are small, but they are really beautiful. For the same reason, the process does not take a lot of time. Making it easier for busy individuals to stay connected to their passion for art despite
their busy daily hustle. If you're ready to indulge in a quick art break,
grab your supplies, cut your paper
into small pieces, let's begin this journey.
2. Class Overview: Hello, dear friends. Welcome to 30 days of painting many
verticar landscapes. Being both a mom and homemaker, it's challenging to
dedicate time to art. I know many of you
are in the same page, and that's why I'm here today
with a vertica challenge where we're going to try small
soul fulfilling artworks, which you can finish in
less than 20 to 25 minutes. As you are already aware, this class is composed in
a daily challenge format. So starting from today
for the next 30 days, we will together paint a
mini verticor landscape. They are mini, but
they are beautiful. Every day, you will
get to learn a lot of techniques and new
color compinations. We'll try beautiful meadows, seascapes, spring
landscapes, and a lot more. Every day is
painting, start with the quick color
swatching exercise, to make you familiarize
with the colors. I will also briefly
explain about the process, which will make you prepared and also gives you an idea
about what to expect. Before we get into this journey, let me quickly show you a few of my favorite artworks.
Here's one. I really love the way
this one has turned out, especially that fog
effect and the color coination. And this
is another one. This one is a really
quick and ECC scape, which you can do in
less than 20 minutes. Here's another one.
For this painting, the process is really exciting. In this artwork for
the background, we will simply drop in some
paint onto a pet background, and we will create a texture. And then we will simply
add some white lines onto those rocks and create
a beautiful waterfall. So, yeah, every artwork
is really exciting, even though they
are super small, and with every artwork, we'll be exploring
different color coinations, compositions and subjects. And the best part is that, all these artworks can be done in less than 20 to 25 minutes, which means if
you're someone with a busy schedule and still want to spend some
time on creating art, I can give you company
for the next 30 days. So if you're ready,
join me right away. Let's create 30 met
verticlor landscapes.
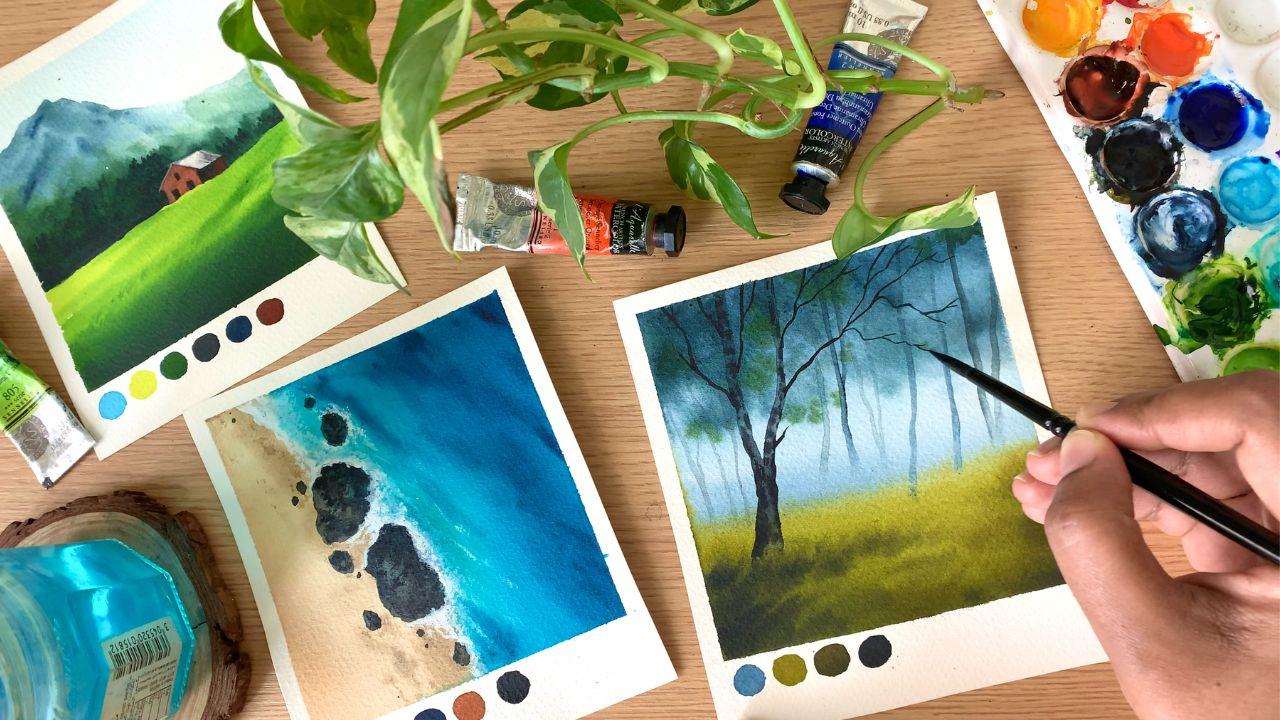
3. Materials you'll need: Before we start,
let's have a look at the materials you will need
for this NTIA challenge. I will start with the paper. Here's the paper I'm going to use for this NTIA challenge. It is from arches. It's a
cold press aticul paper. And it is one 40 LB, which means the paper is
quite thick enough to handle multiple layers
of paint or water. Then it is 100% cotton. Arches is a brand I've
been using for years, and I just love this paper. But it can go with any
artist grade verticar paper. Just make sure the paper is 100% cotton and also one 40 LB. The brand doesn't matter, just focus on those specifications. Now let me show you the size of the paper I'm going to use. It's a small plaid size. We are going to do
a collection of mini verticular paintings,
and this is the size. It is 121412 this
way and 14 this way. To get a better idea about
the size of the paper, I will show you free
of the paintings. So here we are. You can see the way I have
composed the painting. If you leave out the border, the painting will be
more like a square, maybe 11 by 11 centimeter. Choose your paper size, it can be a bit
bigger or smaller, but don't make it too big and also try to go with a
similar orientation, as I have composed all
the paintings this way. Next, coming to the watercolors
for all these paintings, I'll be using watercolor tubes. I will explain about the colors at the beginning
of every painting. We will do a swatching
to get a better idea. You can go with
vertcular tubes or watercolor pants.
It doesn't matter. Try to go with the
color which is nearly similar. All right. Now, the next item you will need is a mixing
palette obviously. You can use any kind
of mixing palette. This one is a ceramic
mixing palette. It has got so many
small sections and also two big sections
to mix the colors. So, I just go with any
mixing palette of a toys. It can be ceramic or plastic
or even a dinner plate. Next, let's take a look at
the watercolor brushes. For this entire series, I'll be using five
different brushes. The first one is
a 1 " flat brush. I'll using this brush to apply
water onto the background. Just go with any of
your wider brush to apply a coat of water
onto the background. The next one is
another flat brush. This one is a half
inch flat brush. I'll be using this one
mostly to blend the colors. Just go with any of your
medium size flat brush. Now we have three
different round brushes. The first one you see here
is size number eight. Then I have size number
six and size number two. I'll use the bigger
one size number eight to apply paint onto
the background. The other two brushes are
mostly for detailing. I'll use size number
six for the medium size detailing and size number two is for all the fine details. All of these brushes are
from the brand silver brush. That summarize all the
brushes you will need. We spoke about the colors, the brushes, and the paper. Now the next material you will
need is two jars of water. When you're working
with watercolo, it is really important to
have two jars of water. One has to stay clean. We'll be using this one to apply coat of water onto
the background, and also at places where
we need clean water. The next one is to resolve
the pain from your brush. Now, coming to the
next material, you will need a
masking tape to fix your paper onto your board
or onto your drawing table. I'll using a 1 " masking tape. You can use any tape
that you normally use. It could be 1 " or a half inch. It doesn't matter.
Also, you can fix your paper directly onto the table or onto
a drawing board. Next, you will need a
pencil and an eraser. We don't have a
lot of sketching. There are only minor
sketching involved. For that, you will need
a pencil and eraser. Now, last but nother least, you will need a paper towel. We'll be using this to dab off the excess amount of
water from our brush. That summarize all the materials you will need for this
entire challenge. Keep them ready, and let's
begin with this journey.
4. Before We Begin: Before we start, I want to talk about a few important
key points. The first one is
about the paper size. As you already know,
we're going to use small piece of paper for
this entire challenge. So that's the size
I'm going with to get a better idea.
Here is a painting. This one is more
like a rectangle, the longer side is 14, and the shorter side is 12. I would recommend going
with a smaller size of similar proportion because this is how I have composed
all the paintings. If you want to go
for a square shape which is slightly bigger,
that's totally fine. You can go with a similar size. You can also go for a slightly longer
portrait orientation. But keep in mind, these
paintings are not so detailed, and they don't have
a lot of elements. If you go for a bigger size, you might lose the
essence of the painting. So my recommendation would be to go with a small sized paper. It can be square or rectangle. That's totally up
to you. That is the first thing I
want to talk about. The second thing is
about fixing your paper. You can fix the
paper either onto your table or onto
a drying board. If you have noticed
on the bottom, I have a thicker border and on the other three sides,
it's a thinner border. I have used a
thicker border along the bottom to swatch
out the colors. You can use the similar
thickness throughout your paper. It doesn't need to be
thicker at the bottom. Also, you don't need
to add these swatches. You can write the name
of your artwork or the date or a coat or something that makes
it more personal to you. Here's how I'm going
to fix my paper, a thicker masking tape
along the bottom, then thinner along the
other three sides. You can use any masking
tape that you normally use. It can be a painters tape or a washi tape or
any kind of tape. The masking tape I'm using
here is a very normal one. I got it from a local
stationary store. That's how I'm going
to fix my paper. Now coming to the third point, which is about keeping your
colors ready in advance. Before you start
with your painting, Before we start
with every artwork, I will briefly talk
about the colors. This way, you already
know which are the colors you will need for
that particular painting. I'll be doing a quick
splashing exercise to give you a better idea. Before you start
with your artwork, make sure you have all the
colors ready on your palette. I'm saying this mainly because there are paintings
like this one, where we're going to
paint the T background in one co. We will
start with the sky. Then we have a soft line here, and then we'll add
paint onto the bottom. The NT background is done
in one single layer, which means you
should have all the colors ready on your palette. Because we have to
apply all the colors onto the background
while it is still wet. If you lose that
time in between, you might not be able to
get that foggy effect. Be sure to keep all the colors ready on your palette
before you start. Now, just like keeping
your colors ready, it is also important
to work with clean brushes and clean palette. Sometimes in a rush, I used to miss
washing my brushes. The next time when I pick it, there might be some
leftover paint. I used to mess up my sky, be sure to clean your brushes thoroughly before
you switch from one color to another and make sure it is clean
and ready for action. Now, there's one more thing I want to talk about the brushes, especially about the wash brush. We used to apply code of
water onto the background. This is the brush
I normally used to apply code of water
onto the background. And I don't mix it
with my painting. I use it only for applying
water. So it is mostly clean. But if you use the
same brush for applying water onto
the background, and also for painting, before you start, make
sure it is clean. Now, just like clean brushes, it is also important to
have a clean palette. This part has got two big
divisions to mix the colors, and it has got so many
small divisions as well. Every time I'm done
with my painting, I clean my palette, using a wet cloth
or a wet vibe and I make it clean and ready
for the next painting. If you use a dirty
palette for your works, the colors will end
up looking muddy. You won't get that
fresh vibrant colors. Ilways make sure you have a clean palette before you start. You can see how quickly
I cleaned my palette. This is one reason why I love ceramic palettes over plastic. But that doesn't matter if you prefer plastic,
that's totally fine. Working with a clean palette
is all that matters. Now, the final point is about the importance of having
two jars of water. If you can replace your water quickly where it is
getting dirty, it's fine. Then you can go with
one jar of water. But for paintings like this, in between the process,
we need clean water. So if your water
is muddy or dirty, you won't be able
to act quickly. By the time you go
and change the water, the backroom might
have dried. Okay? So it is very important to have two jars of water when you're
working with watercolor. All right, so we have discussed
about the key points. I know you already know them, but I just thought
of reminding it. Okay, now it's time to officially start a
watercolor challenge.
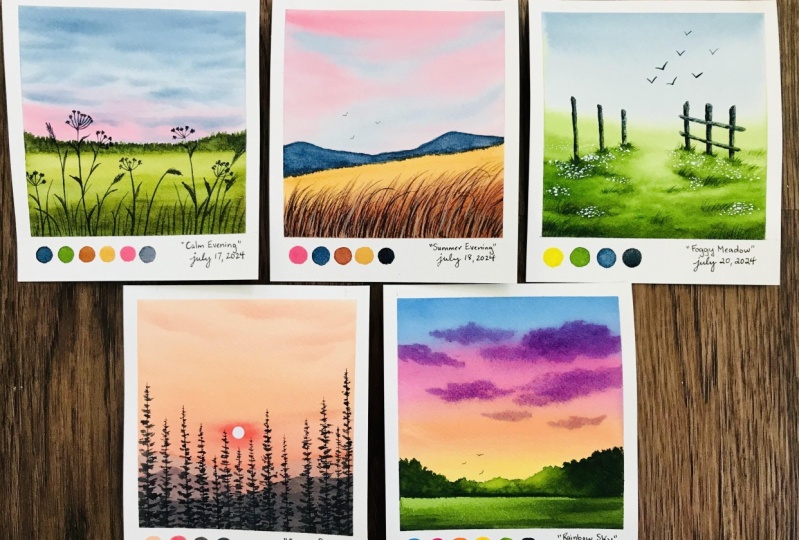
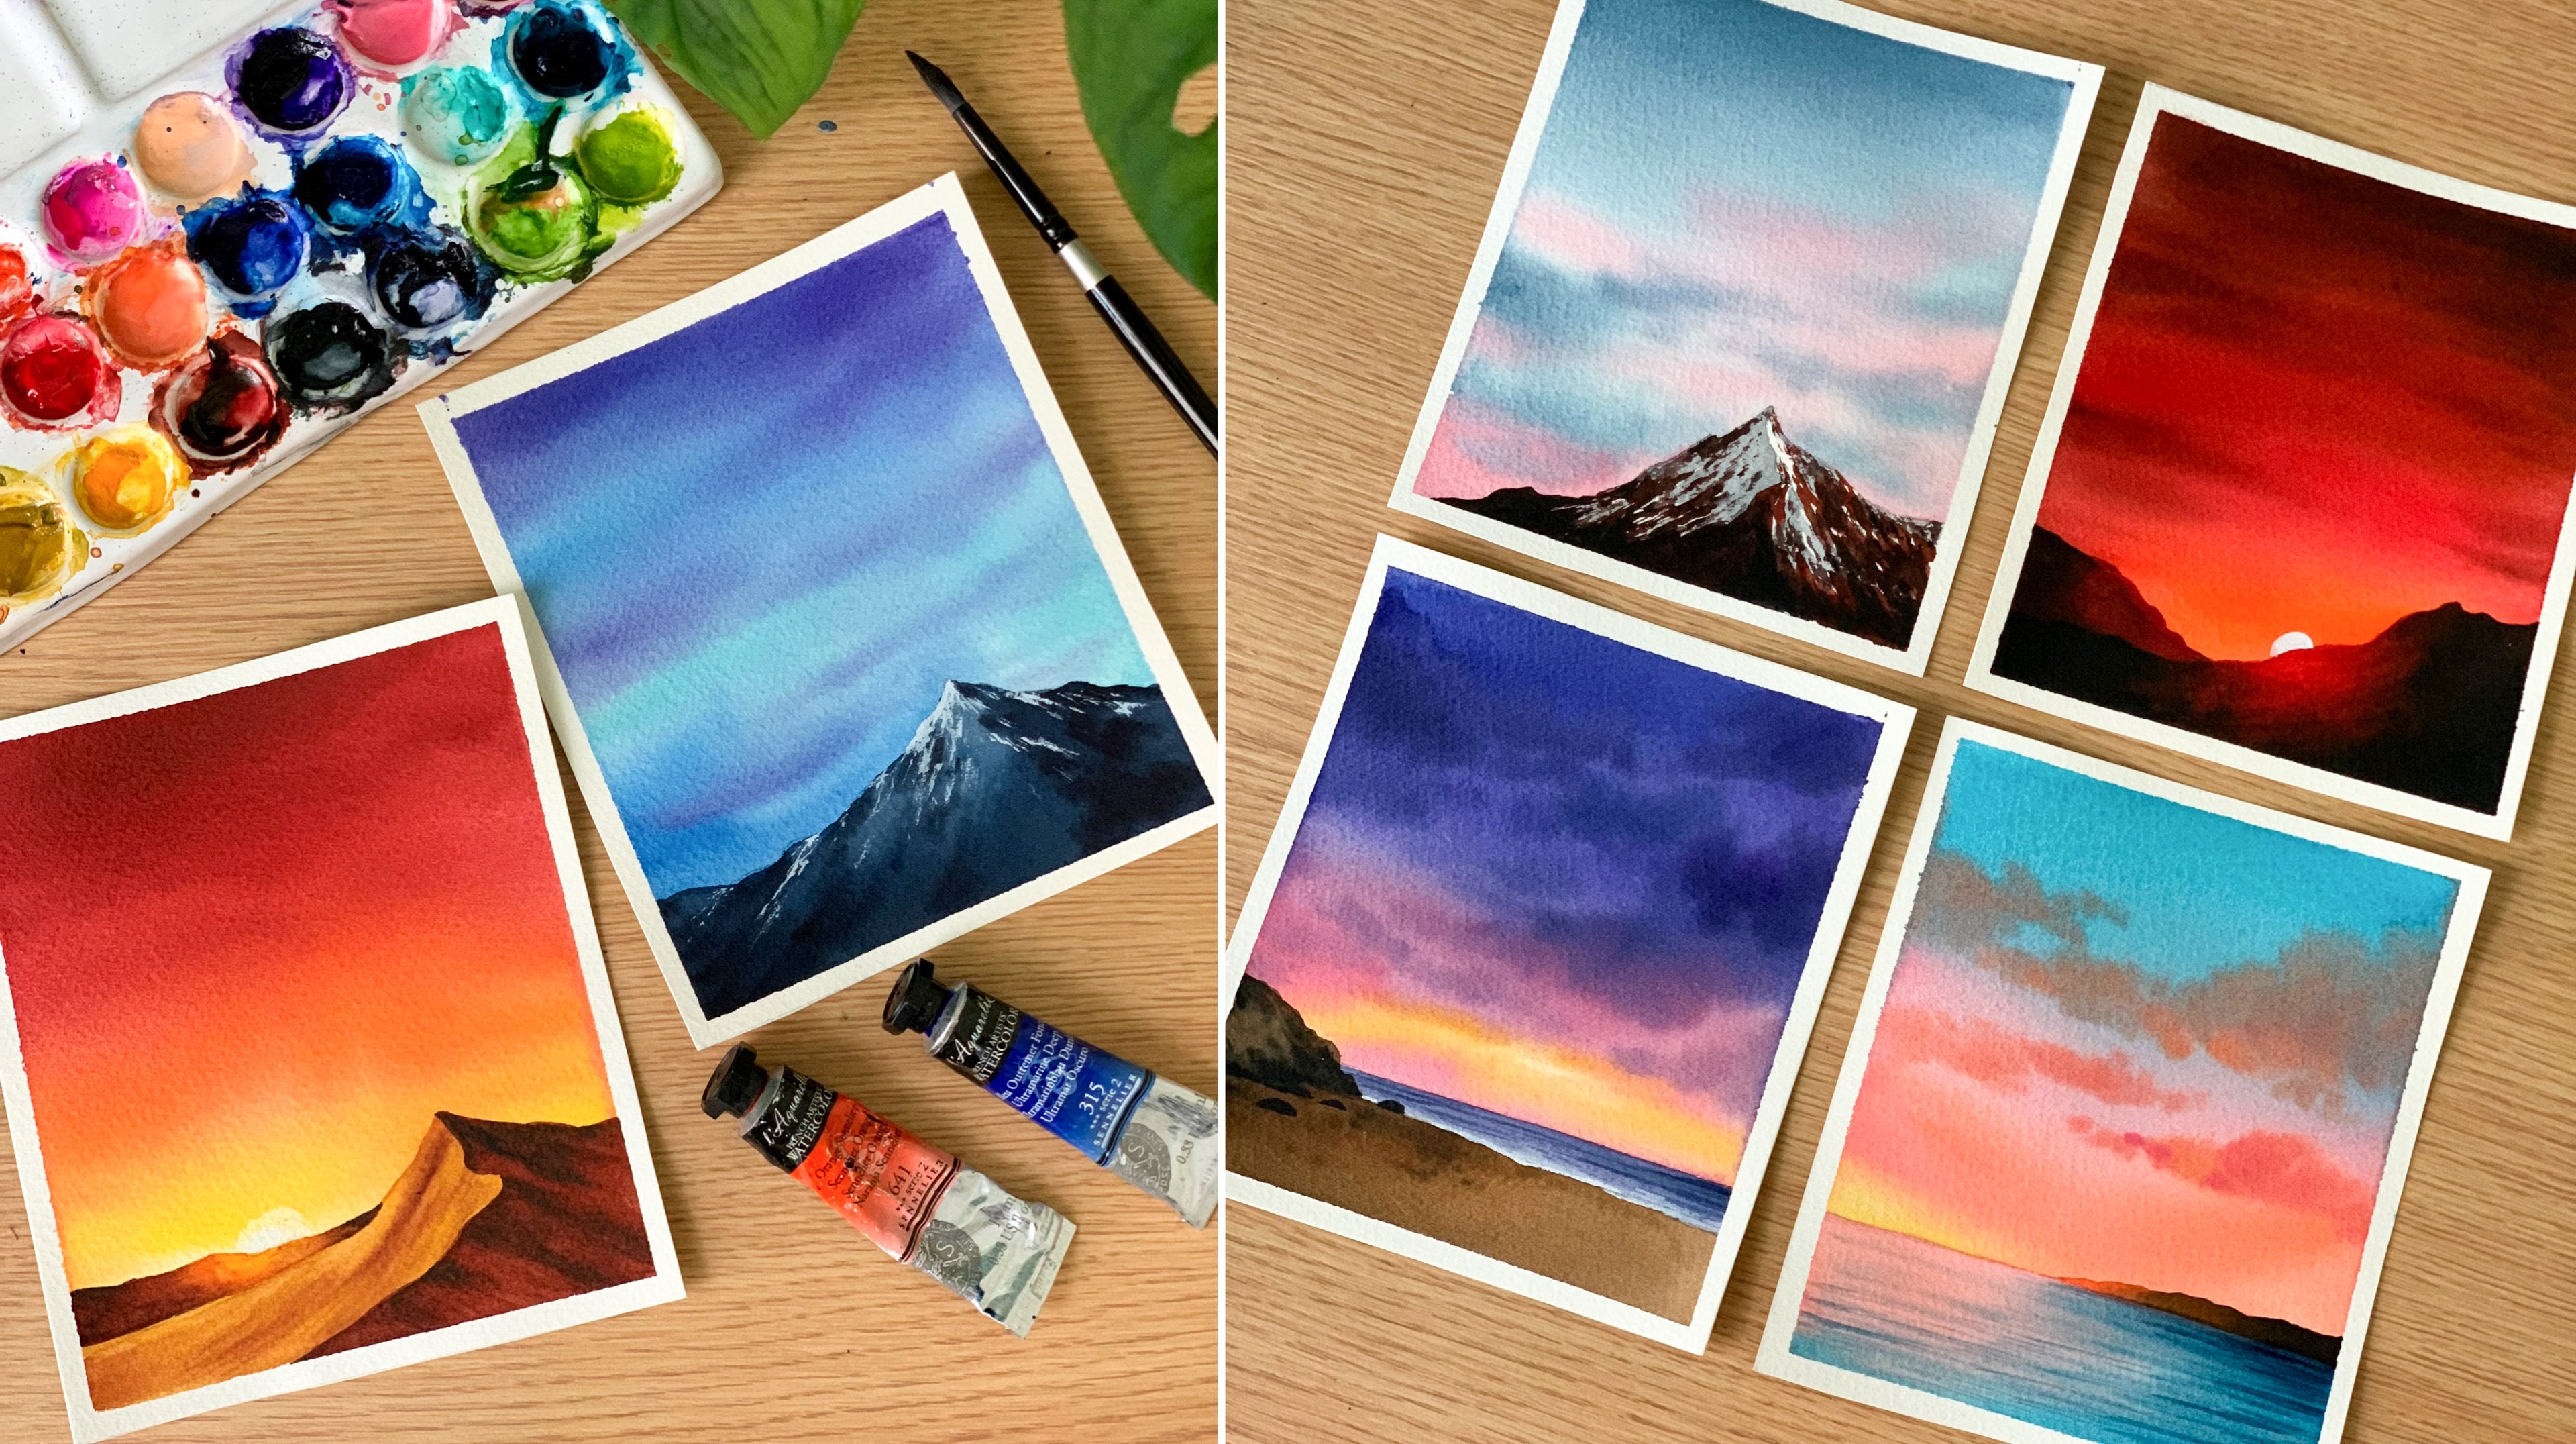
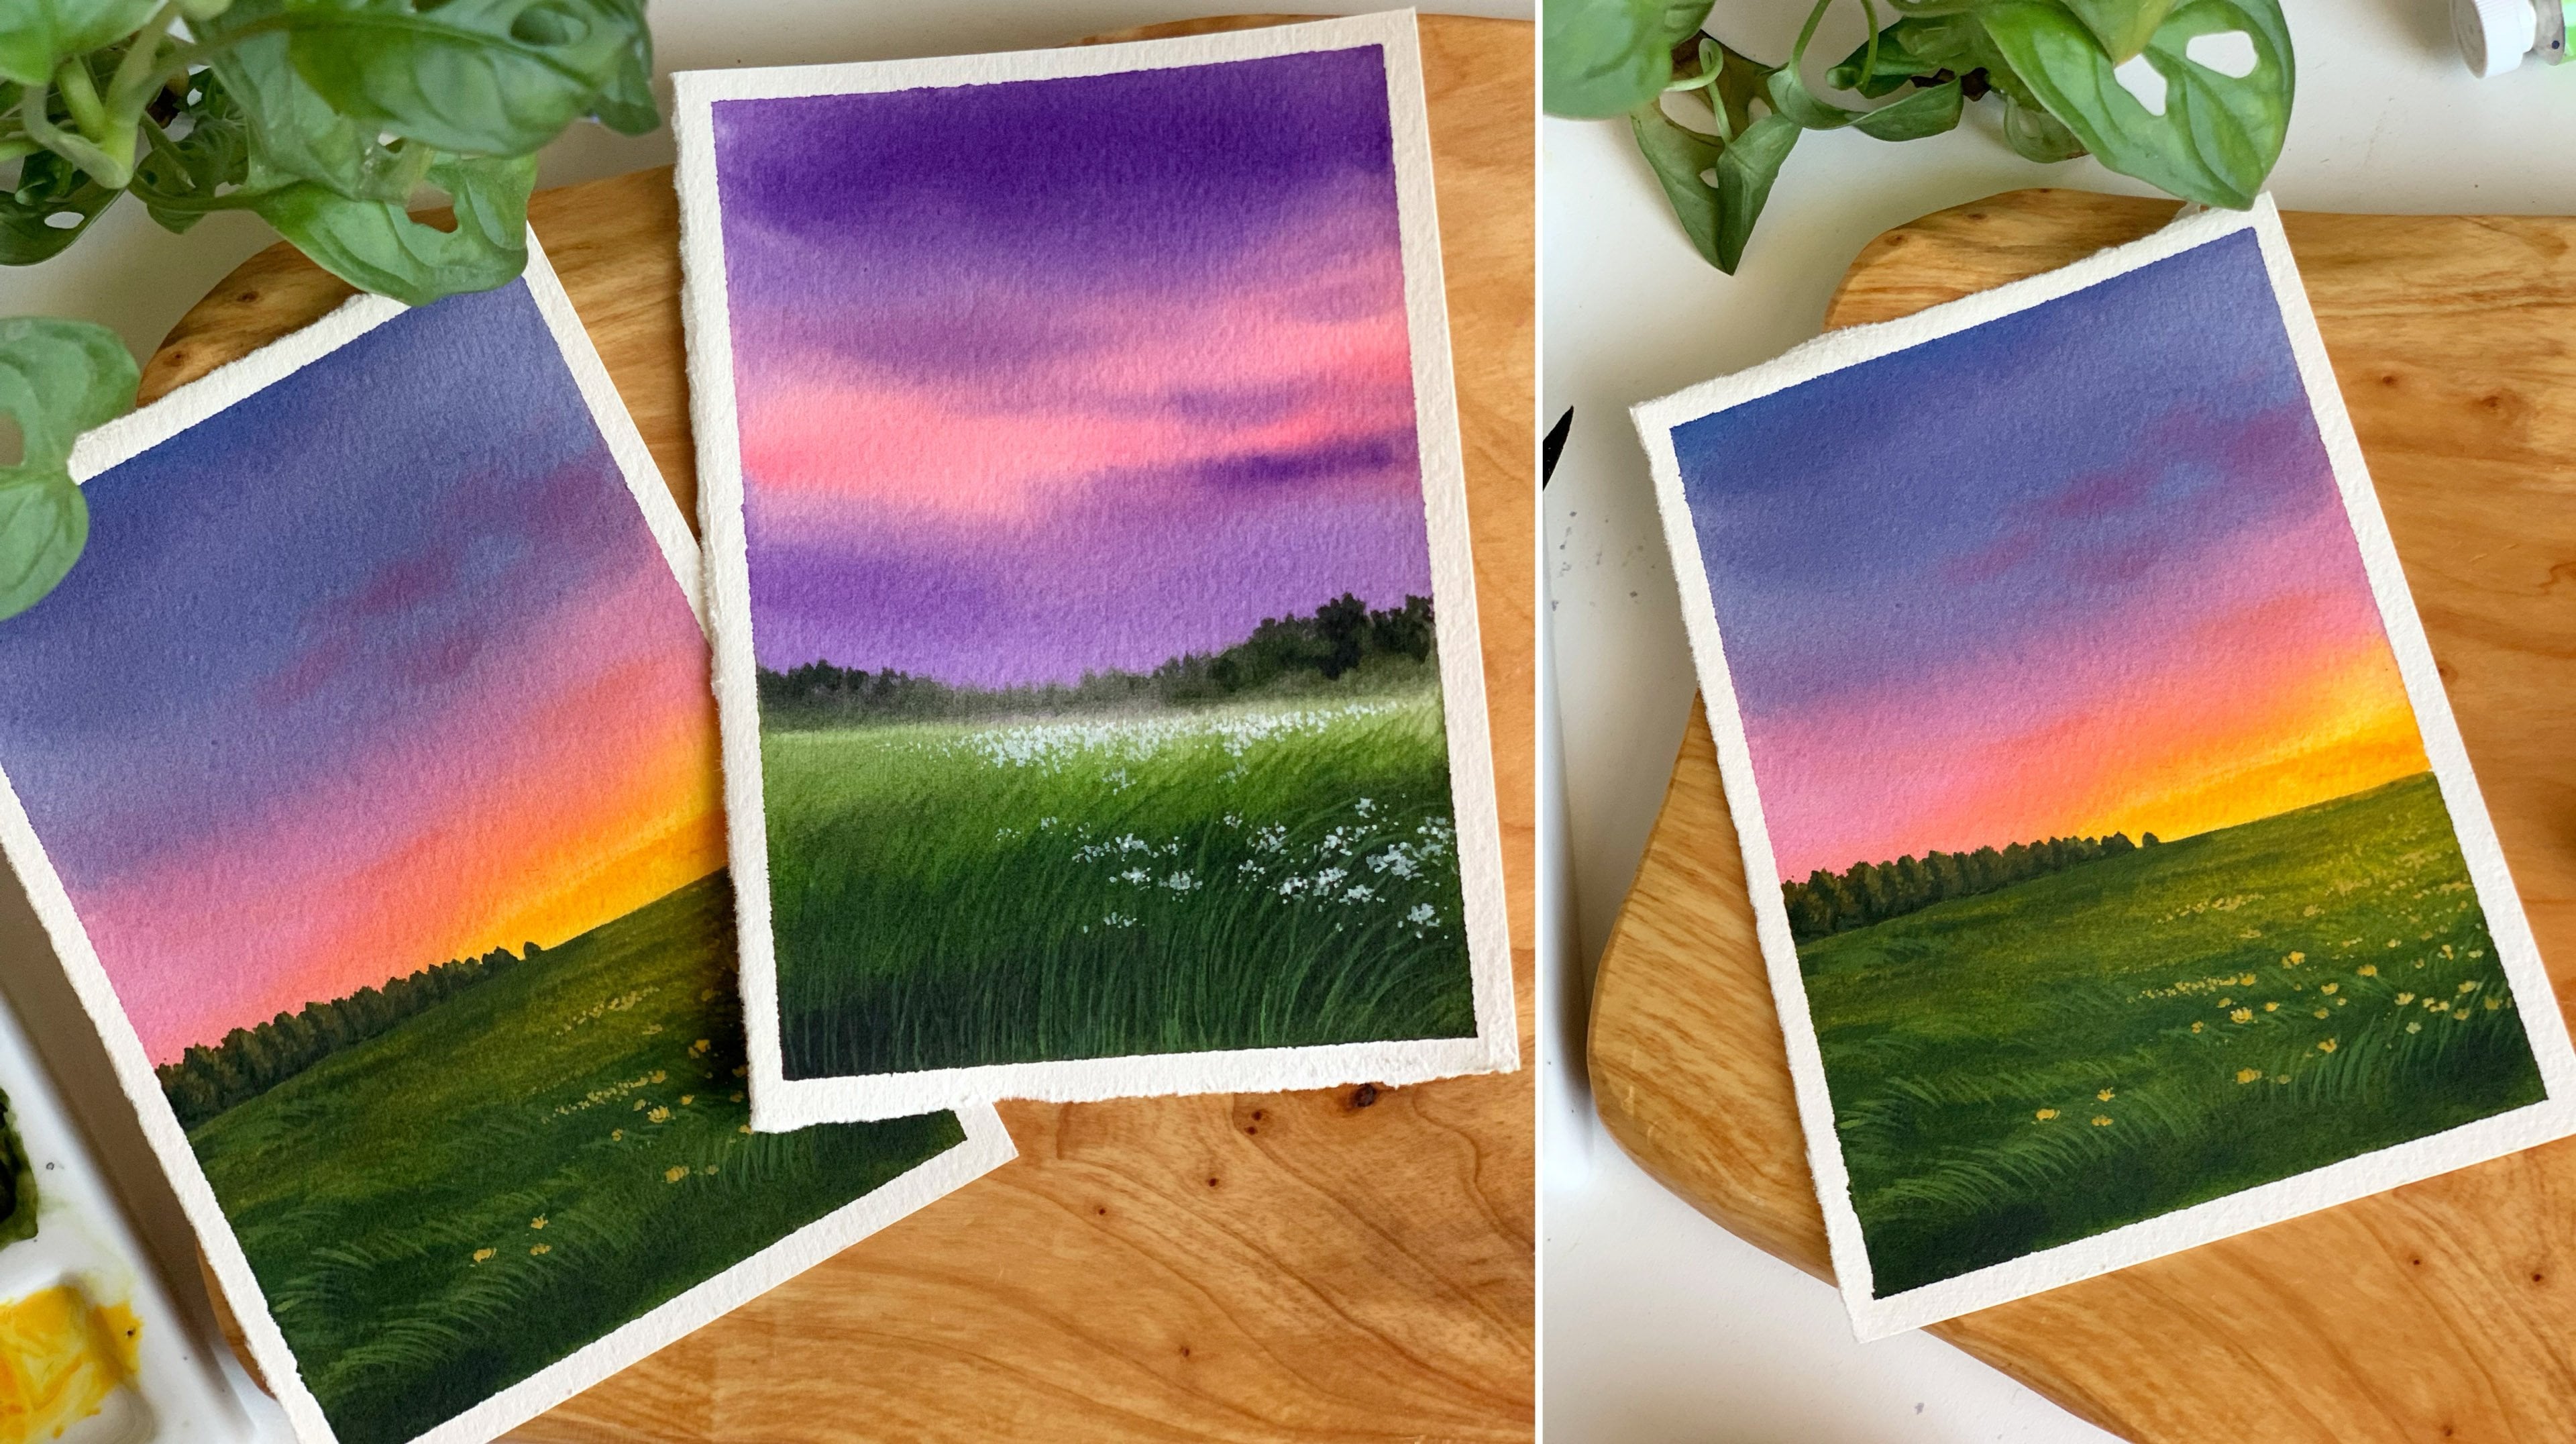
5. DAY 1 - Golden Hour: Hello, dear friends, welcome to a brand new 30 day
tclor challenge. Here's our first painting. It's a beautiful summer evening. Now, first, I will take you through the colors
you will need. Then we can quickly
start with the process. You will need four colors
for this painting, which is paints gray brown, then some yellow ochre
and a yellowish orange. I will swatch the colors for you so that you
have a better idea. I will start with the colors. I'll be using for the sky. The first color is
db yellow orange. It's a beautiful
yellowish orange. You can go with an
orange or yellow or a yellowish orange.
That's a color. If you don't have a similar
color in your collection, you can simply add
some vermilion to any of the yellow
you have got, and you can easily
create a similar color. This one is yellow
orange from Shinhan. Now the next color you will need for this painting is brown. I'll using permanent brown
from art philosophy. If you have brown, go with that, otherwise, you can
just use burn Cena. Here is the color. It is called permanent brown and it
is from art philosophy. It is a very beautiful
reddish brown. On the other hand, burn
Cena is more yellow wish, but please don't worry
if you don't have brown, just use burn Cena instead. That's our second color. Brown is a major color you
will need for this painting. We will use that for the
sky for the mountain, as well as for the metal. Now the next color you
will need is yellow ocher. We'll be using yellow ocher with a meadow along with
brown and paints gray. On the top, we will
use yellow ocher, then towards the bottom to
make the color more taker, we will introduce brown
and also some paints gray. Now, just in case if you
don't have yellow ocher, you can easily create it, add a bit of brown or burn cena. With any of the warm yellows
you have caught like Cambo yellow or primary
yellow or thin yellow. Just add a bit of burn cena
with any of those colors. That was yellow ocher.
Now, I'm going to go with the final color
which is paints gray. We'll be using paints
gray mostly to add the deeper tones
for the meadow, as well as onto the mountain. If you have a darker brown in your collection, you
can use it directly. In that case, you don't need to mix and create a darker brown. Just use it directly
for the mountain, as well as for the meto. We're not going to use
paints gray actus. We'll be mixing that with brown to create a darker version. That is our last color. We only need four colors
for this painting, Cadmium yellow orange, brown, yellow ocher, and paint screen. If you don't have the
exact same colors, that's not a problem. Just go the colors you have with you, which is
nearly similar. Let's start by
adding the sketch. We need to add the
horizon line and also a mountain in
the background. That's all we need to add. I'm going to place
my horizon line a little below the center
of the paper right there. Next, I'm going to add
a very simple mountain. You can go to any
shape that you prefer. It doesn't need to be
the exact same way. Okay, that's my sketch. We have a mountain and the
horizon line. That's all. Now we're going to
start with the sky, and then we will
paint the meadow and finally the mountain. Okay, so a lead start. Now, these are the two colors I'm going to use for the sky, which is permanent brown
and cadmium yellow orange. I will take out some
paint onto my palette. Okay. So if you don't
have the same colors, you can go with any color
which is nearly similar. It can be an orange or yellow, and intra of brown, you
can also use burn sina. I have the two colors
ready on my palette. Now, I'm starting by applying a coat of water onto the sky. A nice gentle coat of water. I'm adding the water
along the outline. If you can try to lead
the mountain actus. But if you accidently add a little water,
that's totally fine. Don't worry about it.
My sky is evenly wet. Now to apply the paint, I'm going to go with brush. Before you start, make
sure your brush is clean. Now the first color I'm going to pick is Cmium yellow orange. This one is a yellowish orange. You can go with
permanent yellow orange or any similar color, or you can simply
add some scarlet or vermon with a bit of yellow. And you can easily
create a similar color. Now I'm starting to apply the
paint, it's a medium tone. I'm assuming the sun
to be over here, which means when I'm
about to reach that area, I have to make the
color lighter. Right now I'm using
a medium tone. Now I'm picking some water, dabbing it on a paper towel. Over here, I'm making the color slightly lighter. See that? Now, for the remaining area, we can apply a medium tone. Only about the mountain where
we are placing the sun, we have to make the
color a bit lighter. The rest can be medium
tone or darker tone. That's totally
fine. Okay. Now I'm picking more yellowish orange and I'm adding that on the top. Okay. So that is Cuello orange. Next we can I go with brown. So I'm going to clean my brush. And then I'm right away
switching to permanent brown. This one is a reddish brown. Now I'm applying
that on the top. Brown and orange,
it's a beautiful color coination
to paint sunsets. Now using the same color, I'm going to add in some clouds to make the sky look
more interesting. First, add in brown and plan
that with yellow or orange, which will be the
color you're using. Then with the same brush, add in some clouds. Once you have added them,
d brush on a paper towel, then very gently smudge it
and give it a softer look. We can add a few more clouds. With the same sh, I'm
picking a little more brown and I'm adding
some more clouds. You can see I'm still retaining that lighter tone
closer to the mountain, where we are imagining
the sun to be. For the rest of the area,
I'm adding more cloud, I'm adding metium tones. Keep on adding more
clouds if you feel like or if you're
happy with the result, you can just leave it actus. This is how my sky
has turned out. I'm very happy with the result. Now in the meantime,
while the sky dries, we can start with the meadow. I already have some
brown on my palette. Along with that, I will need some yellow ocher
and paints gray. First, let me take out some
paint onto my palette. The smells yellow ocher. Next, I need paints gray. My yellow ocher is from
Shinhan Pines gray is from Rembrand. We have
the colors ready. Now we can start
with the meadow. It's a small area, so
I thought of going in directly with the paint without
applying a coat of water. The first color I'm
picking here is yellow ocher and I'm applying that along
the horizon line. Go with the medium tone.
Don't make it too light. That's the color I'm using. It is yellow ocher from Shinhan. Apply that along the
horizon line and gradually go with
permanent brown and fill up the remaining area. Start with the medium tone, then gradually towards
the bottom most area, make it more darker. Along the horizon line, we have a medium tone of yellow ocher. Then towards the bottom,
the color is more. Now with the same
pain, I'm just adding a few lines and some shapes
to give it some texture. And maybe we can apply a much more taco
tone at the bottom. The color I'm using right now is a mix of paint screen and brown. You can also use burn temper. Okay, so the base
layer is ready. Now I'm going to
keep this brushreide I'm going with my smaller brush. This one is size number two. Our next task is to add some grassy pattern on
to this wet background. I'm starting by picking
a bit of brown. And then I'm just going to add
some free hand lines on to this background from the bottom towards the top. See that. Go with any of
your smaller brush or a bit with the pointed tip, and keep on adding
some grassy lines. They can be longer
at the bottom. If you're adding them
closer to the horizon, make them a bit shorter and also don't use a
taco toon over there. Just keep on pushing and pulling that paint and simply add some
free hand lines like this. When I'm adding these grassy
lines in the background, I'm not picking any new paint. I'm just making use of
that leftover paint on my brush so that they
won't look too prominent. But towards the bottom where
we have that taco Tunes, you can add more paint and
you can add more taco lines. Let's keep on adding
these grassy pattern and make our meadow
look lush and thick. I think I have added
enough on the top. We don't need much
here. It is far away. We have to focus more on
the bottom most area, so I'm picking more brown and I'm going to continue adding
more lines at the bottom. Maybe you can use a darker tone by mixing some paints
gray with brown, or you can also go with
burn tumber as it is. Okay. Let's keep on adding those free hand
lines at the bottom. You can see the color. It's pretty dark and also I'm adding a lot more
because at the bottom, we want it to look
like lush and thick. Right now, your background
might have tried a little. That's totally fine. You can continue adding those patterns. The brush I'm using here
is size number two, and that is the reason why I'm able to add thin crisp lines. Here is the brush. It has got
a really nice pointed tip. Try to use a smaller brush or a brush for the
pointed tip for this exercise that you will get those lines very
crisp and thin. I'm going to add a few
more lines at the bottom. Right now, the
color I'm using is a mix of paints gray and brown. I have only added a bit of paints gray. It is not too dark. But depending on the color
you have in the background, if you want to go
for a much more taco to, feel free to do that. Okay. I will add some more
along the bottom line, and then we can go
with the mountain. That's how it has turned out. I'm very happy with the lines and the color and the texture. Let's take a short
break and come back when this has
dried completely. The background has dried up. Next, we can go
with the mountain. First, we're going to
start with the area, which is closer to the sun. Over there, we have to
introduce a lighter tone. I'm going to go with
the lighter tone of dmu yellow orange. Use the same yellow or orange
you have used for the sky. Add a few drops of water and turn that into
a lighter tone. Now I'm applying that over here. I have to make it even more lighter, so I'm
adding more water. This looks fine. Go with
a really light tone. Now with the same brush,
I'm going to pick brown. We can apply brown to
the remaining area. Go with the medium
tone. Only when you're getting
closer to the sun, you have to make
your color lighter. The rest can be medium anacots. Okay. See that. I'm applying a medium tone of
brown on either side. Next, I'm picking some
yellowish orange. I'm trying to blend brown with that yellowish color there.
Let's clean the brush. We can smudge it
with a clean brush. Try to retain some
of that lighter tone where we have the sun. Then gradually when you're
going away from the sun, make the color more taker. I'm picking a bit more
yellowish orange and I'm trying to blend
it. See that. That's the area where
we have the sun, go with a clean brush
and gently smudge it to give it a softer look. That's
how it has turned out. Now onto the rest of the area, we can add more brown
and more taker to. Have completed that shape. We only have some area
left at the bottom. Over there, we have to
introduce a detail, we'll leave it
acidus before that, I'm going to drop in
some paints gray onto either side. To
make it even more. Only onto either side.
The rest remains actus. We have a lighter
tone at the center, where we have the sun, then
some medium tones around it. Then towards the end,
we have some taco tone. Now we have to add paint
along the horizon line. I'm picking the same
tacton of brown. First, let's fill in brown
on that remaining area. Then we can introduce
our detail. It's a dacton of brown and I'm filling in
that remaining area. Once you have added paint
along the horizon line, the same brush, we're going
to add a tiny detail. All you have to do is
just keep on adding some teeny tiny lines
using that same paint. This will look like those
grassy patterns far away. If you add the paint
as a straight line, it will look a little weird. This way, it will
look more natural. We're trying to show that
grassy lines far away. Add paint in a similar way. It is just some simple lines we're adding close
to each other. It doesn't need to
be perfectly shaped or anything. This is far away. With your smaller brush
or a medium brush, just keep on adding some
lines close to each other, and that's all. See that? You can clearly see
the difference. Whenever you're
painting a meadow, never paint your horizon
as a straight line. Always use this detail. It will instantly add a lot of difference to your painting. Now there are some
small gaps in between. I'm just adding paint
and I'm filling them up. And I'm also smudging the paint. There's a lot of paint
I'm cleaning it, and I'm dabbing it
on a paper towel. Now, with a clean dry brush, I will gently smudge this part. Okay, so that's how
it has turned out. Actually, at this point, we are done with our painting. But then if you want to enhance some of the details a bit more, you can go for a smaller brush
and pick some more brown. Then you can add some more
lines along the horizon. To give it a bit more fine look, but this tip is
completely optional. If you feel like it is
looking beautiful already, you don't need to do this again. The brush I'm using here
is size number two, and it has got a much
better pointed tip than the other
brush I was using. I just thought of adding
some more lines here. To give it a better look.
You can see the lines. They are much more
thin and delicate. Okay. So go the darker
tone of brown and add in some more lines using a smaller brush or a
brush with a pointer tip. But just like I said, alli this one is completely optional. You don't need to add them again if it's looking good enough. I'm nearly done with that, but there is one
more thing that I want to do with the same color
and with the same brush. Which is adding a
little more grassy pattern onto the meto. But again, this step is
also completely optional. Only if you feel it is necessary to add some more grassy pattern, you can go ahead with this step. Otherwise, you can just
leave it the way it is. The color I'm using right
now is a Daco brown. I've added some paints
gray with brown, I'm using a size
number two on brush. I'm simply adding
some free hand lines. Mostly at the bottom. See that. I'm adding them from the
bottom to at the top. I'm just adding some
free hand curvy lines. I feel it looks more
fuller and thicker now. Anyways, I have some more
area left on the left side. I will add some more
lines on the side. With that, we'll be done with the first painting
from the series. Honestly, I'm very excited
for the upcoming days. There's a wide collection
of subjects we are going to explore and some beautiful
color compinations as well. Okay, so I'm adding the
last few lines over here. With that, we are done
with our summer evening. If you want to add some birds on the sky, you could do that. You can add a small group of birds to enhance your painting. All right. That's
all for the day. Now it's time to peel
off the masking tape. And here's our gorgeous
summer evening. I hope you all enjoyed it. I believe it was
a quick painting, and you all are happy with the
painting you have created. Give it a try if I get to
try it and let me know if you liked it. Okay.
6. DAY 2 - Misty Lake: Hello, friends.
Welcome to Day two. Today, we're going to try a very easy a beautiful moody morning. The best part about
this painting is that you will only
need two colors. And also, you can finish this
in less than 15 minutes. Okay, so let's have a look
at the colors you will made. The only two colors
you will need for this painting is indico
and paints gray. For the background, I'm
going to use indico. Then for the fogron elements, I will use paints gray. Actually, if needed, you can
skip paints gray and use a dakotn off indico for the
focron elements as well. Anyways, I'm going to
swatch out indico first. The one I'm using here
is from art philosophy. It's a beautiful dico. If you're using Indico
from a different brand, there are chances it
might look a little different, which
is totally fine. Some indico look more
grayish than bluish. Don't worry about
those differences. It will still give you
a beautiful painting. Okay, so that is indico. Now the second color you
will need is paints gray. But just like I
mentioned earlier, if you want to go
for a darker tone of indico instead of paints
gray, that's totally fine. That way, you can just use one single color for
this entire painting. The paints gray I'm using here is from a prand
called Temprand. If you don't have paints gray, you can also use black. Okay. Those are the two colors you will need for
today's painting, indico and paints gray. Here's a closer look of the
painting and the colors. Quickly go keep those two colors ready on your palette,
and let's give it a try. All right, so I have my
paper, and the colors ready. Now, I'm going to start
by applying a cot of water onto the
entire background. Using my 1 " flat brush. The major color you will need for this painting is indico. I'm hoping you all have
it ready on your palette. If you don't have
indico on your palette, that is the first
thing you have to do before you start applying
water onto the background. My background is we Now, to paint the base layer, I'm
going to use my flat rush. This one is a half
inch flat rush. Even a round brush will work, it doesn't need to
be a flat rush, go with any medium
size flat rush. Now using this brush, I'm going to pick some indico. I want a medium tone of into. Looks like this is quite dark. I need to add more water. That looks fine. Now
I'm going to apply that onto the top of the
paper over here. That's the tonal value
I'm starting with. It can be a bit more darker or lighter. That doesn't matter. I've cleaned my brush. Now, I'm going to make the color lighter towards the center. First, I will tap it
on a paper towel. Looks like there's a lot of
water and now I'm running my brush back and forth and I'm making the color
lighter toward the center. Maybe we can drop in a bit
more brighter tone on the top. We still have a lighter
tone towards the center. Okay. We need a medium tone on the top and towards the center, we have
to make it lighter. Now, from this point
from the center, we are going to add more
paint, a medium tone, and then we will make it a bit more darker
towards the bottom, the same brush, I'm
picking more indico, more like a medium tone. Then towards the bottom, I will introduce
some more paint. On the top and the bottom,
we need a medium tone, and at the center, we want
to make the color lighter. I'm picking more paint
Bea at the bottom, I want the color to be slightly darker compared to the sky. That's a first part
of the base layer. We have painted the
sky and the lake. Now, before this
base layer dries, we need to add some
more elements. I'm keeping my flat brush aside, and I'm picking my medium
sized drawn brush. The brush I'm going to
use is size number six. You can go at six
or five or four. I dropped in some water. Never mind. It is still wet,
so I can just smudge it. Now, with this brush, I'm going to pick a slightly
darker tone of indico. Now, you see the Daco to, we're going to add
in a random shape along the horizon line somewhere over here to show all the plants and trees
in the background. If pain is too watery, dab on a paper towel. Otherwise, it will spread a lot and it will become really difficult to control the
way it is spreading. Dabit on a paper towel. Every time you feel like
the pain is watery. Now, I'm going to
add in that shape. You don't need to put a lot of effort and make it
look like a tree. It can be a very simple
irregular shape like this. Now let's clean the brush
and dab it on a paper towel. Now with that clean dry brush, I'm going to smudge this area. On the top, we have an irregular shape and towards the bottom, we are just smudging it and we're blending that
into the background. This will create a foggy effect. To create that foggy effect, we need to tate some of the
light of space at the center. Now with the same brush, I'm
picking some more indico, a slightly darker tone. I'm going to make that
shape a bit more bicker. I feel like the color
is really light. I'm going to
introduce that again. But towards the bottom,
along the horizon, we still have to retain
that lighter to. That's a shape.
I've made the color more darker and also the
shape is more bicker. Now I'm cleaning my brush, and then again with a clean
dry brush, I'm smudging it. Be very gentle when you're
smudging the paint. Don't put a lot of pressure. Okay, so that's a foggy
moody background. Now, there is one
more thing we have to do before the
background dries up. We're just adding some
lines on the lake. Using the same brush, I'm
picking some more inco then I'm going to randomly add some lines onto the
lake. Not a lot. I will add them mostly at
the bottom toward the top. I want to retain all
the lighter toes to create that foggy effect. Just add in a few lines
onto that wet background. Like I mentioned earlier, if you feel your pain is really watery, dab on a paper towel, you should not go in with
a very watery paint. If the pain is too watery, the lines will spread and
they will lose its shape. I've added some
lines at the bottom. Then towards the top, I have
just added one or two lines. That's it. Now finally, I'm going to clean my brush, Dabit a paper towel. Now with that clean dry brush, lift off some paint
to show that horizon. Gently swipe your clean brush and the lift off some paint. You can repeat the same step until you're happy
with the result. That's my background. I'm very happy with the way
it has turned out. Now we'll have to
wait for this to try. I'm a little impatient, so I'm using a blue dryer
to speed up the process. You can use a blue dryer or
you can just leave it for a few minutes and let
it dry naturally. Mine has dried up, and this
is how it has turned out. I'm really loving that moody
effect we have created. The color is really beautiful. Intego is one of the best color to create a moody background. Anyway, let's go
with the next step, and for that, I'm going to
go with a smaller brush. This one is size number two. The color I'm using
here is paints gray. With any of your
smaller brush or a brush with a pointed tip,
pick some paints gray. Okay. Now with this preshe we're going to add some grassy
lines at the bottom. That's our next step. We
have a moody background. Now we're going to add
the foreground element. For this step, it's
good to go with a smaller presh or any
brish with a pointed tip. I'm starting with the
first grassy line. I'm planning to add it
towards the right side. But you can compose your
painting however you want to. You can add it on the
left or the right, or maybe at the center. Okay. Now with this brush, I'm adding the first line. It is a long pointy line with
a slight curve in between, so that it look more
natural. See that. The first line. Now I'm
adding the second one. Maybe we could add one
more in between. See that? That's the lines I'm adding. They can be long point, and add them however
you want to. The color I'm using here is
paints gray is super dark. That's why it is
looking like black. See that. I've gone in with
a different shape now. This weight will
look more natural. Some of these lines can be long, some of them can be, add them in different ways so
that it look more natural. This is the only foreground element we have
in this painting. If you want to add more lines, you could do that, or you can just go for one
group like this. I'm going to add in
a few more lines, maybe another group to a right, and a smaller one to at a left. First, I will extend this line. I feel it is looking
a bit weird. From here, I'm
bringing that down. I feel it looks better now. Next, I'm going to add a few more lines towards the right. There is some more
space left in there. It's going to be
the same method. Go with any of your smaller
brush or a brush with a pointed tip and add
in some long V lines. We just need some
free hand lines. You can add them
however you want to. They can be leaning on to
the right or the left, they can be point or C. I'm going to add a few
more lines in a similar way. I will fill in that cap. If you're not feeling confident, you can add a pencil line first, and then you can follow
that line using your brush. I have added a long line there. I still have some space there
maybe for one or two lines. Let's add another one,
and get a longer one. The last one can
be a shorter one. That's how it has turned out. Now finally, there is
one small detail I want to add onto
some of these lines. It's more like a small grain
on the tip of those lines. You can add some lines onto
either side, only on the tip. That's the first one.
Along with that, I'm just adding a small leaf. Now onto this one. Simply add
some small tiny lines onto either side and make it look like a grain or
maybe like a flower. Then along with that, you can
add some leaves like this. Small ones. Next, I'm going to add that grain
or flower onto this one. Maybe I will add a
straight line first, and then onto the tip, I will add those grains. It's just a matter
of adding some teeny tiny lines onto either side. It's a very small detail. Here's a closer look. You can see the way
it has turned out. So onto either side, keep on adding some tiny lines. They can be short on the top and a bit more wider
as you come down. Then add in some leaves as well. That's a detail. If you want to add in some more,
you could do that. I'm going to add one more smaller group towards
the left side. I'm also adding
some more leaves, one can be over here. The leaves are just
some simple thick lines with a pointed
tip, nothing much. I'll just finish
off this leaf and then I will add a smaller
group towards the left. I'm adding that over here. If you're happy
with the painting, you can color it down. You don't need to add
any more extra lines. Okay, with that, we are
done with our painting. It's really easy
at a pretty one. We took hardly 12 minutes to
finish the entire painting. I hope you all loved it. Now I'm going to peel
off the masking tape. Peel it off carefully at an ankle so that you
won't rip off your paper. Here's our painting,
Moody Morning. It's a really
beautiful painting. You can do this in
less than 15 minutes. Give it a try for you to try it, either with the same colors or a different color
compbination of your choice.
7. DAY 3 - Green Meadow: Hello, dear friends.
Welcome to day three. Today, we're going to
paint a lush green meadow. This one is actually one of my favorite from
the ENT collection. I really love the colors and the end feel of this painting. So as usual, let's
start by looking at the colors we will need
for today's painting. The very first color you
will need is paints gray. For the sky, I will use a
medium tone of paints gray. And then wherever I need to use dacoons I'll be
using paints gray. Okay, that's our first color. I really love working
with graykyanGrains. It's a beautiful
color coination. Now, just in case if you are
not a fan of paints gray, you can use a medium tone of indico. So that's
our fist color. Now, the next color
I'm going to show you is cadmium green. We will only need a little of this color to add
some highlights. You can see these grassy pattern along the horizon,
these ones here. We'll also use this color to add some texture
on the pine trees. Now the next one is sap green. If you don't have
cadmium green or any light green, there
is nothing to worry. Take out some lemon yellow, and then mix some sap
green with it and that will easily give you
a beautiful light green. Now, coming to the next
color which is indico. You won't be able to find indico as it is from the painting. I'll be mixing
that with a bit of cream to create a different tonal value
in the background. I will explain more as you
paint. That's our last color. We will need four colors
for this painting, paint screen, Allied green, sap cream and also into. Here's a closer look of the
colors and the painting. I think it's an absolutely
beautiful painting, and I'm so excited to
show you the process. So let's give it try. Okay, so I have the paper here. We're going to start by adding
a line with this horizon. So define a horizon line first. I'm adding that a bth below
the send of the paper. Now, as you're painting,
we'll be adding some faraway pine trees in the background
somewhere over there. We just need to add the
horizon line first. Now we're going to
start with the sky and the color we're
going to use pain grey. Instead of paints gray, you can also use indico if
you prefer that. I'm starting by picking some
pain scree and I'm adding a few drops of water to turn
that into a medium tone. But I just realized I haven't applied a cot of
water onto the sky. Let's start with
that. Apply a code of water onto the sky. Leave a tiny cap above the horizon so that we don't need to wait
for the sky to dry. We can directly
start with the met. The sky is wet. Now
I'm going to go back with my paint screen,
picking more paint. That's a tonal value
I'm coing with. The brush I'm using here,
a size number eight. Now, I'm just randomly applying
that paint onto the sky, leaving some caps
in between. Okay. See that? Go with
a medium to and randomly apply some paint scree onto the wet
background. See that? When it dries up,
it will look like a really soft and
beautiful cloudy sky. Just drop in some
random paint onto the background while leaving
some gaps in between. If you want to, you can
use a little more darker to to make your sky
look more dramatic. I feel the color is
not really visible. Maybe we can pick some
more paint screen and add in some more clouds. This is looking better. You can see the way how I'm adding it. I'm simply adding
some random shapes onto the wet background, and I'm trying to
create a cloudy sky. We'll add some on
the top as well. That's how the sky
has turned out. Now, while the sky dries, we can start with the meadow. I have some sap cream
here along with that. You will also need
some paints gray. I'm starting by picking a
good amount of sap cream. I'm using a medium to, and I'm going to apply that on the top part of the meadow. Then gradually
towards the bottom. I'll have to make the
color more darker, so I will introduce paints gray. Okay. I'm going to
start with Sap cream. Use a similar tonal value.
Don't make it too light. Let's add in some
more sap cream. Then towards the bottom, we will apply paints gray
to make it darker. That is sap cream. I think
I have added enough. Now with the same brish
I'm picking some paints gray. I will need more. Go with the taco to and
apply that at the bottom. We have a nice green
on the top and a dakot towards the
bottom. See that? It doesn't need to be a
clean, perfect blend. Simply apply that paint at the bottom. That's a base layer. We can add in a few lines using
that taker to. All right. Now, I'm going to keep
this pressure side, and I'm switching
to a smaller one. Then we need to add
some grassy pattern. Just the same way how we
did for the first painting. This is the brush
I'm going to use. It is size number two. Now go
with a taco tone of cream. I'm mixing some paints
create and sap cream together to create a taco to. Okay. Now with that paint, I'm just going to add
some grassy line. On the wet background itself, you don't need to
wait for that to dry, keep pushing and pulling that
paint into the background. This will create a very
soft, beautiful result. If you wait for
the paint to dry, it won't have that
natural field to it. The textures will look a little more artificial
than natural. Okay. So first go with these patterns while the
background is still wet. Then later, if you feel they
are not very prominent, you can go for one more round. You can use a daker
ton of cream and add some more grassy pattern at the end when everything
has dried up. Now, I'm going to
add a few patterns in the background as well. I mean along the horizon line. You can keep on adding
those grassy pattern until you feel like you have
got a lush greenery there. I'm going to add a few more. I've taken some more tacot I will add another round
of grassy pattern. See that. I'm using a taco tone and I'm adding
them at the bottom. We have a nice medium tone on the top and a dakot
towards the bottom. This will give a
sense of distance. If you don't play with those
colors and tonal values, you won't be able
to get that feel of depth in your painting. For now, this is all we need. I think it has come
out really high. Now we'll have to wait for
this to dry completely, and then we can
go the next step. That is right completely. Next, we are going to
add some landscape in the background,
using paints gray. We will go for a medium tone. Then we will add some
far away pine trees. I'm using a size
number six brush. Go with any of your
medium size brush. Now I'm picking some
more paints gray. I already have a little there, but the color has to be a bit more darker than
the background. Otherwise, it won't be visible, but it should not be too dark. Now, I'm starting with
a very basic shape. These trees we're adding right
now is in the background. I'm going to add that over here. A this is in the background, you don't need to worry
a lot about the shape. Simply add a rough
shape like this. At some places, it
can be a bit taller, and at some places,
it can be lower. This way, it will
look more natural. For now, simply add
a shape like this, using a medium
tone of pins gray. Then pick up some water and make it lighter
towards the bottom. Okay. Once we're done with this, we will add another layer of pine trees in the foreground, using darker tones of green. This one doesn't need to
be very well detailed. You can simply add
a shape on the top, then using some water, make it lighter towards the bottom. So I'm just adding
some lines more like a spikes on the top to make it look like there are
some trees over there. That's how
it has turned out. Now, only at some places, I'm going to add a
shape of a pine tree. It is not well detailed.
I'm adding a line. Then I'm just adding some
zzag lines on either side, and that's it. See that? We don't need to add
them everywhere. Just pick a few places in
between and add similar shapes. This is just to
enhance it a bit more. Only at some places,
introduce a pine tree shape. Which doesn't need
to be well detailed. You can clearly see my trees. They are just a messy pine tree, and I'm only adding them on
the tip. That's all we need. We can add a few more
towards the left side. Here's a much more closer view and you can see the way how
I have added those trees. I think they have added enough, so I'm going to stop it here and I'm going to
leave it for trying. Now the next task is to add
the trees in the foreground, and for that, I'm going to go with my size number six brush. To paint the trees, we will use different tonal values of green. At some places, I
will use a taco to. At some places, I will
use a medium tone. I'm starting by picking
some paints gray, and I'm mixing that
with green to create a dao I'm going to add
the first tree over here. Add a line now
only onto the tip, keep adding some za lines. For this tap asp, we are only focusing on the
tip of the tree. We're not going to
show the entire tree. That's my first tree. We're only focusing on the tip of the tree. Now I'm picking more paint, and I'm simply adding
that over here. See that? We only need to focus on the top
part of the tree. The rest is going to be just
a fronteral values of green. We're going to
simply fill it up. Now I'm going to add the
next tree over here, which can be a bit more shorter. First add a line then onto that. Keep adding some zigzag
lines onto either side. In a similar way, I'm adding
another one. See that. Start by adding a straight line. Then onto that line, keep on adding some six act
lines onto either side. Now I'm going to pick more
paint a darker to of cream, and I'm adding that over here. Okay. Only on the tip, we have some pine trees towards the bottom, we
are just filling it up. Next, I'm picking some sap
cream, and I'm adding that. The basic idea here is to keep on switching from one
color to another. You can use a metam
tone of green and also a taco tone and keep on adding some
pine trees on the top. Just a random shape, then towards the bottom, you can simply fill in the color. Now, I'm going to add
another tiny pin try here. It's a very simple pin tree. Start by adding a line. Then onto that, add some
zzag lines, and that's it. It doesn't need to be
very well detailed. To create the darker green, you can either make
some sap green with indico or sap green
with painsra. Right now, I have used
sap creen with indico. Both gives you
different in green, and that is the exact
same reason why I'm using sap green and paints
gray at some places. Then Sap green and indico
at different places. This way I can achieve different tonal values
in the background. Next time picking some water. I'm making the color lighter
and with that lighter tun, I'm adding another
tree here. See that? It's a mix of sap green and intc the color I use right now is
slightly lighter. See that? This way we can try to introduce different tonal values
in the background, which will
automatically bring in a lot of realistic
character to your painting. I'm using the same
color. It's a medium to. I'm adding another tree there. See that. You can really
make out those differences. Now towards the bottom, I'm introducing
some paints gray. See that? We have a
medium tone on the top, and darker tone
towards the bottom. Now I'm picking some cream and I'm adding that
onto the background. Just keep on playing
with different greens and darker tones. I'm adding that onto
the enter left side. Now going with a mix of
indico and sap cream. And I'm adding that onto the
background pool to that. Just keep on
dropping that paint. Trust me, it is not
a complex task. Give it a try, then you will gradually get to
know how easy it is. Just go with your intuitions
and wherever you feel like using sub cream
add in that color, towards the bottom,
be sure to add a dakot Because we have to introduce some more
grassy texture at the bottom. Only if we have a darker
tone in the background, those lines will be visible. Now I'm going to fill in this
entire area in a taco tone. That's a bottom
part. Now, we need to add more pine trees
onto the left side. That's our next task. Be sure to play with
different tonal values. That is what makes your
painting look more beautiful. Don't use the same
tonal value throughout. Over here, I have used a darker
tone for this pine tree. Now I'm going to dive
br in some water. I'm making the color
slightly lighter. See that? Now with that lighter tone, I'm adding the next tree. Maybe with the same tonal value, we can add one more here. Look at that. So
beautiful right. Play with different tonal
values in a similar way. Trust me, it is going to take your painting to a
whole another level, and also add them in
different height. You can say have
some taller trees on the right end, then
to the center. They are shorter. Now,
maybe towards the left, I will make it a little more
taller like the right side. First, I'm going to
apply some paint there, just randomly
applying the paint. It's a Daco tone of cream. I guess it's a mix of
indico and sap cream. I just use some
paint on my palette. Okay. Now onto the top, I'm going to add some daker too, and then we also need to add some pine trees in
between and with that, we'll be done with
the left side. I'm picking some indico
and using indico, I'm just dropping in
some daker toons onto the top part. See that? Just drop in some darker
toes here and there. It doesn't need to be perfect. We are only trying
to create a texture. There is no particular way or method, you need to add them. Just add some teeny tiny
dots and some shapes. Now with the same color, I'm going to add a few
pine trees on to the top. See that? Go at different heights, just like we did earlier. Some of them can be taller and some of them can be shorter. Maybe we can add a few
on to the left end over here. Add a line. Then add some messes exact
lines onto either side, and that's your pine tree. All right, so that's
a background. Now, I'm going to keep
this pressure side, and I'm picking
my smaller brush. This one is size number two. Then I'm picking a
dark tone of green. The same color I used at the bottom, almost
the same color. Now, with that, I'm going
to add those grassy lines. It's the same
technique we used for the first painting,
if you remember. Add some lines at the bottom. The simple technique will give an impression of the
grass in the background. If you have a straight
horizon line. It will look a little weird. This way, it will look
a lot more natural. Don't skip this step. Go with the color,
which is almost same as the one you have
used in the background. Then add these patterns, using a smaller brush. I'm almost half done, and I think you can clearly
see the difference here. On the other half, it is a simple line and you can see which one is
looking more beautiful, which clearly says we have to do the same thing on the
other side as well. Let's quickly do that. Oh. All right, I'm nearly done, and that's how it
has turned out. Beautiful. Now the next task is to add some more grassy
line at the bottom. This one is completely optional. Only if you want to
add some more lines here at the bottom,
you could do that. To give it a more finished look. Earlier, we added those grassy
lines on a wet background. Now when you add those patterns
on a drier background, it will look more definite. It will have a better sheep. That's the only reason
why we're doing this. I'm using the same
color I used earlier. It's a mix of sap
creen and into, and I'm only adding
them at the bottom. The topmost area
can stay acetus, add them only at the bottom, where you have the taco tons. But again, this
step is optional. If you feel like there
is enough texture and grassy pattern there, you don't need to
add them again. So far, I'm really
loving this painting. I love those pine trees and the texture we
have got there. Anyways, this task is done. Now with the same tonal value, I'm just adding some
paint in the background. I feel like it looks like
a line in the background. I'm just scrubbing and adding
some paint over there. All right, so that we're
done with our painting. But there is one more thing
that I would like to do, which is completely optional. Oh is adding some final
touches using a light green. Here's the color
I'm going to use. It's cadmium green light. You can go with any light
green or you can just add a bit of sap green with lemon yellow and create
a lighter green. Now, I'm going to pick
a little of that paint. Okay. And I'm dabbing my
brush on a paper towel. Now with the slightly dry brush, I'm going to add some
patterns onto the background. The paint you're using doesn't
need to be too opaque. You can add a few
drops of water. Go with a medium tone so that
it is not too prominent. My intention is to add some more textures
in the background, but this step is completely
optional, as I said earlier. The color I'm using here is cadmium green light and I
have used a medium tone. Then I'm just adding
some patterns onto the background in
a very random way. Here is a closer look off all
those patterns are adding. See that? They're
not too prominent, but you can still see them. Go in a similar way. If you're adding them,
don't use a lot of paint. Go with bare minimum
paint on your brush. When you add them on the areas where you have a darker
to in the background, it looks really
beautiful. See that? So just add them in a random
way wherever you feel like, and be sure not to go
then opaque paint, add a few drops of water, and coat the color that
is kind of a medium tone. This way, it won't
be too prominent, it will just merge
with the background. That's a right side. In a similar way, I'm going to add a few patterns
on the left as well. I'm really impressed
with this texture. Honestly, with tclar we
doesn't go for these layering. It is mostly a gashe
and cylic technique. I'm someone who follows
the traditional tcl rules. For me, it is all about enjoying the process and creating
something that I allow. If you want to add some extra texture onto your background, you can follow this step. Otherwise, you can
just ignore it. I feel those textures
really made a difference, but maybe it's just me. Anyway, I will add a
bit more on the top. Then with that, we'll
be done with this step. The color I'm using here
is cadmium green light. It's a medium tone, and every time when I'm
taking the paint, I'm dabbing my brush
on a paper towel. Just to be sure the
paint is not too watery. I want a paint which is
slightly dry, not entirely. Also the color doesn't
need to be too prominent. Those are the things
you have to keep in mind when you're
adding these patterns. Now, just in case, if you feel like they are way too much. In that case, dip your
brush in some water, and then with a
slightly wet brush, gently dab on those patterns. Now this will give it
a more softer look. Now, I'm going to pick
a little more paint, and I'm going to add some
grassy lines in the background. Again, this one is also
optional. That looks too bright. Go to the medium ton of
any light green you have caught and add a quick round of grassy pattern only
in the background. See that? This is where we have lighter green
in the background. Am grassy pattern there. This will give it a
more finished look. But again, it's
completely optional. If you're already happy with the background and the result, you can totally
ignore this step. When you add these
patterns using a light two green onto that daco background, it makes your painting a little more interesting. See that? From the bottom,
add them towards the top into that do background. It's a beautiful trick,
but again, not necessary. Now there's a little
more area left. I will add some grassy
lines over there as well. The color I'm using
here is a medium tone. That is why when
it is drying up, it looks a little lighter. I'm not using a
thick opaque tone. That's how it has turned out. I might be completely biased, but I have to tell you I'm
in love with this painting. Maybe it is one of the best
from the anti collection, and it is tiny, and
it is beautiful. Anyway, now it's time to
peel off the masking tape. I'm gently peeling it off at an ankle so that I
have a clean border, and I won't rip off my paper. Okay. So that's the last side. Looks like I have
got a clean border. So here's a closer look for all the textures
and the details. I think it is beautiful, and I'm hoping you guys are
loving your painting as well. If you're yet to try
it, give it a try, and let me know if you liked it.
8. DAY 4 - Seaside: Hello, dear friends. Welcome to day four of painting mini
watercolor landscapes. Our painting for the day is a very minimalist yet a
beautiful beach landscape. The entire process
is very simple, and there isn't any
complicated elements. Let's start by looking at
the colors we will need. The first color you will
need is cillin blue. That's a color I'll
be using for the sky. You can go with any other
color of your choice. It doesn't need to
be cerlian blue. You can use Kobal
blue or Prussian blue or any blue you have caught. It's a very simple sky. We'll start with
the medium tone, then towards the bottom,
we will make it lighter. Just go with any blue you
have caught for the sky. Now the next color you
will need is Coval cream. That's a color we
will use for the C. We will apply this color onto
the end a background first. Then to add some textures, we will use cerliu blue. Those are the first two
colors you will need, Ciliin blue or any other
blue, then Coval cream. Now coming to the third
color, that is burna. We will use a really light of burn cena for the sandy area. You can see the color
there. It's really light. For that, you will need
some burn cena or brown. So that's our third color. This is the balcren.
It is from Shinhin. The next color you will
need is sap cream. The only foreground
element we have in this painting is those grasses. That's the only
element we have here. And to add those
grassy patterns, we will need sap cream. I won't be using sap creen acts, I'll mix some burned
cena with sap cream, and I'll create a color which is very similar to live cream. Now, the final color you
will need as pin gray. We don't need a lot of
paints gray only at some places to create
a burn temper. Also to turn the
green into a dakot, we will add a bit of pins gray. That's a final color
you will need. There you have all the colors. Please don't worry if you don't have the exact same colors. Just go with any color
that is nearly similar. Go with any blue for the sky. It doesn't need to be cyan blue. Keep all the colors ready,
and let's give it a try. Okay, so here we are, I have my paper ready. I have fixed it onto my table. Next, I'm going to
add a quick sketch. We need to add the horizon line. That's my horizon line. The entire top part is
going to be the sky. Next, we need to add
an irregular line to separate the
sand and the sea. It's a simple irregular line. You can add that
however you want to. The in between space, the sea and the bottom part is going to be the sandy area. For now, you only need to
add these simple lines. The rest, all the
textures and everything. We can add them
later as you paint. The sketch is ready. Now we're going to start by
painting the sky. The very first color you
will need is cerliin blue, which is the color
I'm going to use. You can go with any
blue of your choice. Now I'm starting
by applying a coat of water on to the entire sky. Just a nice gentle coat of
water, don't add a lot. And make sure it
is an even coat. Run your brush back and
forth, multiple times. Just to be sure there is no
pools of water in between. My sky is evenly wet. Now to apply the paint, I'm going to go with my
size number six brush. Always make sure your brush
is clean before you start. Now I'm starting off with
a medium tone of cerliin blue I'm going to apply
that to the top of the sky. That's a medium tone
of Cillian blue. Now, I'm just going
to add some lines onto that wet background. If you want to go for a simple gradient wash,
that's totally fine, or you can simply add some
lines as you come towards the bottom onto
that wet background so that you have some
caps in between, which will make your sky look
more natural and beautiful. See that? Simply add some lines
onto that wet background, using your brush in between
leave some paper white. This will give you a very
natural looking sky. If you want to add some more
lines, you could do that. Just pick some more paint and add a few more
lines in between. Then dab brush on a paper towel. Make sure there isn't
much paint on your brush. Now with that dry brush, just uh those paint to
give it a softer look. It's a very simple sky. Make your background wet, then go for a medium
tone of any blue. Then start by applying a
medium tone on the top. Then as you come
towards the bottom, introduce some lines onto the wet background while leaving some space in between. That's
how it has turned out. Now, let's wait for this to try. The sky has dried completely. Next, we're going
to start with the s. As I mentioned earlier, first, we're going to apply
Coval creen that tier strip. Then we will introduce some
texture using cerlian blue. Lodo brush with a bright
tone of Coval creen, simply apply that color onto the space we
have in between. We can see the tonal
value I'm using. It is pretty bright. Go with a similar tonal value.
Don't make it too light. We're not going to add
any other elements onto the horizon line. Make sure you have a
straight line there. Apply the pain carefully and
make it a straight line. Now, fill in the bottom end, run your brush along that outline and
carefully fill it up. Right now, I have just applied
a solid wash of bal cream. Now onto this, we have to
introduce some textures, and for that, I'm going
back with Cerlian blue. Which way the blue
you have used for the sky, you can
use the same one. Pick up some paint. Now onto that bed background,
add in some lines. They don't need to
be too prominent, go the similar tonal value, and add a few lines
here and there. The major color has to be
Coval cream. Don't add a lot. Be careful about that. We only need few lines in
between. That's all. Now, at any point, if you feel those lines are
looking very rough, pick some coal cream
again, and then smudge it. This will give it a softer look. That's how it has turned
out. In case if you feel like adding a few more
lines, you could do that. Maybe I will add a
few more extra lines. Okay. Maybe only
along the horizon. That's how it has turned out. I'm really happy with the
color and the texture. Now we'll have to
wait for this to try. Now it's time to
paint the sandy area. First, I will apply
a coat of water. I'll make sure my
brush is clean. It wasn't. There was
some green on it. Now it's clean.
Start by applying a gentle coat of water
onto that sandy area. We have paint on the top, so be careful to leave
a gap in between. Along that top line, leave a tiny, tiny cap. We can fill up that cap as
we're applying the paint. That area is evenly wet. Now the color I'm going
to go with is burna. I will go with a lighter tone. Also, I will change my
brush to a smaller one. I think this one is much better. This one is size number six. Again, make sure your brush
is clean before you start. Now, go with a light tone
of burn sena or brown. I'm picking a little adding
some drops of water. We need a really light tone
to make it look like sand. Be really careful from the top. I'm just adding some lines
towards the bottom. See that? The background is
wet, so the lines will nicely spread
into the background, leaving a very soft texture. From the top, simply introduce the paint
towards the bottom. It doesn't have any
particular shape or anything. Just add that onto the wet
background. That is a footep. We have applied a
really light tone of pursina onto the background. Now, we have to go with a
little more darker tone. When I say dark, it is
just one to not too dark. Now let's apply that paint
on the top in a similar way. If your paint is too watery, dab it on a paper towel
before you start. Now add in a few lines from
the top towards the bottom. Okay. See that? When you're adding these lines, try to leave some
gaps in between. So in between, we have
some lighter tone and also some medium tone. Now, I'm going to go
for one more round. And for that, I'm adding a little la pins gray
into the same mix, a tiny bit of pinray. Now with that color, I'm adding some more
lines on the top. So I'm just making the
color a little more darker. This way, we have
different tonal values in the background, and it will make it
look more natural. Don't cover up that entire area. We need some lighter tone, then some medium tone and
also slightly taker tone. Okay, so the sandy
area is ready. Now onto this, we need to
introduce those grassy pattern. For that, I'm picking
more burn sa I'm adding some sap green along with that color to
create olive green. If you have live green with
you, you can use it directly. You don't need to
mix and create. Here's the color I've created by mixing sap green and burn. Now, first, I'm going to locate the areas where I want to
add those grassy pattern. The first one is going
to be on the left side. Okay. Okay, so for now, I'm simply adding a shape there. Then I'll give it
a more finer look. Make sure your pain
is not too watery. If it's watery, dap it on a
paper towel before you start. That's a first section. Now I'm adding another one
towards the right side. Right now, it doesn't
have any define cheap, which is totally fine.
Don't worry about it. For now, we are only
indicating the locations. I'm picking some more sac
I'm adding that on the top. This is just to introduce
another tonal value. Now let's add another one
at the center over here. At this point, you might not be really pleased
with your painting, which is totally
part of the process. Now, don't think
about anything else, simply add in that basic shape, and just locate the areas wherever you want to add
those grassy pattern. You can also spread
those patterns a little towards the bottom to
give it a natural look. Using the tip of your brush, add in some teeny tiny
pattern towards the bottom. At this point, your
background might either have completely dried or it
might be a little wet. For me, the left side
is still a little wet. The right side has
almost dried up. If your background
is still really wet, you have to be a bit careful. Otherwise, you can just proceed with this step. You
don't need to wait. Right now, we just have
a random shape there. Next, I'm going to pick up
more paint, more olive green. I will introduce a better
looking grassy pattern there. Also, I have changed my
brush into a smaller one. This one is size number two. This brush has a much
better pointed tip so that I can add these
lines very nicely. That's a first cluster.
In a similar way, we have to add grassy patterns
onto all these clusters. We have one at the center. Then we have a longer one on the left side. It's
a simple step. There is nothing much
complicated here. Go with any of
your smaller brush and add some grassy pattern. Along with that,
you can also add a few onto the sandy area, which has to be much
more smaller. See that? Towards the bottom,
where you have sand, introduce some smaller patterns, and towards the top, where you have the sea
in the background, you can add longer
and dramatic lines. If you have a smaller brish or a brish with the pointer tip, it is better to go with that so that you can add these
crisp and thin lines. Here, I just keep on adding these free hand curvy
lines onto the top. You can add them
on top of the sea. Some of them can be longer. It can go over the horizon. Some of the lines can be longer, and some of them can be shorter. Those things are
totally up to you. This will give it a
more natural field. Okay. I will add a few more, then I will finish this cluster. Then we have to
come back and add a few more lines
using a taco to. Now, when you're adding
these grassy lines, don't forget to add them
at the bottom as well. First, we can finish
the top part. On the top, we are
adding longer lines. Now with the same
brush, I'm going to add shorter ones
at the bottom. See that? This one is also important to
give it a finished look. Add few along the bottom part. Using a smaller brush
which is really important. Otherwise, the lines will be
really thick and prominent. Next, I'm going to add a bit of paints gray into the same mix. Using that dakotun I will add a few more lines to give
it a finished look. Right now, the color
is a medium tune. Go the dakotun and only
add a few extra lines. Also, the color doesn't
need to be super dark. You only need to add a little
of paints gray to green. Now I'm going to add some more
lines also at the bottom. See that? This group has a much more polished
look than the other two because we have
used darker tos. Now, in a similar way, I'm going to add some lines
onto this group as well. Finally, we have to go
with a bigger group. Now I'm adding a few
towards the bottom. Some teeny tiny ones. Now going with the last group. If you don't add these
lines using a darker tone. If we only leave it
as medium tones, it won't have a finished look. You can clearly
see the difference between the other two
cluster and this one. To make our painting
look complete, it is really important to go with the final round
of grassy line. You don't need to add a lot. Just a few is all we need. Mix some paints and sap cream, go with a smaller brush. Now add a few more lines
and finish it off. So that is done. Now we have two more task left. The first one is adding some
texture on the sandy area. I'm mixing some paint
scray with brown, and I'm creating a color which
is similar to burn temper. Now, once you have taken
the paint, Do paper towel. Just add small patterns below that grassy
thing we have added. See that? Just add some super tiny and some
random shapes. We are trying to
add some texture. We need these patterns
only over here, so don't go overboard and be careful to add
them in a smaller size. It can be just a few tops
and small lines and shapes. And also maybe
some dry patterns. Okay, that's it. That's how it has turned out. Now, we have one more task left. For that as well, I'm going
to use the same color. It's a mix of brown
and pinks gray. First, I'm going to add a few
lines, a few longer ones. I have added two, going
with the other one. Maybe we could add one more. You can add in as many
lines as you want. It doesn't matter. You can
add them on the right asph. I'm just focusing
on the left side on this particular cluster. Okay, so the lines are in. Now on the tip of the lines, I'm going to add a detail, which is more like Pampas
grass or Foxtel plan. Just add some lines
or some grains onto the tip of that line to
give it a better character. Now let's do the same
thing on the other one. Add them only on
the tip. Just add a few lines on either
side, and that's it. It doesn't need to be perfect. They're super tiny,
and they're far away. Just keep on adding
some tiny lines on either side. That's it. The brush I'm using here
is size number two. It has got a really
nice pointed tip. Go with any brish with a pointed tip so that you
can add them very nicely. Okay. You can also add a few more extra
lines, longer ones. All right. With that, we're done with our
painting for the day. It's a very simple
beat landscape. Give it a try if I re to try it. It's a very minimal
and clean painting. There isn't a lot of elements. So, now it's time to peel
up the masking tape. All right, so here is our minimalist, beautiful
Beach landscape. I hope you all enjoyed the process and loved the
pain you have created. Before I wrap this up, there
is one task I want to do. For that, I'm picking a little white quash.
This is nothing else. I want to cover that blue
paint along the border. I want to clean border. There are a few there are a few things which I'm
very particular about. Getting a clean border
is one of them. If it doesn't happen, I just fix it with
some white quash, and it just makes
me happy, why not? Anyway, here is the
finished painting. I hope you all had
a lovely time. Okay, so that's all for the day. Thank you so much for joining. I'll be back here soon with
our next mini landscape. Oh.
9. DAY 5 - Red Poppy: Hello, my dearest friends.
Welcome to Day five. Our meaning painting
for the day is a bright red poppy flower. I really love that
striking contrast we have here that red flower and
the green background. They're going very
well together. The painting process
is really interesting. In a way, let's have a look at the colors and then
we can get to that. As you could see
here, I have used a wide range of greens
for the background. There is a light
green, a medium green, and also a darker green. The light green I have used
here is cadmium green light. You can go with any lighter
green you have card. If you don't have
a lighter green, you just have to simply
add some lemon yellow with Sap green and you can easily
create a lighter green. It doesn't need to be
the exact same color. Just go with any lighter
green you have card. That's the first color.
The next one is sap green. Sap green is a common color, and I hope you all have it. It's a beautiful green.
It's a beautiful green to paint lush greenery, which no other green can match. Those are the two
greens I will be using. One is cadmium green light, which is the lighter green. Then it is sap green, which is the medium green. Now, there is one
more color you will need to make your green
appear more darker. For that, I'll be adding some paints gray
along with Sab cream. Basically, we'll be
applying coat of water onto the background while
leaving the flower. If you want to apply masking
fluid onto the flower, you could do that and you
can preserve that area. Then onto that wet background, they onto that wet background, we will randomly
add these colors. That's how we're going
to paint the background. Now, along with these colors, you will also need some white
guash, or white watercolor. You can see those thorns and
some highlights over here. For that, tube will need some white guash or white watercolor. Now, there are two more
colors you will need. Over is an orange and red. Those are the two colors we
will use for the flower. First, I swatch out orange. This color is called
brilliant orange. It is from Shinhan. It's a
bold and beautiful orange. If you don't have
a similar color, you can go with vermin, or you can go with
any sort of orange. Okay. Go with a bright orange
to create a contrast. Along with orange, you
will also need some red. These are the two
colors I'll be using, brilliant orange and Pyl red. Let's watch out red next. This one is also a
really bright color. And that's why we have
a striking contrast here. See that? It's a very bold red, and it is called Pyl red. You can go with permanent red
or any other red hop cord. Those are the colors you will
need for today's painting. You will need a variety of green and then a red and orange. Please don't worry if you don't have the
exact same colors. Just go with any color
that is nearly similar. As I mentioned, we just need
some green, orange and red. So keep all the colors
ready. Let's give it try. Okay, so I have my paper ready here. Now, the very first step
is to add the sketch. We need to add a poppy
flower and also a bud. First, I will start by adding
a line a long curvy line. So that's a stem. I'll add one more similar
line to show the thickness. Now onto this, I'm
going to add a flower. I'm going to go for a
very simple flower. It's not a complicated shape. Also to make it easier, I'm adding the finished
painting here. You can have a look at that
and adding your flower. Also, if you want to go for a different shape,
that's totally fine. It doesn't need to be
exactly the same way. Also, one more
thing, you can place your flower wherever
you feel like. It doesn't need to
be towards a left. You can place it at the
center or towards a right. Those things are
totally up to you. The basic shape is ready. Next, I'm going to add two
more petals over here. These will be the
petals in the front. Then we have two petals
right behind that. That's a shape I'm going with. You can modify it
however you feel like. Maybe we can stretch
this petal a little more to give
it a different shape. Now, next, we need
to add the bud. I'm again going with two lines and then a sheep on the top. That's a sketch. I'm only going for one
flower, and one bud. If you want to add
one more bud or another flower, feel
free to do that. The sketch is ready.
Now, the first thing we are going to do is to
paint the background. For that, you will need
different kinds of green. I will use some light green, screen and also
some paints gray. I have a light green, a medium
green, and a darker to. Now when you have
the colors ready, apply a hot of water
onto the background. Try to leave the flower and apply water onto
the remaining area. If you want to
apply masking tape onto the flower,
you could do that. It's a big flower, so I thought we just have to
be a bit careful. There is no real need
of masking fluid. But if you prefer that way, you can apply masking fluid. Now, the same h, I'm
picking some grain, this one is sap cream and I'm applying that onto
the wet background. See that? Simply adding your paint
onto the wet background, and it would spread and
create a nice blurry texture. I'm just randomly applying
sap cream around the flower. Next I'm picking
some light cream, and I'm adding that
in a similar way. The only place you have to be careful is the place
around the flower. The rest you can simply drop in the paint without
thinking much. Okay. Just keep switching from
one color to another. At some places, you
can use sap cream, and at some places,
you can use ato cream. Next, I think I will apply
paint around the flower. Then I will introduce
some dakotons as well. Right now, I have applied
cadmium green and sap cream, and that's how it
has turned out. I'm going to pick
more sap cream. First, I will carefully fill in the area
around the flower. Then we can start adding the dakotons Go with any of your smaller brush
or a medium size brush, which brush you're comfortable
with and carefully follow the outline of the
flower and fill in those areas. This one is a very
small piece of paper, so we can manage to finish painting in the background
before it dries up. If it's a bigger background and if you have a
lot more flowers, obviously, you will have
to go for masking fluid. Otherwise, it will become a very difficult task to finish everything before
the background dries. Have finished one side. Now, I have some area left on the top and also
at the bottom. The brush I'm using here
is size number eight. If you want to go
for a smaller one, you could do that as well. I'm also applying
that around the stem. The stem is not
really important. If you're not able to retain
that space, it's okay, you can just fill up
the paint on top of it, then we can come back
with a lighter green and add that again.
That is totally fine. The only major element
here is the flower. Try to retain that.
For the flower, we have to introduce
some beautiful orange and red shades. If there is some green on
it, it won't look nice. Be really careful when you're applying paint
around the flower. The stem, as I said
earlier, that's fine. We can somehow manage
to make it look okay. Now, I have some
more area left here. I will quickly fill
in that space. Then we can go with some
paints gray and introduce some dakotons onto
the same background to make it look
more interesting. Oh. Okay, as have apply paint
onto the entire background. Now with the same brush, I'm going to pick some paints gray, and I will mix that with sap cream to create
a darker tone, and we have to introduce
that color onto some of the areas before the
background dries up. I'm just using a
dao tone of green. It's a mix of pinsra
and a bit of sap cream. I'm randomly dropping
that in onto the background
before it dries up. Okay. There is no rule here. You can drop in your taco
tones wherever you want to and you can retain the lighter tones,
wherever you want to. Those things are
totally up to you. Just go in quickly and
add in those paint, however you feel like.
Don't worry a lot. When it dries, it will
look really beautiful. For now, your only
task is to add in those different tonal
values onto the background. Before it dries up, I'm very happy with the
way it is turning out, but I feel there is still
some dakotuns lacking. With a smaller brush,
I'm going to pick some paint skin acids and
I'm going to quickly add that onto some random
places to introduce those taco toes I will add few
around the flower as well. See that. Simply adding your
paint and scrub that into the background
to give it a softer look. You don't need to add a lot,
add a few here and there. Let's add some towards
the bottom as well. I want to tell you, you
don't need to follow the same way how I'm adding
these tacotons or the greens. They look at your painting. Wherever you feel
some tacotons will enhance the background,
add them in. It doesn't need to be the exact same place where I'm adding it. Just keep on adding them
onto the background quickly. Before it dries up, we
want a soft background. Those colors should not
look too rough. Okay. Also, if you feel
it is good already, there is no need to add
any extra taco tones. You can leave it the way it is. Just because I'm adding more, you don't need to do the same. To me, I have the
habit of overdoing things sometimes end up good
and sometimes it doesn't. So I'm not really sure how
this is going to enter. This background is
looking really nice, so I don't think I
should take a risk. I should call it time.
Beautiful. I really love all those grains
we have created here. The texture is really nice. Now when we add the red flower, it will look even
more beautiful. Only to this corner, I will add some
more paints gray. With that, I'm going
to call it done. That's my background. I hope you all are
enjoying the process and loving the cordial
background you're creating. Here's mine. With that, I'm calling it done and
I'm leaving it for drying. Okay, the background is ready. It has dried up beautifully. I'm loving the colors and the textures we
have created here. It looks really nice. Anyway, the next task is to paint the
flower, and for that, I'm going to use
majorly two colors, which is brilliant
orange and Pyl red. These are the two colors.
They are from Shinhan. Just go with bright
orange and bright red. Now, the very first
step is to apply orange onto the entire flower. Go really bright tone of orange. It can be any orange or vermion. Now I'm going to apply
this onto the flower. I'm leaving the petals at the back and I'm focusing
on the front side. See the color. It
is a bright orange. This particular color is
called brilliant orange, and I think the name
is very accurate. It's a bold and
brilliant orange. Now I'm going to apply
this to the flower. Go the similar tonal value. Don't add a lot of water
and make it light. We want a bright color for the flower so that it will
stand out from the background. Okay. So as I mentioned, I'm going to leave the p
petals as it is for now. Once we finish the front part, we can paint the other two. Okay, so I'm going to quickly
paint the base layer. Then using red. We need to
add some textures on to that. Oh. Oh. Okay, so that is the base layer. I have applied orange
on to the te flower. Now with the same brash,
I'm picking some bread. This one is spiral red. Now, from the bottom,
I'm going to add some lines onto the top. See that? This is just to
create some texture. Otherwise, it will
look plain and empty. Before the base layer dries up, using red color, add in some
lines onto those petals. You can add a few lines from the top to the bottom as well. I'm really loving
that bright red and orange against
the green background. Anyways, let's add
in some more lines. If you feel like there's a
lot of paint on your brush, dab it on a paper towel. For the base layer, we
used brilliant orange. Now using red, we are
adding some texture. I haven't added any lines from the top towards the bottom. I will quickly add a few lines. Then I will go the
dark toon of red. From the top to bottom as well, add in a few lines
in a similar way. Now, with the same brush, I'm going to pick some
paints gray a little bit. Then I will mix that with red to create a daco red. That's
the color I'm using. It's a mix of paints
gray and red color. Now with this color as well, we have to introduce some
lines only at the bottom. From here, add some
lines toward the top. We don't need a lot.
The major color has to be that red and orange. Just add a few lines from
the bottom toward the top. Be careful about
the tronal value. It should not be too dark. Okay. I've cleaned my brush. With that paint in the
background itself, I'm just pushing it towards the top because I don't
want that to be too dark. Just use that paint
in the background and simply pull that
towards the top. And add some lines
in a similar way. You can see how
beautiful that flower is turning out when we are
adding those taco tones. It is actually the magic
of different tonal values. First, we used orange
for the base layer. Then we added some
textures using red, and now we are playing
with a taco tone of red. Next, I'm picking some
more paints gray, and I'm adding that at the
bottom area. See that. For the poppy flower, it
looks darker at the bottom. That's what I try
to do right now. Okay. Now I'm going to paint these two petals
at the back for that, I'm going to go with some red. And I will simply apply that
paint to those two petals. I won't be adding any
extra texture or details. You can either use red or
a mix of red and orange. And simply fill that in. If you want to, you can add some textures onto those petal, some lines like we did earlier. But I feel it's not necessary. It's a small section. As we're using a taco toon, it looks like there
is some shadow on it. I feel it is this colors enough, but that is totally my opinion. If you want to add some dakots
you could do that. Okay. I'm nearly done with
this pato. All right. That's our flower. Now, we have the stem
and also the bud left. Which is a fairly easy task. The first color,
I'm going to pick the slight green and I'm going to add that
onto the left side. Go with any of your smaller
brush or a medium size brush. Now onto this stem, apply
a light cream first. Even if you haven't got
a clean line here or if there is some pain
in the background, that is totally fine. You can still use
the same technique, but you'll have to
go with a slightly opaque tone of green. Next, I'm picking some sap cream and I'm adding that right
nextra light cream. You don't need to put any
extra effort in blending. It is just a thin line. Simply add in your color. It will automatically blend into each other, and
that's all we need. There is no near of
putting any extra effort. We have light green
and sap cream. Next, we have to go the
much more taco green. We have to add that onto
the right side over here. I'm picking some paints gray. I only have a little pin there. I think that would be enough. I'm mixing that with green. Now I'm adding that onto
the left side. See that? We started off with
a light green. Then we used sap cream and
now we're using a taco cream. And that's a first stem. Now, in a similar
way, we have to paint the bud and also the
stem for that one. So I'm going back
with light green, and I'm adding
that onto the bud. Now we can continue the same
paint towards the bottom. Let's add that onto the stem. Now, with the same press, I'm picking some sap cream. Now let's add that onto the
stem and also to the bud. Just in case if you don't have a clean shape there,
that's totally fine, like I said earlier, go
with an opaque tone, don't add a lot of water into your light cream and
simply add in the line. It will still be visible. Now, in case if
it's not visible, what you can do is add some white watercolor
or white quash, just a tiny bit into your light cream and give
it some opaque character. That's what you can do, give it a try and let me know if
you have any questions. I've used light green
and sap green here. Next, we have to go
with a darker cream. I'm mixing some sap
green with paints gray, and I'm adding that color onto
the right side of the bud, as well as onto the stem. Right now, we have
simply applied the paint onto the stem and
also onto the bud. But you can see it doesn't
have a finished look. It still looks like there
is something lacking. First, I will add a bit of
paint here at the bottom. Then we can go with
those final touches. We have the stem and
the bud in place. This one has nearly dried. It is not completely wet. Now for the final detailing, I will need some white gouache. It can be white gouache
or white watcl. If you have guage go with that, we only need a
tiny bit of paint. I'm going to squeeze
out a little of white gouache onto my palette. Then you will also
need a smaller brush, a miniature brush or a detailing brush or any
brush with a pointed. I'm using a size
number two run brush. Now, with this brush, I'm
picking a little white guash. Don't take a lot of paint,
pick only a little. Now with that pointed tip, I'm adding some highlight
onto the left side first. Go with a similar thickness. Don't make it too opaque. You can add a few drops of water into white guash
or white watercolor. W B that you're using
and add a line. It doesn't need to be
a continuous line. You can add a broken line. Okay. Now in a similar way, I will add some white
highlights onto the bud asple again
onto the left side. We need to retain the shadows and the taco Tons
on the right side, add the highlight
only on the left. Now, there's one more
task that we have to do with adding some super
tiny lines onto this stem. Give it a watch. They have to be super tiny and super thin. I don't know really what
these lines are called. You can see them on the stem of some flowers and also
some vegetables. See that. The thickness is something you have to
be really careful about. Also, you don't
need to add a lot. Just add a few in between. Okay. So please be sure to go
with a smaller brush or a detailing brush or any
brush with a pointed tip. You can also use a wide che pen if you feel that is more easier. Anyways, this one
is nearly done. Now we have to add similar lines onto the other stem
and also the bud. First, I will add
them on the stem. Leave some gaps in between. Don't add them too
close to each other. Okay. The stem is done. Next, I'm going to add
them onto the bud. I will add them along that
shape first, that oval shape. Then I will add a few
onto the surface asp. Quickly add a few lines
along that outer line. Okay, so that's done. Now we can add a few onto
the surface of the bud. Please go the deing brush
or a smaller brush. Otherwise, these lines will
look really prominent. Now they are barely visible,
go in a similar way. All right, so that's a bud. With that, we are done with
our painting for the day. I hope you all enjoyed the process and managed
to finish the painting. To me, the most interesting part is that striking contrast. Before I peel off
the masking tape, I'm picking some paint screen, and I'm giving it a
better shape here. Okay, that's it. Now it's time to pin
up the masking tape. To be honest, I'm not a huge
fan of painting flowers, but I had a similar painting in my spring vertica challenge. It was on a bigger scale
with a lot more elements. Maybe that is the
only floral painting I really enjoyed working with. I thought of adding
a miniature version in this class, here it is. I hope you all enjoyed it. Give it a try. It's
a simple process. The only tricky part
would be leaving the flower when you're applying paint onto the background. But you just have to be
a little extra careful. That's all. It isn't
a complex task. We just have to drop in
different tonal values of green onto the background, and they will create
a nice blend. All right, so that's
all for the day. Give it a try if I had to try it and let me know
if you liked it.
10. DAY 6 - Aerial Sea: Hello, L. Welcome to day six. Our painting for the day
is a stunning seascape. This one has to be one
of the easiest and the prettiest seascape
I have ever painted. Let's quickly have a
look at the colors. Let's get into the process. To paint the sea, I will
be using three colors. I will start with Cabal creen. We will only use a little of Cabal creen closer to the shore. The major color is
Terquoise blue. That is Coval creen. The one I'm using here is from Shin him. The next color you will
need is Terquois blue, which is the major color
I will use for the sea. This one is from White knights. Now, there's one more
color I will use to add the taco Tones which is indico. We don't need to add
a lot of daker toes. We only need to add a little mostly towards the
top right corner. And for that, I will
use a bit of indico. Those are the three colors I
will use to paint the sea, Coval green, turquoise
blue, and intc. The next color we will
need is burn cena. We'll use a lighter tone
to paint the sandy area. We will use a lighter tone of burn scena to paint
the background. Then onto that, we'll add some textures using a taco tone. Which is going to be a mix
of Burna and paints gray. We'll also be using paints
gray for the rocks. That is our final color. To paint the rocks, we will
only need paint scray. We will start with the
metamtne as the base layer. Then on to that, we will
introduce some textoes. Those are the colors you will
need for Trays painting. We will need oval
creen, turquoise blue, indico, burn Sina,
and paint scray. Keep all the colors ready,
and's give it a try. All right, so let's start. First, we have to add
an irregular line to separate the
sea and the sand. Just go for an irregular line. We can modify that
later as we paint. Next, I'm going to randomly
place a few rocks. I will add the huge ones. I'm adding one over here. Go with an irregular
shape to make it look more natural. See that? Now, next to this, I
will add a smaller one. Now, maybe another one there. Add them in different
shapes and sizes. You can add them
however you want to. It doesn't need to
be in the same way. Next, I'm adding a
bigger one over here. We have two bigger rocks. Now we can randomly place
a few smaller ones, one there and one here. Maybe we can add
one more over here. I hope it is not too
much. That's a sketch. We have the sand part and
the s. Then also some rocks. Now, first, we're going
to start with the sea. Along with that, we'll
also paint the sante area. Finally, we will
add the waves and the texture and also we
will paint the rocks. I'm hoping you guys
have the colors ready. We need turquoise
blue, cabal green, and also some into. These are the three colors we
will use to paint the sea. Then along with
that, you'll also need some burnsina
and paints gray. Before you start, make sure you have all
the colors ready. Once you have them
ready, apply a code of water onto the end of paper. Okay. You don't need to
leave out the rocks. You can apply water
on top of it as well. Okay, so the background
is evenly wet. Now we can start applying the paint B I'm making
sure my brush is clean, and I'm starting off
with turquoise blue. Pick a medium tone first. Now, apply that onto the wet background. I'm
starting from here. And I'm adding turquoise
blue almost onto the half of the s. I
used a medium to first. Now I'm picking a
slightly taco tone, and I'm adding that
onto this corner. Okay. Next, with the same brush, I'm going to pick
some cobalcream I'm going to add that
onto the remaining area. You don't need to
clean your brush, pick cobalcream with
the same brush and add that over here. Okay. Closer to the rocks. I'm using Coval cream onto
the remaining area, I have applied turquoise blue. So far, we have only used
turquoise blue and Coval cream. Now it's time to introduce
more deeper tones. First, I will use a taco tone
of turquoise blue itself. I'm dropping in that
onto the wet background. Mostly onto the outer side, then we can add a few lines
in a very random way. Don't add a lot towards rocks. We have to retain
that coval cream. Also, if your paint is water,
dab it on a paper towel. Don't let it spread a lot. Okay. The color I'm using right now is a darker tone of turquoise blue itself. Gradually, I will cover some indico to introduce
some more taker tones. Mostly under the outer corner. Always be sure to
cover the paint, which is not too watery. If it's too watery,
it will spread a lot and we'll cover up all those medium tones and lighter tones. I'm picking some more paint. I'm adding a few
more lines towards the outer corners over here. You can see I'm randomly
adding some lines. They don't have any
particular size or shape. Next, I'm picking some indico, and I will introduce
some more tacotons Only go to the outer side. I don't want to add any
tacotons towards the shore. I'll just add a few here to introduce a different
kind of texture. They can be a broken
line or a thick line or any kind of shape.
That is indigo. Now I'm going to clean my grah I'm picking a little
of turquoise blue, more like a medium tone. Then I will gently smudge it. You need to do this
only if you feel like those patterns are very
prominent and too loud. Otherwise, you can
just leave it acidus. You don't need to smudge
it. That's a background. Please be sure not to
wear a lot of patterns. It's a very small
piece of paper. Let's not overdo it. That's my background. I'm done with the C. Next, we have to paint the sand part. Okay. So I'm cleaning
my brush and I'm right away going with a
lighter tone of burn cena. The brush I'm using here
a size number eight, the same brush I used
to paint the sea. Now, let's apply that over here. Looks like the
background has tried up. I'm picking more water and
I'm applying the paint. The brown and blue doesn't
need to blend into each other. They can look as two
separate sections. That's not a problem, so
don't worry about it. So first, apply a
lighter tone of burn scena onto the entire area. Now, I'm picking a
little of paints gray, and I'm mixing that
with burn seiner. More like a burnt umber
shade, but it's not too dark. Now I'm going to
apply that color onto the wet background, closer to the sea. See that. Simply add in some shapes and lines and some
thoughts maybe. We're trying to
create a texture. Just add that onto
the wet background. You don't need to
think a add that in. When it tries, it will
look really beautiful. Play with a similar tonal value. Don't make it too dark. That's the only thing you
have to be careful about. I know at this point,
the background is looking super messy, which is totally okay. Don't worry about it.
With the next step, it is going to look
incredibly stunning. That's a background.
We have painted the sea and also the sand part. Now we'll have to
wait for this to try before we go
with the next step. So that's how it has dried. It is still looking
a little messy, but it is going to change
in the next few minutes. Okay. So first, I'm going
to pick some paints gray. I will start with
the medium tone. And I'm going to apply
that on to the first rock. Simply follow that outline and fill in the shape and a
medium tone of paints gray. You can either go one by one or you can paint
all the rocks together. I'm going to apply a
medium tone of paints gray on to maybe two or
three rocks together. Then I will add
the darker tones. This way, we can finish
it off quite quickly. Here's a second rock. I'm
adding a medium tone. Now for the other one as well. Now we have another one here. Then we have a bigger one. Simply follow the outline and add in a medium tone of paints gray onto that entire shape. You can modify the
shape if you want to. Go for an irregular shape to
make it look more natural. Half of the rock is on the sea and half of
it is on the sand. Now let's introduce the taco
tones with the same press, I'm picking a taco tone I'm adding that
randomly onto the rock. Okay. See that?
Simply add that in, it doesn't need to
look perfect or it doesn't need to be
blended into the background. We're trying to
create some texture. If it's rough, it's better. Start with the medium tone, apply that onto the entire rock. Then add in some taco tone
in a very random way. Now let's go with the
second bigger rock. I'm adding some textures
using a taco tone. See that. My idea is to have
some medium tones in between and also
some taker tones. I'm not worrying too much. I'm simply adding that taker
tone onto the background. We have a few more
smaller rocks. Next, I will go
with this one here. See that. That one has
completely dried up, which is completely fine. It's a very small rock, and you can still
add taco patterns. Now we have two or three tiny
rocks towards the bottom. Let's go with that. We
have to apply a medium to. That is too dark. I'm applying a medium to onto the
remaining rocks. Now we have a smaller one there, and also one at the bottom. Next, I'm going to
add some more texture onto the bigger rocks. The other ones are
looking quite fine, but for the bigger ones, we need to add
some more texture, and for that, I'm using a
darker tone of paints gray. I'm picking an opaque paint. Now I'm dabbing my
pressure on a paper towel. Now, let's introduce some
dry patterns onto the rock. This is just to give
them some extra texture. Randomly add some right
textures onto the rock, using a darker tone. These textures will make
it look more realistic. That's the first big rock. Now in a similar way, let's add some right patterns onto
the other one as well. At any point, if you feel
your pain is watery, dab it on a paper towel, before you add these patterns, and they can be super random. We can add them
wherever you want to. Now let's go with
the smaller rocks. We have two on the top
and few at the bottom. These ones are very small, so you can just add a
few here and there. Now we have few at the bottom, but they're already very dark. There's a trick that you can do, dip your brush in some water. Then with a wet brush,
smudge the paint a little. That. You're basically
lifting off the paint. We can do that over here as
well. Wherever you feel. Wherever you feel, there
is some texture lacking, go with the wet brush
and just mudgt. By doing this, you're actually
lifting off the paint. Thereby introducing
some texture. With that, we have finished
painting the rocks. Our next and the final
task is to add the waves. For that, you will either need white guash or white watercol. I'm going to use
some white guash. I have taken some
paint on my brush. I haven't added any water. It's a very opaque ic paint. Now, first, I will add
an irregular line. I'm adding the wave right
where we have brown and alreen Just follow that
line and add in a wave. You rely to worry a
lot, add a thick line, a thick white line. You can take that along
the outline of the rock, then continue to the sandy area. See that? Just add them
around the rock and then continue and add in your line until you
reach the other end. Okay. The first step is to
introduce that line. Then we can add more textures. Don't add much water. Go
with an opaque paint. You can either use
gouache or watercolor, both will work. Have
added the line. Now we can introduce some dry textures towards the inner side where
we have the sea. The same brush, I'm just adding some dry textures to make it look like
that forming water. I think it is better to
start from the top and then come to at the bottom. Okay. You can also modify the
shape of your wave. On the top over here, I'm adding some more white
paint to cover all the mess. Then I'm going to continue
that towards the bottom. Just keep on adding some dry patterns towards the inner side. I haven't added any water. I'm just picking
the paint acids, and I'm introducing some dry textures onto the background. If your paint is
loose or watery, you won't be able to
get those try patterns. Also, you will end up lifting off the paint from
the background. Please be sure to
go the dry paint to get the best result. You can see how beautiful it is turning out when we
introduce the wave. That's the reason why I told you it is totally okay if the blue and brown is looking
like two separate sections. You can see how
easily and smartly we transformed a messy background
into a beautiful seascape. I hope you guys are
entering the process. Now I'm picking more paint, and I will add some
more patterns. Okay, so that's how
it has turned out. Now, just in case if you want to add some more opaque paint, around the rocks,
you could do that. I've taken more paint, and I'm adding some
textures around the rock. I will do the same for
the other one asphal I'm picking more paint
directly from the tube, and I'm adding that over here. It's a thick opaque white paint. I haven't added any water. Just around the rock, I'm
introducing more white paint. To make it look like there are some waves crashing onto them. We can add a few here
asphal onto this rock. Just go the white paint, preferably a dry paint and add some textures
around the rocks. We have another tiny rock here. Let's do the same
for that as well. Yeah, just go with some
opaque white paint. It can be a white quash or white tclar and add some textures
onto the background. You can add some thick
white paint around the rocks to make it look like there are
some waves crashing. Then onto the background, you can add a few textures
as using a trip paint. They don't need to
be too prominent. Just add some subtle
patterns. See that? Pick a little paint, not a lot and then introduce some textures like this onto the background. That's how it has turned out. Now, if you want to
add some more paint, you could do that. Add a little more here. I
feel it's not prominent. I'm just going for
one more round. Now once I'm done with this, I'm going to extend the waves
a little into the sand. We don't need to
limit their shape, we can make them
flow into the sand. Break that wave and
add some white texture around the rock over here
where you have the sand. We can do the same thing
on the other side as well. This way it will
look more natural. Yeah, have a look at your
painting and wherever you feel, you want to extend the
shape of your wave. You could do that. Just add a few more white lines around the rocks or
wherever you feel like. Okay. Now, there are a few final touches
I want to go with, which is completely optional. The first step is to add some
more texture onto the rock. I'm cleaning my brush and I'm going with a really
dark tone of paints gray. It's a super dark tone. Once I've taken the paint, I'm dabbing it on a paper towel. Now I'm introducing some more
dry textures onto the rock. Using a really duct. I had a look at my painting, and I thought it's nice to add
some more darker patterns. But if you feel you already
have enough darker patterns, you don't need to add anymore. I felt like mine has faded and that's the reason
why I added them again. Anyway, if that's done. Now the same color paints gray, I'm going to add a few
tiny rocks here and there. See that, they're super tiny. Place them randomly
wherever you want to. These are very
small, so we don't need to add any extra
textures or anything. Go with a dark tone of pain scray add some small
random shapes like this. It doesn't need to have
any particular shape. It can be super random. I will add one
more next to this. I don't want to overdo it.
With this, I'm stopping it. Now, there is one more last
task I'm cleaning my brush, and I'm going back with that burnt umper color
I created earlier, which was a mix of
paints gray and a bit of burn cena Okay. I've taken that paint. Now I'm dabbing my brush
on a paper towel. I'm introducing
some textures onto the background. It's
a lighter tone. These are just some
quick textures. It is just a simple mix of some paints gray and burn scena. Go the lighter to dab
it on a paper towel. Make sure you have a dry paint. Then simply add some textures around the rocks and
wherever you feel like. That's it. With that, we're done with
our painting for the day. Now it's time to peel
off the masking tape. Okay, my dear friend, so here
is the finished painting. It was a quick one, and I think it is really
beautiful as well. I hope you all enjoyed it. Thank you so much
for joining me. I'll be back here soon with
our next mini landscape.
11. DAY 7 - Foggy Forest: Hello, friends. Welcome today seven of painting many
vertical landscapes. Today, we're trying a
monochrome painting. The entire process is really gorgeous and even the painting, and the best part
is that you will only need some paints
gray for this painting. We will play with different
tonal values of paints gray. We will start with
the lighter tone, and that's the color we're going to use for the background. Something similar
to the tonal value. Okay. And then for the trees, we will go with a medium tone, which means you have to add
less water and more pigment. We will use a
similar tonal value to paint the trees
in the foreground, and for the final detailing, we will use a taco tone. The paint scra I'm using for this painting is from remrant, The one you see right
there on my table. You can go with paints
gray or even antico for this painting or a
different color of your choice. It can be a dao brown
or a Daco green. Basically, it can be
any color where we have opportunity to play
with different tonal values. Right here, I have added
satusf a lighter tone, a medium tone, and a taco
tone of paints gray. For our painting asph we
will use a similar range of tonal values to create
that foggy effect. Keep your paper ready
and squeeze out some paints gray
onto your palette, and let's give it a try. So today, we're going to
try a monochrome painting, and the only color you
will need is paints gray. You can also go with indico. Okay, so that's the only
color we will need. We will play with different
tonal values of paints gray. Now, I'm starting by
applying a coat of water onto the
anterior background. Apply a nice general coat
of water. Don't add a lot. Make sure it's an even coat. I'm hoping you guys have the
color ready on your palette. It can be either
indico or paints gray. We're going to start applying
the paint right away. And for that, I'm going to go with my size number eight rush. Make sure it is clean
before you start. Now, to begin with, we are going to go with a lighter
tone of paints gray. Add in enough of water
and keep the paint ready. Now I'm going to drop that onto the wet background in
a very random way. See that? Simply add in some shapes and some patterns
onto the background. While leaving some
caps in between. You can see at some places,
we have a lighter tone. In between, there is some
caps, some wide caps. Only on the top part, I
have added some paint. It's more like a
lighter to medium tone. Now we can drop in
some more paint on the top to introduce
some texture. For this painting,
the only element we're going to add
are some trees. On the top to create that
texture like foliage. I'm dropping in some more paint, using a medium tone. You just have to put some dots and some tiny tiny patterns. Nothing much. It will nicely
spread into the background, leaving a soft texture. Add them only on the top,
the bottom can be actus. You don't need to add any
extra patterns at the bottom. Just keep on adding some
patterns using a medium tone. If you paint is too watery, remember to dab your
brush on a paper towel. Otherwise, they
will spread a lot and it will be very difficult to control the way
they are spreading. Okay. So to get a
better control, it is always good to
work with the pain, which is not too watery. I will add a few
more in between. Maybe using a little
daker tone This way, we have different tonal
values in the background, and it will automatically add a lot of beauty to painting. That's how it has turned out. I think I have added enough I'm cleaning my brush and I'm
dabbing that on a paper towel. Now, only if you feel your
patterns are too much, you can gently smudge them
using a clean brush. See that? Don't put a lot of pressure, be very gentle, gently those patterns to give
it a softer look. Only if you feel they
are way too prominent. Otherwise, you can
just leave it acts. If your background is
still wet and if you want to add some more patterns,
you could do that right now. So take a quick look and see
if there is enough patterns. Okay, so that's my background. Now we can leave
this for trying. That's how it has turned out. I feel like I should
have gone for a bit more darker tone because the colors are very light
right now when it dried up. Anyways, what's done is done. Now let's go the next step, and for that, I'm coing with a medium tone
of pinks gray again. For this step, I'm
using a smaller brush. This one is size number six. Now, we're going to add plenty of trees in the background. That's the kind of tonal
value I'm going with. I'm going to add the first tree. It's just a thick line
using a medium tone. Go the similar tonal value. Don't make it too dark. Now,
let's add another tree. It can be a straight line or
a slightly irregular line. Don't think too much, add
them wherever you feel like. Okay, that's my second tree. Now I'm going to add another
one right next to that, or the same tonal value. Then gradually we can
make it more darker. While I'm adding my next tree, I will also do a trick
using a paper towel. I hope you all have a
paper towel next to you. Let me quickly finish
the third tree, and then we can do the magic. Now with a paper towel, I'm simply dabbing on the tree. Okay. See that? This is just to create
a foggy effect. The paint is looking
lighter at the center, and it looks like there is
some fog, and that is a trick. Just one gentle press
is all we need, and we have to do this while
the pain is still wet. If it has dried up, the
paint won't come off, and it wouldn't create
that foggy effect. Now, I'm going to add
another tray over here. Using a similar tonal value. It's an irregular shape. I will add that
onto this corner. Now, if you want to
dab your paper towel, and then gently press on it and remove some paint to
give it that foggy effect. It's a very beautiful trick you can easily create that
foggy misty effect. Now, let's add the other trees. You can add the trees
however you feel like and you can place them
as per your choice. It doesn't need to be
exactly the same way. Once we are done with
this, we will go for a little more taco and we will
add another set of trees. I'm adding the next one here. Again, using the
same tonal value. Now I'm picking my paper towel, and I'm gently tapping on it. Okay, that's how
it has turned out. We have one, two, three, four, five trees now, and it's
all using a medium tone. I think it looks boring. So to give it some
extra dimension. We need to introduce a
slightly darker tone, and that is our next task. It is exactly the same exercise. We're going to add
few more trees, but using a slightly
darker tone. Let's start. Using
the same brush, this one is size number six. I'm picking a
slightly darker tone of paints gray, not too dark. It is just one tone darker than the color we used earlier. Okay. If you want to, you can try the color
on a scrap piece of paper before you start. I'm going to add
the tree over here. That looks super dark. Okay, this is fine. Now I'm going to continue
that towards the top. If you have noticed, I haven't added any trees overlapping
with each other. In the previous layer of trees, I added them with some cap in between so that I don't need
to wait for them to dry. But now they have dried up, which means I can add some
trees on that side as well. That's a tree. Now I'm grabbing my paper towel, and I'm picking some paint
from the background. See that? In a similar way, you can add as many
trees as you want. The basic idea here
is to play with different tonal values to create a mysterious
look in your painting. First go with a lighter tone, then you can go
with a medium tone, and then maybe a darker tone. Now this area has dried. I'm going to go
with my next tree using a similar tonal value. If your background has dried up, you can add them in
an overlapping wave. Otherwise, give it a few
minutes and let it dry. I'm just adding an
irregular thick line. Add a tree in a similar way. Don't make it a straight
line all the time. Some of the trees can
be a straight line and try to give a different
character to the other trees. That's my next tree. You don't need to
create that foggy effect for all the trees. For this, I'm not
picking up any paint, I'll add it be as it is. Now with the same tonal value, I'm going to add
another tree over here. Add them in any direction. It's all your choice. We can also add some
branches onto these trees. You don't need to add
branches for the ones in the background. I mean,
the lighter ones. You can add them only on
the ones in the foreground. For example, this one here. I think before we jump
onto the branches, we can add some more trees, and then we can add
them in one go. I'm going to add the
next tree over here. Or maybe here. There's a lot of
space at the center. Take a look at your painting and wherever you feel like there's a lot of gap in your painting. Place the tree over there. There is nothing much to think. Just go for an irregular line and give it a
thickness. See that? Now, in between these two, I think I can add another
tree, maybe a thicker one. I'm picking more paint, the same tonal value, and I'm going to add a thicker
bulky tree at the center. I'm starting with
a straight line. Then I will add some
thickness onto that. All right, so that my next tree. I feel like I should have added some more trees in
the background. There isn't enough now, and some of them got half hidden when we added the
trees in the foreground. In a way, let's
focus on the rest. So I'm just adding some more
thickness onto this tree. All right, so that's
how it has turned out. Now, we'll have
to wait for these to dry. I mean, the trees. In the meantime, we can add some texture in the background. For that, we are going
with paints gray again because that's the only
color we are using and I don't know why I
washed my brush. Now mind I'm picking some
more paint on my brush, and then dabbing my
brush on a paper towel. I want a paint that is dry. Now, let's add some dry
textures in the background. Only on the top, where
we have the foliage. Pick some paint on a brush, a medium tone of paints gray. Then die a brush
on a paper towel, make your paint slightly dry and then keep on creating some dry textures
in the background. We don't need a lot, we
only need them on the top. Be careful, those
trees are still wet. If you run your brush
on top of those trees, you might smudge the paint.
Be a little careful. I will add a few towards
the bottom as well. Okay. Now, we can add a
little towards the left side. This side is pretty empty. So I'm just scrubbing and adding some tried textures
in the background. It is nothing much. And we're adding them
only on the top, where we have that medium
tone in the background. Okay, so that's how
it has turned out. I think it is
looking quite nice. The trees are still wet, so we'll have to take
a break and we'll start again when it
has dried completely. Okay, here we are, that
has dried completely, and now we can go
with the next step. Forward, we are using
paints gray again, a slightly darker tone, and I'm using a size
number six rush. Now, our task is
to add some lines onto these trays,
some irregular line. They can be long,
they can be short, they can be straight,
they can be super random. Just keep on adding some lines onto these trays we
have in the foreground. I the ones where we
have used medium tone. Go with a darker tone of
paints gray and use any of your smaller brush or a
brush with a good tip, and then simply add
some lines onto the tree to give
it some texture. It is just super random lines. Add them as if your hand is shivering. That's
the first tree. You can see how beautiful it is looking with those texture. It's a very simple trick, but it will make your
tree look more natural. If you don't add these lines, the trees will be very
empty and boring. Now let's go with
the other tree. Just keep on adding some lines onto the tree. Give it a try. It's a very satisfying task, and you will see how beautiful
it is going to turn out. It is nothing but some lines. The best part is that you can add the lines, however
you feel like. They just have to fall
inside that tree. That's all. That's the only thing you
have to keep in mind. Now in a similar way, let's add lines onto the other
two trees as well. We have one over here, and there is one more
towards the right side. Now, I'm thinking of adding one more tree towards the left side. Before I go the tree, I will add some
right texture here. And then I will add the tree. Take a look at your painting, and if you feel there is
some extra space in between, you can add a tree or two. And if it's completely packed and there is no
space in between, you don't need to
add any extra tree. All right, so I'm
going back with that medium tone of paints gray, and I'm going to add
a tree over here. This one is completely optional. Only if you feel there
is some gaps in between, you can add one more tree. Instead of medium tone, I used a darker tone so that I don't need to
add any lines onto it. Okay, that's our final tree. Now we have one last task left, which is adding the branches, for that as well, I'm missing
a tacton of paints gray. I'll start with the tree itself. Add the branches,
however you feel like you can add as
many as you want to. This will obviously add a lot of character to your painting. Don't skip adding the branches. It is really important. These branches will
make your painting look more complete
and more polished. Go with a smaller brush and add in the branches,
wherever you feel like. Next, I'm adding one here. Go with an irregular line and
make it look more natural. The next one I will
add over here. At the beginning, I wasn't really happy with this painting. I really wasn't sure whether I should continue or stop it. But now I'm really loving it. I'm glad I continued,
I didn't give up. I really like that
foliage on the top, those textures we have created. Now over here, I'm just adding a broken branch, just like that. Okay. I really feel these branches and
those texture on the tree made a lot of
difference to the painting. I think that is the beauty
of monochrome paintings. Only at the end, you
get to see the magic, because in the beginning, it will be just some lighter tones. In most of the cases,
there won't be anything fascinating
or exciting. You have to wait till the
end to see the magic. Anyways, I'm nearly done
adding the branches. If you feel there is
more empty spaces, you can continue
adding the branches. Here's mine, and I think
it is in a good stage. I don't need to add
any extra branches. All right, so it's time to
peel off the masking tape. And here is the
finished painting. I absolutely enjoyed
the process. I hope you all did it too. It's a really
beautiful painting. So if you are yet to try it, you know what to do, grab some paint scray and give
it a try right away.
12. DAY 8 - Waterfall: Hello, dear friends. Welcome to day eight of painting mini
watercolor landscapes. Today, we're painting
a beautiful waterfall. There is no complicated
techniques. It's a quick one. I'll start with the
colors. The first color you will need is Coval green. That is the base color I
will use to paint the water. The Coval green I'm using
here is from Shin hun. Coval green is a
beautiful color, especially to paint
tropical beaches and turquoise waters. That's our first color. Now to add some details and some texture
onto the background, I will be using two colors. One is turquoise blue. This one is from white ninth. Now along with Turquoise blue. I will also add some sap
green along with that, to create a turquoise green, and I will use that color
aspll to add the texture. I will show you how to create
that color as we paint. We will need Coval green
and turquoise blue. Now let's have a
look at the colors you will need for the
rocky background. I will be using two
greens and paints gray. You will need a lighter
green, also sap green. This one is cadmium green light. You can go with any lighter
green you have got. Or you can just make
some lemon yellow with sap creen and create
a lighter green. This is the one. It is
called cadmium green light. The next color you will
lead is sap cream, which is one of the major color you will lead for
the background. We won't be using a
lot of light green. The major color is sap cream. We will use light creen mostly to add some textos
and highlights. That's all. We have a
light green and sap cream. Now to add the Daco tunes, you will need paints gray,
which is our final color. It's a very quick artwork. You will only need less than 20 minutes to finish
this painting. I think it is really beautiful,
especially the colors. It is really giving
you that holiday vibe. That summarize all the
colors you will need. Here is a closer look. As I mentioned Doli we'll
start with Coval green. Then to add the textures, we will use turquoise
blue and Sap cream. Then to paint the background, we will use sap green
and paints gray mostly to add some textures, we will also use
some light green. That summarize all the
colors you will need. Keep them ready and
let's give it a try. The first step is to add a line. The top part is going to be the rock and the bottom
is going to be the water. Now, right at the center, I'm going to add two lines
to indicate the waterfall. I'm placing that at the center. You can place it
towards the right or the left. It's your choice. Just add two lines
for us to know where the waterfall is
happening. That's it. The rest of the details we
can add as we're painting. Now, first, we're
going to start with the water and for
that tv pre colors, Coalcreen turquoise
blue and sap cream. We cobalcreen for
the base layer, then we have turquoise blue and sap creen
to add the textures. Keep them ready if you
don't have it ready yet. Once you have it ready,
start by applying a cot of water onto the
entire bottom part. Just to apply a nice
gentle coat of water. Don't add a lot. Now you see
my size number eight trash, I'm going to apply cabal
cream onto the entire area. Just apply and even wash of this color onto the
entire background. Okay. It's a beautiful color. Looks like there is
something on the paper. I'm trying to cover that up. I need to add some more
pain there, let's see. Okay, so it's
covered. Maybe there was some oil or
something on the paper. I'm not sure. Anyway,
that is coal creen. I have applied a medium ton of cobalcreeno the
entire background. Now, we can start
adding the textures. Now I'm going to clean my brush. I'm going to pick
some turquoise blue. Okay. Go with a medium tone, then add some sap cream
with that. See that? That's the color I
was talking about. Just mix some sapreen
with turquoise blue, and you will get a
beautiful color, which is more like Peacock,
blue, Pacock cream. Now, I'm going to
apply some lines onto the wet background
using that color. I'm starting from the top, and I'm adding some lines
on either side. Just some random lines. Okay. If you want to
modify the color and add some more green or Cirquise
blue, you could do that. Now don't add a lot of
lines onto the water. The major color has
to be bal cream. Now I'm cleaning my brush, and with a clean damp brush, I'm just smudging the lines
to give it a softer look. Quickly, smudge it so that
they won't look too rough. Also, when you're
smudging the paint, don't put a lot of
pressure, be very gentle. Now we can add
some more texture. I'm adding some more green. You see that color, I will add a few more
lines in between. You can add these patterns and lines, however you want to. Just focus on the color
and don't add a lot. The major color has
to be coal green. Now I'm taking a bit
more taco to I'm adding a few more lines on either
side to show the shadows. I think this is
looking good enough. I don't want to add a lot and
cover up that coal cream. It is looking really nice. With a clean brush,
I'm smudging it. I'm really loving the
color and the texture. I don't want to overdo it. I'm really loving the
colors and the texture. It's a beautiful color coination we started off with coal cream. Then using turquoise blue and a mix of turquoise
blue and green. We added some lines and
then we smudged it. When you're smudging,
you can also use some cobalcream if that helps. Sometimes the background
might be a little dry. In that case, you
can pick a little of cobalcream on your
brush and then smug it. That's how it has turned
out. That's the leak. Now we'll have to wait for
this to try and after that, we can start with the top. Right now, let's
take a short break and let's leave it for drying. That is right completely. Next, we can start with
the rocky background, and for that, you
will need two colors, sap green and paints gray. Keep these two colors
ready on your palette, and then apply a code of
water onto the background. When you're adding the
water, be careful, don't add any water
onto the lake. We just need a nice gentle, don't add a lot of water. Maybe you can leave
a cap in between. Okay, so that is entirely wet. Now to apply the paint, I'm going to go back with my
size number eight on brush. I'm starting off
with paints gray. We can go to the
medium tone first. Then gradually we can
make it more darker. Okay. Now, I'm going to
simply drop that paint onto the background in a
very random way. See that. There's no particular
order or anything. Simply drop in that paint. Closer to the waterfall, you can simply add some lines. You can limit adding
paint over there. This way, we can make
use of the paper white. But if you accidentally add some paint over there,
that's totally fine. Anyway, we're going to use
some white quash over here. Now I'm picking a taco I will
add that along the bottom. See that. It's a
much more taker to. Now, I'm going to drag
that towards the top. From that bottom line
with your brush, drag it towards the top. We have a taco tone
at the bottom, and we're dragging
that towards the top. We could do the same
thing on the other side, pick some paints gray, add the line and define
that rocky mountain. Now just drag your brush towards the top and spread it
into the background. I'm trying to save
the waterfall. Let's see how much paper
white we can save. Now I will add some
paint on the top. See that? You can carelessly add some paint here and
there. It doesn't matter. It is eventually going to
look really beautiful. Our idea is to create some
texture in the background. However, you add the paint, it will look really beautiful. Don't worry about the
messy stages in between. You keep on adding the paint. I think I have added enough. Next, I'm going
to clean my brush and I'm going to
pick some sap cream. Now onto those in
between spaces, all those paper
white we have here, I'm going to add some sap cream. It can be a medium tone. Simply add that paint. See that? You can see how
beautiful it is turning out. Now let's add that on
the other side as well. The colors are
spreading into each other as the background is wet and they're creating a
beautiful texture by its own, and that is exactly
what we need here. Use some brighter tunes. Otherwise, when they try up, they will look really faded.
That is a first step. Now, if you want to
make it more intense, you can keep on
dropping more paint. I'm going to pick some more
darker tone of paints gray. Then I will add that
at the bottom again. Then maybe we can come
back with some sap cream as f and then add
that in between. Basically, the idea is to
create some texture here. You can keep on switching
from paints gray to sap cream and then add
it however you like. There's no particular
order or method here. As I said earlier, we just need some texture
in the background. However, you feel
like, drop your paint. I'm adding some
more paints gray. To create more rocky
texture on the corners, I'm using a taco tone, then I'm simply adding some
paint in between as well. That's how it has
turned out. I think it is really beautiful. The textures are amazing. I'm going to add some more. I have some paints
gray on my brush. If it's too watery, dab
it on a paper towel, and then keep on adding
some more texture. At any point, you're happy with the colors and the result. You can call it done, or you can simply add some more lines and texture onto the background. The background is
starting to dry, so we need to be real quick. I'm just adding a few lines in between to give it an
impression of the rock. See that? Similarly, I will add a few lines on the
other side as well. The left side is more brighter. I think I haven't added much
greener on the right side, but it has its own beauty, so I have no complaints. Now I'm going to pick
some more paint, and I will add that next to
the waterfall on either side. This way, we can create
a beautiful contrast between the white and
the darker tones. Now, just in case
if you couldn't retain any of the paper white at the center where you have the waterfall, there
is nothing to worry. We'll be coming back with a white gas or white
watercolor to add the texture. Don't worry at all. If you don't have any white space in between. If you have it well and good, but if you don't have it,
that's totally fine too. Now, I'm picking a
little of sap green, and I'm adding that
onto the right side. I feel like the color
is dull at some places. Wherever I feel it is dull, I'm introducing some green
or some paints gray. That's how it has turned out. If you want to add
some more taco tones in between, you could do that. Because with watercolors when
it dries, it tends to fade. It's good to go
with a taco tone, especially when
you want to create those taco textures
and patterns. My background is
starting to dry. I don't want to add more
patterns and mess it up. I'm going to call it done. Now, before I try
out completely, I'm going to add a few
textures in between, using a light cream. I already have some
paint on my palette. I'm going to pick a little. It can be a bit of
water. It doesn't need to be an opaque paint. If it's too watery dab
it on a paper towel. Now, I'm going to
add a few patterns in between. See that? Over here, the
pain is still wet. I'm just adding a
few random shapes and lines onto the background. To introduce some more texture. You can do this on a completely
dry background as well. It will still be
really beautiful. I'm just adding a few here. Over there, the
pain has completely dried, but never mind. We can go the wet
press and smudge it. Okay. I'm just adding them on the top in
a very random way. I'm not adding a lot. We can add a few along the bottom part where we have black
in the background. It will look like
those wet mass. This side is nearly done. Now we can add a few patterns
on the other side as well. I think you can clearly
see the difference. The left side has more live, and the right side is looking
quite plain and empty. Go back with some green
paint and add some texture. On this side as, some
places are still a bit wet. The rest has completely
dried up, but that's okay. You can still add your patterns. It will be a
beautiful combination of dry textures
and wet textures. I think it will add a lot of
beauty to your background. It will look more
natural and realistic. Just go ahead and add some highlights and
textures in between. Okay, so that part is done. Now the next step is to add
the waterfall and with that, we'll be done with our painting. To add the waterfall, you will need some
opaque white paint. It can be the white
quash or white ticar. I'm going to squeeze
out some white tcular onto my palette. Just a little. We
don't need a lot. We have already spotted the
location for the waterfall. Now, I'm going to clean
my brush properly, and I'm picking
some white guash. See that? I'm not
adding a lot of water. I want an opaque paint. There is some paper
white in the background, but it is very messy. On the same place, I'm
adding some white guage. It's a dry paint. I'm
not adding much water. When you use a dry paint because
of those grainy texture, it will look like
the water splashing. To create that texture, go with a pain which
is not too watery. Now you can add a few
lines onto either side. It looks like it doesn't
write completely. I think it's a good idea to take a short break. It's
time for a break. Let's all come back when
it has writ completely. Now it has dried completely. I'm picking some
white quash again. Then with that dry paint, I'm adding some lines over here. It's more like a broken line. It doesn't need to be a
thick continuous line. It can have that dry texture and add that in a broken way. Now I need to continue
the line on the top. Over here, I'm making it a bit narrow and towards the bottom, it's a little more wider. Just go the same paint. Don't add a lot of water. To create the texture,
we need a dry paint. Now in a similar way, I'm adding a line on
the other side asper. Now when you're
adding this line, it can be a little away from the waterfall so that we can see the rocky
background in between. That's how it has
turned out. Now I need to fix the bottom part. It looks quite messy. I'm going to add more
paint at the bottom. Pick up some nice white
paint without adding much water and add
that at the bottom. You can simply dab and
apply the paint over here. We need a opaque bright paint here to create that
forming character. Keep on adding the paint. Now if you want to add
some more paint on the top, you could
do that as well. Take a look at your painting, and if you fail,
there is some paint missing anywhere,
just add that in. To me, I think there is some
paint missing on the top. I'm adding that again. Then I'll have to add some
more paint at the bottom. We're nearly done
with our painting. You can see how beautiful
it has turned out. It is only a matter of
adding that white textary paint onto the background
to create the waterfall. Now, there is one more
task we need to do before we wrap it up with just adding some more paint on
either side and extending that
outwards. See that. Just add a line underneath
that rocky background. It can be a broken
line and go with a very little amount
of paint. See that? The line doesn't have
to be too prominent. Add that in a broken
way and go with a dry paint. Do that only once. Don't go over it
again and again. Closer to the waterfall, that line can be a bit more thicker and towards either
end, make it really thin. That's how our painting
has turned out. If you want to add some more
white paint or texture, you could do that right now. I'm actually very happy with
the way it has turned out, but I think I can
add some more paint right where we have
the waterfall. I'm picking a bit
more white paint, and I will add some lines here, right where we have
the waterfall. Okay. Add extra white paint only at the center where
we have the waterfall. Let the other areas stay actous. We don't need a lot of
paint on either end. I think I will add one
more line on either side. There is some leftover
paint on my brush. With that dry paint. I'm
adding a line on either side. How a look at your painting? If you feel you need to add some more white paint,
you could do that. Right now, our paper
is really small, one waterfall is enough. If you're trying out the same
painting on a bigger scale, maybe you can introduce one more waterfall towards
right or the left. Anyway, I'm super happy with
the way it has turned out. I hope you guys love it too. Now let's peel off
the masking tape. All right, so here is our lovely waterfall
and turquoise waters. It's a simple, get a
beautiful painting. We finished this one in
less than 20 minutes. So if you haven't tried it yet, do give it a try and let
me know if you like it.
13. DAY 9 - Purple Evening: Hello, dear friends. Welcome to day nine of painting mini
vertical landscapes. Our painting for the day is a simple yet beautiful
foggy evening. You will only need a few
colors for this painting, and also you can finish this
in less than 20 minutes. Anyway, let's start by looking at the colors
you will need. The first color I'm going
to swatch out is violet. This one is permanent
violet from S. You can go with
any violet you have, or can mix and create
your own violet. That's the first color.
Now, the second color you will need is pink. This one is a nice basal pink. If you don't have pink,
you can add some white to water color with any
of the red pigment. It can be crimson or permanent
rose or any other color. Those are the two colors
I'll be using for the sky, permanent violet
and brilliant pink. Next, you will need
two more colors, which is indico and paints gray. We'll be using these
two colors to paint the meadow and also to
add the final details. First, I will start with Itco
The indico I'm using here, it's from art philosophy. It's a beautiful bluish intco. If you're using indigo
from another brand, it might look a
little different, and that is totally fine. Now, the final color we
have is paints gray. I will use this color to add
some dakotons at the bottom, and also to add those details. I mean, the fu ground elements. That's some rise all the colors you will need for
today's painting. Here's a closer look
of the swatches. We need violet, a Pasal pink, indigo, and paints gray. Okay, so grab all the colors, squeeze them onto a palette,
and keep them ready. All right, my paper
is ready here. Now, before we start, we have to make sure we have all
the colors ready. For the sky, I'm going
to use violet and pink. Then along with that,
you will also need some indico and paints
gray to paint the meadow. Make sure you have all the
colors ready on your palette. When you have them, start by
applying a coat of water, using any of your white brush. Apply a nice general coat of water on to the
entire background. Don't add pools of water. We only need a shiny coat. Okay, so the background
is evenly wet. Now, I'm going to keep
this pressure aside. I'm going to go
with my flat rush. This one is one half
inch flat rush. The first color I'm
going to use is let. I will start with a medium tone, and I'll apply that on
the top of the sky. Then as I'm coming down, I will switch to pink. That's a tonal value, I'm using. Now with a flat brush
or a round brush. Apply that on the
top part of the sky. Go with the similar tonal value. Otherwise, when the
background dries up, the colors will
look really dull. Apply violet on the top part. Now, clean your brush and go the second
color, which is pink. I'm picking pink and I'm adding that from
the horizon line. Then I will go towards the top, Blending violet
and pink together. Okay. So we have a nice
bright pink at the bottom. Now towards the center, we
are blending the colors. Okay, so that's a base layer. We have violet on the top
and pink at the bottom. Now, I'm going to clean my brush and I will pick some more pink. I want the bottom part to
be a bit more brighter. I'm adding some more pink. I think it looks better now. Now into the same background, before it dries, we need
to add some clouds. I'm going to keep
this pressure side, and I'm switching to a Rmrush This one is size number six. To add the clouds, I'm
picking some violet. Go the paint which
is not too watery. If it's watery, dab
it on a paper towel. Before you start
adding the clouds. No, I'm just going to
add some lines onto the sky to create the clouds. I won't be adding a lot. I just need some linear
clouds over here. That's all. I don't want to make the
sky look too dramatic. I will just add one
big cloud over here. That's all. If you want to add more cloud,
you could do that. It's not a problem. It's
totally your choice. Okay. Maybe I will make
it a bit more darker. Whenever you're
adding the clouds, always go the paint,
which is not too watery. If it's do watery, by the time you add the paint
onto the background, it will spread a lot and it will become really difficult to control the
weight of spreading. It's always a good practice to check the water
content of the paint. If it's do watery, dab it on a paper towel
before you start. We can add one tiny cloud here. Okay, that's my sky. There's some water
blooms on the top. I will add some paint there, and then I will start
with the meadow. That's my sky. Now, let's start with the
meadow right away. First, I'm going to mix
some indico and violet together to create
a darker violet. Now using this color, I'm going to add some
landscape in the background. We need a dark of violet and now simply add some shapes over here on that wet background. Okay. See that? Now, continue that
till the other end. Now, just like I said earlier, if you feel your
pain is too watery, dab it on a paper towel
before you start. Otherwise, they
will spread a lot. Looks like mine
is really watery, so I'm dabbing it
on a paper towel, and I'm continuing with
the same exercise. Just have some lines using
the tip of your brush, and then towards the
bottom, just spread it out. Now, clean the brush and with some water,
make it lighter. We have a nice sky and some
trees in the background. Now we are making
it lighter towards the bottom to create
a foggy effect. Looks like my paint
was really watery. I couldn't retain
a lot of pink sky. Anyway, that's how
it has turned out. Now, I'm going to keep
this pressure side, and I'm switching
to a bigger one. This one is size number eight, and I'm picking some into I'm going to add that onto
the entire bottom part. Go the similar tonal value
and close to the horizon, leave a gap. See that? We have some white
space in between where that background trees
and the meadow is meeting. Now towards the bottomost area, you can make the
color more darker. Only along the horizon,
we need to leave a gap. Then for the rest of the area, you can use a darker tone. Now towards the
bottom most area, introducing some paint screen to make it even more darker. Along the top, we have a medium to and
towards the bottom, we have made it really dark. The base layer is ready. Now, I'm going to go back
with my smaller brush. First, I will fix this part. Still there is some
paint missing. I'm not sure if I'll
be able to fix it. Anyway, I'm dropping
in some paint. This happens when the water from the masking tape flows
back into the painting. Usually, I used to wipe it off, but today, I forgot. Anyway, next I'm picking
some taco ton a violet, I'm adding some
trees on the top. Here, the shape is
not really visible. I'm adding that again.
Tick it a proper sheap. Now the background
is starting to dry, so the paint won't float a lot. This way, we can retain a
nice sheap add that again. Using the same color
you prepared earlier. Over here, we can add a bigger tree because
it has spread a lot. This way, we can
cover therapaswll. Those are the trees
in the background. Now, with the same brush, I'm going to add some
textures towards the bottom. Right now, we have just
added intc and paint screen. Let's go ahead and add
some grassy pattern at the bottom to create
some texture. With the same brush, I'm picking some paint scree I'm simply adding some
lines at the bottom. The background is still wet. The lines you're
adding right now wouldn't have a proper
shape, that's totally okay. Our intention is to
create some texture here. It doesn't need to look like a grassy pattern or anything. Simply keep on dragging
a brush towards the top and add some
lines like this. I think I will go
with a smaller brush. This one was size number six. I will switch to my
size number two rush. I've taken some
more paints gray, and I'm adding
those lines again. The only thing you have
to be careful about is to retain that line
in the background. Don't add any lines or any
extra paint over there. Let it stay as it is to
create a foggy effect, that line is really important. That's how it has turned out. Now let's leave it for drying. That is dried completely, and the colors are looking
a little dull than earlier, but that is something with verticular which
you cannot help. Anyway, let's go back
with paint screen, and I'm using the same brush.
This is size number two. Now we're going to add plenty of grassy pattern onto
this background again. Earlier, it was wet. Now we're adding them on a
dried background. This is the only task
left and we have to add a lot of them to create a
dense and thick meadow. Go to any of your smaller brush or any brush with a pointed tip, and then keep on adding these free hand lines to
create that lush meadow. They can be long, curvy,
pointy, add them, however you want,
add them close to each other and make it look
really dense and thick. Okay. Start from the bottom and
then simply track your brush towards the top and create
something delicate lines. I don't know, for some reason, I always start from the right. I think it's sensible
to start from the left and come
towards the right. In a way, we have to
add a lot of them. We still have half
of the area left. I will focus here rather
than how my brain is thinking. Half is done. Now I'm going to continue adding the same patterns
on the left side. Now, let me tell
you these patterns, they don't need to
be super perfect. Simply keep on adding them, add as many as you can. That is what matters. We need to create a dense and
thick texture here. That's all. Don't focus
on each and every line. You can add them in a messy
way. That's not a problem. If you can try to go
with a smaller brush or a detailing brush to get those
lines thin and delicate. That is the only thing
I want to recommend. Rest is totally up to you. You can add them
however you want. Focus more along the
bottom side and make it really dark at the
bottom. I'm nearly done. I have added plenty of lines, but I think the bottom part
can be much more better. I'm picking more paint, and I'm adding more lines
only at the bottom. I want this area
to be really dark. That's how it has turned out. Now, the same paint
and the same brush, I'm going to add a
few longer lines. Add them wherever you feel like. You can extend some of the
lines into the sky. See that. Add them wherever you feel like and add them in any height. Don't make all of
them look the same. Few of them can be long and
few of them can be shot, add them in a very random way. Okay. Once we're done
adding these lines, we need to introduce a
detail onto the top. Let's quickly add these lines. The line I added right
now is a taller one. Go in a similar pattern, make some of them really tall, some of them can be shorter. This way, your painting
will look more interesting. Now, I'm going to add a few
more on the other side, once we are done with that, we can introduce
the final detail. I've added a few longer lines. Now onto the tip, I'm going
to add a tiny detail. It's more like a grain onto
either side of that line. I'm adding a small
detail like a grain. Use any of your smaller brush or a brush with a pointed tip. Now, simply add some tiny shapes on either side of that line. Only on the tip,
here's a closer look. It can be like a tiny leaf. See that? Now, let's add
similar detail onto this one. That's how you have
to add that detail. In between, you can add
some leaves as well. So long pointed leaves. Okay. Now let's continue
with the other ones. We have a few more
lines on the left side. Now onto the tip, I'm going to add that detail. You can call it a grain
or a flower or a leaf. It's a quick and simple detail. You don't need to think much. Just add those tiny shapes onto either side and fill up the tip. It doesn't need to be perfect. At some places, you can leave some extra spacing to make
it look more natural. Now I'm going to add a similar
detail onto this one here. Okay, so go ahead and wherever you want
to add that detail, add them in and finish
off your painting. Oh. In between, I have
added another line. Now onto the tip. I'm going
to introduce that detail, along with that, I will
add a few leaves as well. Some nice curvy leaves. Now, take a look
at your painting. Wherever you feel, there is
some extra gaps in between. You can introduce another line and add that grain on the top, maybe you can just
add some leaves or some grassy pattern,
whatever you like. Take a look at your painting. And if you feel, you need
to fill in those gaps, introduce some more details. Okay, so that's a last task. With that, we'll be done
with this painting. To me, I feel the left
side is quite empty. So I'm going to add some
more lines over there. Okay. Okay, so that's it. With that, we're done with our
painting for the day. It's a simple, yet
a beautiful sunset. I hope you all enjoyed it. To enhance it even more, maybe you can add some
birds on the sky. I'm not going for
any extra detail. Now, I'm going to pick
up the masking tape. All right, so here is our
mini aticor landscape for the T. I hope you all loved
it. It's a quick painting. If you get to try,
do give it a try. And let me know if you liked it.
14. DAY 10 - Misty Forest: Hello, dear friends.
Welcome to day ten. Our painting for the day is
a gorgeous forest scene. The process for this painting is really quick and
very much exciting. We are going to paint the
entire background in one go. We will start with the top, then we will come to the meadow. Then later we will add these
trees onto the background. Even though it is small, it's a painting where you will
learn a lot of techniques. Anyways, let me quickly explain
the colors you will need. Then we can start
with the process. The very first color
you will need is into. We will use different
tonal values of intco for the background. The indico I'm using here
is from art philosophy. You can go with any
indigo you have caught. This one is a bluish indigo. That is the first color. You can see different tonal
values of indico here. Now, the second color you
will need a sap cream. I won't be using
sap cream acids. I want some dull grains for
the metal to create that, I will be mixing some yellow
ocher with sap cream. Let me show you how
to create that. I'm taking some yellow ocher. And with the same brush,
I'm picking some sap cream. Now I will mix them together. See that? That's the color I'll be using for the greenery. It is a simple mix of
yellow ocher and sap cream. Now let me swat it out. There is a very similar color available with Daniel Smith. It's called green cold. If you have that color with
you, you can use it directly. You don't need to mix and
create. That's a first green. Now, you will need
one more green, which has to be a
bit more darker. To create that green.
Instead of yellow ocher, I will be mixing some
burn sa with sap cream. Pick some sap cream first. Then add some burn
cena into that color. This mix will give you a color which is more like olive green. I have mix some burn cena with sap cream here's the
color I've created. Just like I said
earlier, if you have olive green with you,
you can use it directly. You don't need to
mix and create. Okay. Also one more thing, as we're mixing and
creating these colors, the color may vary
a little according to the amount of green and
burn cena you're adding. That is totally fine. It doesn't need to be exactly the same. Those are the two
grains we'll be using. It's a mix of yellow
ocher and screen. The second one is a mix of
sapcreen and burn cena. Now, there's one more
color you will need, which is paints gray to paint the tree and to
add those branches, we will need paints gray. And that is the final color. It's a quick process and you
don't need a lot of colors. It's a beautiful painting, and I'm really excited
to show you the process. Here is a closer look
of all the colors. Over here, I have
shown the color mixes, but you will lay intego, yellow ocher, sap green, burn Cena and paints gray. Keep all the colors ready,
and let's give it a try. So let's start.
We're going to paint the entire background in one
go, as I mentioned earlier. Before you start,
make sure you have all the colors ready
on your palette. I'm hoping you all
have them ready. Now, I'm starting by adding a line a little below
the center of the paper. Go the really light pencil
line. Don't make it too dark. Now this is where we're
going to add our main tree. We only have one
full ground tree. The rest is all in
the background, and this is where I'm
going to place it. You can add a rough sketch now. It doesn't need to be
a well detailed one. We can add all the branches
and everything as we paint. For now, just indicate
the location. That's a sketch. Now we
can get into the process. I'm starting by
applying a coat of water using my 1 " wash brush, apply a nice general
coat of water, don't add a lot and also run your brush multiple times and make sure it's an even coat. Okay. Now, to apply the
paint onto the background, I'm picking a size number eight rush and I'm starting off with a
medium tone of intc. I'm applying that on the top. Say that. Start with
the medium tone, then make it lighter
towards the horizon line. There is something wrong
with the paper. See that. Something is coming off.
Anyway, that's the sky. Now I'll pick a bit more intc and I'll add that at the bottom. We have a medium
tone on the top, a lighter tone at the center. Then again, a little
medium tone at the bottom. Now with the same brush,
I'm going to pick some sap cream and I
will mix that with into. I'm dropping that onto
the top of the paper. This is to create
some texture in the background to make it look like the foliage
of the trees. Simply drop in that paint. It doesn't need to have any
particular shape or pattern. Just keep on adding it. You
can use a dacone on the top, and then a medium tone towards the bottom. I will
add a bit more. I'm just adding some dots
and some small shapes onto the bed background to
create that texture. I'm not thinking a lot. I'm adding that in before the background
dries up. That's all. Okay. Next, I'm picking
a lighter tone. Then I'm going to add a few
more patterns over here. On the top, we have
a darker tone or a medium tone, then
towards the bottom. I'm continuing that pattern with a lighter tone.
That's a background. Next, we can go with the meadow. For that, I'm going to mix some yellow ocher
with sap cream. I don't want to use
that fresh green. That's why I'm adding some
yellow ocher over sap cream. That's a color I've created. Now I'm applying that
onto the background. Maybe we can add some
more yellow ocher. This color is more
like an olive green. If you prefer using a
bright fresh green, instead of yellow ocher, you can add some lemon yellow or any other yellow with green. Now towards the bottom, I want to make the
color more darker. I'm picking some more sap cream. Then I will mix that
with burn cena. There is a color
called green cold, which is more like the
color I use right now. If you have a similar color,
you can use it directly. You don't need to make sap
green and yellow ochre. Anyway, to create
the next color, I'm adding some burn
cena with sap cream. This will give us a much
more darker olive green. I'm going to add that
color at the bottom. See that? Simply dropping that paint onto the
wet background. We need a lighter
tone on the top, and a darker tone at the bottom. Depending on the amount
of brown you're adding, the color will look slightly different, which
is totally okay. It is not going to
affect your painting. Now I simply drop in that paint, add some lines and
some shapes onto the background to make
it even more darker, add some paints gray, and repeat the same
step with that color. I'm adding some here. This
is where we have the tree. Now, I will add a few
towards the bottom as well. It is just some random
shapes and lines. When it dries, it will
leave a beautiful texture. Add in some darker
tunes at the bottom. Also where you are
placing the tree. I think I have added enough. Maybe I can add a few more
small shapes and dots. Okay, that's how the
background has turned out. I'm really happy with
the way it is looking. Now, before it dries, maybe
we can make use of the time, and we can add some more
textures using a smaller brush. I'm going to go with a size
number six round brush, picking some paint screen and
adding that at the bottom. I'm adding a few grassy lines right where we have
these taker toons. They are not well detailed
and properly shaped. Just add a few like that to
create some more texture. We could add a bit more right
where we have the tree. I want this area to be darker. When we have a darker
tone over here, we can skip adding a lot
of details onto the tree, especially the roads, and
that is the reason why I'm very particular about adding some taker toes over here. Anyway, that's how
it has turned out. I feel like adding some
more taker toes on the top looks like my
background is still wet. I'm going back with a mix
of indico and sub cream, I will add a few more patterns
here using a taco tone. This one is completely optional. Only if your background
is still wet, add a few patterns, otherwise, leave
it the way it is. I'm focusing only
on the top line, which is closer to
the masking tape. The rest, I will leave
acts. That's it. I don't want to
overdo and row in it. Initially, I had a different
plan for this painting. But when I did a trial, it came out really beautiful. It's just a matter of adding those paint onto
the wet background. Next, we will add some
tree sand elements in the foreground
when this has dried. Let's take a short
break and come back when the background
has dried completely. The background is
ready. Now we're coming to the best part
about this painting. With this adding the trees with those trees
in the background, the entire painting is
going to look so stunning. Are you ready? All
right. Let's start. The first color I'm
going to pick is indigo. I don't want the indigo
to be too bluish, so I will add a little of
paints gray along with that. Now let's add some more water because we have to
start with a lighter to the paint is ready. Now, you would also
need a paper towel or a facial tissue. I would recommend going
with a facial tissue as it is much more softer. Okay. Now I'm picking the paint, and I'm going to add the
first ray over here. That's a tonal value
you have to CV. Now with a facial tissue, I'm just dabbing off bottom. See that. You can see how easily I created
a foggy effect there. Now let's go with
the second tree. I'm picking the same paint. It's a mix of indico and
a bit of paints gray. The second tree, going
for a different shape. Now going back with
a paper towel. I'm gently dabbing it off at the bottom. Let's do that again. Okay. Be very gentle and dab it off. We can see the beautiful
effect we have created here. In a similar way,
we're going to do the same thing for all the other trees
we're going to add. Next, I will add one over here. This one is a bit more
darker than the other one. Now let's tap off some paint. See that. At some places, you can
use a lighter tone. Then at some places you
can go for a medium tone. But for all the
trees you're adding, lift off some paint
at the bottom, using a paper towel
or a facial tissue. You have to do this right away after you have
applied the paint. Otherwise, it won't come off. I've added four trees so far. We can add a lot more. Next one, I will add
on the left over here. See that? Go for an irregular shape to make
it look more natural. It can be slightly
curvy or slanting or whichever shape you want to go with adder
tree in that way, then dub it off using a paper towel and create
that foggy effect. Now, let's add another one. Maybe let's go for a darker
to. That's the next tree. It's slightly darker
than the previous trees. Now towards the bottom, I will add some water and
I will make it lighter. Then we can go the paper
towel and lift off the paint, towards the top, we can continue the shape
with a metium tone. That. This is another way. If you're using a darker tone, you can make it lighter
using some water. Now in a similar way, let's add one more tree using
that medium to. The color I'm using
here is the same one. It's a mix of paints
gray and indico. But this time, I haven't
added much water. I'm about to reach the bottom, so I'm picking some water. With that, I'm making
this part lighter now with a paper towel,
I'm dabbing it off. Now, let's continue with a tree. We can add some more branches to make it look
more interesting. Okay. That's a way how you
create that fog effect. You can add in as many
trees as you want, but repeat the same step. Wherever you want to
create that fog effect, take a paper towel or a facial tissue and
dab off some paint. That's how it has turned out. Now we have one fogrom tree. That's what I'm
going to paint next. I'm going to go
with the same mixer of paints gray and indico. This time, the color
is a bit more darker. I haven't added any
tree over here, so I don't need to wait
for the background to try. If you have added any tree on the same area where you're going to add
the fo ground tree, you will have to wait for
your background to try. Towards the bottom, I have
added an irregular line. And with the paper towel, I'm lifting off some paint. I have added the tree right where I have the darker tone in the background to hide the
root and all the details. Now with the same color, I'm
going to continue the tree. The brush I'm using here
is size number six. Go with any of your
medium size brush. Don't go for a larger brush. Now, let's add a beautiful tree. Go with an irregular shape to
make it look more natural. We only have one tree
in the foreground. Make it as beautiful
as possible. Now I'm going to extend this
branch towards the top. Okay. See that? The color is again a mix
of indico and paints gray. We started off with
a lighter tone. Then we used a medium tone. Right now, the
color is a bit more darker than the previous
colors we used. That's a basic
shape of the tree. Now with the same brush, I'm going to pick a
darker tone of pins gray. Then I'm going to drop in
some random shapes and dots onto the tree.
While it is wet. See that? At some places, you can add a line. At some places, you can just add a dot or an irrecular shape. Now this will nicely spread
into the background, creating a texture on the tree. If it's de water, dab
it on a paper towel, and then add these
lines and patterns. See that? Add in your tree and while the
background is still wet, add in some lines or some
shapes onto that background. It doesn't need to have
any particular shape or size or anything. Simply add those shapes
onto the wet layer. The bottom most area
looks a little weird. I'm going to dab off some paint. When we did the base layer, we added some
dakotuns over here. This was mainly to
cover the root, so we don't need to add
a lot of details here. I'm just adding some more paint, then I will dab it off with a paper towel to retain
that foggy effect. That's how it has turned out. I'm pretty happy with it. The foreground tree is
looking really beautiful. Now with the same brush, I'm going to add some
branches onto this. Now there are chances, your
background is still wet, you'll have to
wait for some time before you add the branches. Otherwise, they may spread into each other and we'll
create a mess. Mine has dried. I think I can
proceed with the branches. The color I'm using
here is paints gray, and this precious
size number six. It has got a really
nice pointed tip. I will add some taco toes first. Then from those taco toes I'm
going to add some branches. Okay. I will start from here. Go with some nice long
irregular branches. Add as many as you want. That's a long one. Now we
can add some more branches. Add them in any direction
is totally your choice. You're ready to follow the exact same way how I'm adding it. Ignore that and add
it as you'd like. Now we'll add a few on the top. We could add one here. Okay. Now let's add another
one over here. To make your painting
look really interesting, add the branches in different
directions and shapes. Next, I'm adding one here. This can be a broken branch. I'm not going to
show it entirely. Now I'm going to go ahead
and add a few more branches. You can add them wherever you
like and however you like. All right. So with that,
we're done with our painting. I really liked the color palette and the mood of this painting. The te process was really quick, and I hope you all
enjoyed it too. Anyway, now it's time to
peel off the masking tape. And here's our car media
landscape for the day. Look at those details
and the texture. Beautiful right. If you
are here to try it, you know what to
do, give it a try, and I'll let you know if
you liked it. All right. So thank you so
much for joining, and I will be back
here soon with our next mini landscape.
15. DAY 11 - Hillside Cabin: Hello, dear friends.
Welcome to day 11. Today, we're going to
paint a hillside cabin. It's a cute little
green landscape. I love this painting, and it is one of my favorite
from the te collection. Anyway, as usual, let's start by looking at the
colors we will need. For the sky, I will be
using cerlian blue. I'll use a really light
tone of cerlian blue. You can go with any
blue you have caught. You can barely see
any color on the sky. Go with a similar tonal value. It can be Kobal blue, Prussian blue, turquoise blue, or any blue of your choice.
That's the first color. Next, I'll talk
about the greens. For this painting, you will need three different types of greens, a lighter green, a medium
green, and a darker cream. The light green is made by mixing sap cream
and lemon yellow. If you have a similar color, you can use it
directly or simply mix some lemon yellow with sap cream to create a lighter green. Now the second color you will
need is obviously scream. That is our medium green. All the colors I have
swashed out so far, cellin blue, lemon
yellow, and sap cream. Those three are from Shinhan. You can go with any
brand. It doesn't matter. Now, to make the green darker, I will be adding some
paints gray with sap cream. That is our next color. For the middle, mostly we will use light green and sap cream. Only towards the
bottom over here, we will introduce
some darker green. That's going to be a mix of
paints gray and sap green. Now, there are two more
colors you will need. One adico For the mountain, we will go with a
combination of indico, sap cream and paint scream. On the top, we have Itco
and towards the bottom, I have used more of Daco cream. Indigo is our next color. You can actually
use a lighter tone of indico for the sky. You don't need to
squeeze out a new blue. I had some leftover
paint on my palette. I don't really realize
using Indico for the sky, but that is one option. Now, there is one more
color you will need. Over is brown, and
that is for the cabin. The one I'm using here is permanent brown from
art philosophy. You can use brown or burn sana, or even crimson or
any darker orange. Compared to the other
paintings we have done so far. I think today we have
some more extra colors, but the painting is
not that complex. It's a simple one
and a beautiful. Here is the colors
you will need for today's hillside cabin.
Here's a closer look. You will need Colan
blue, lemon yellow, sapuen, paints gray,
indigo, and brown. Keep all the colors ready on your palette, and
let's give it a try. Let's start by
adding the sketch. We need to add a mountain
and also a cabin far away. First, I will add
an irregular line showing the meadow part. It can be a simple irregular
line, sloping to one side. Add it almost at the center. Now, let's add the cabin. I'm adding that
right at the center. Start with the roof. I'm
adding a very simple cabin. If you want to add some more
details, you could do that. This one is a super
simple cabin. Now I'm going to add
the roof here. Okay. I'm changing the shape a little. Now I will add the
remaining lines and I will finish it off. Be a little mindful
about the size. Don't make it two pi. Go with a similar size or
make it even smaller. Otherwise, you won't
get that sense of distance in your painting. That's the only thing you
have to be careful about. Other than that, it's
a very simple shape. Now let's add the doors and the window openings, one there. Now we can add one or two doors. The cabin is ready. Now we
need to add the mountain. I'm going for a huge
mountain and I'm adding that over here. That's
the highest point. Now, I'm bringing that down. You don't need to finish off the shape towards
the right side. We use a lighter tone, so we can just leave
that line as it is. The remaining details
we can add as we paint. That's a sketch. We
have a mountain, a huge mountain,
and a tiny cabin. Now let's start with the sky. First I'm cleaning my brush, and I'm going to
go with a really light tone of cerlian blue. You can use any blue
of your choice, go with your brush
or a flat brush, and pick a lighter tone
on your brush. Okay. I don't have enough
paint on my palette, but I think this
would be enough. Now gently apply
that onto the sky. When I'm applying the paint, I will leave a cap
along the meadow line. I won't be touching that area. This way, we don't need to
wait for the sky to dry. We can start with the
meadow right away. I feel the color is
not really visible. We'll have to add some
more blue onto the top. Just a little. I'm adding
that onto the top again. All right. That's a sky. We have a medium tone or a
lighter tone on the top. Then towards the bottom,
we have made it even more lighter. Now
I'll let this dry. In the meantime,
we can start with the meadow to paint the meadow, I will need some sap cream, as well as lemon yellow. Let me take out the colors. We'll have to turn our
green into a lighter green. We will mix some lemon
yellow with sap cream. If you have a lighter cream with you already, you can
use it directly. I have sap cream, lemon yellow, and some pins gray
on my palette. Those are the three colors you will need for the next step. Now using my fie
number eight rush. I'm picking some lemon yellow. Now, along with that, I will add some sap cream to
create a lighter green. That's a color I'll
be starting with. Here's a closer look of
the color I've created. It's a mix of sap green
and lemon yellow. Now we'll apply this color on
the top line of the meadow. Then gradually
towards the bottom, we'll make the color
more darker by adding sap green
and paints gray. If you feel your color
is not light enough, you can add some
more lemon yellow, and then make it lighter. We need a fresh green. Now carefully add that
along the top line. It's a beautiful light green, but there are similar colors readily available in the market. If you have any of them,
just use it directly. I have a color called
leaf green from Shen. That one is very
similar to this. Anyway, that is the top part. Next, with the same rush, I'm going to pick
some sap green, and I will add that
at the bottom. Go the nice bright tone and apply that along
the bottom part. On the top, we
have a nice bright cream and towards the bottom, we're adding a medium cream. Now to make it even
more attractive, we need to introduce more darker tones onto the background, especially at the bottom. But before adding
those darker tones, I will add some lines onto the background, while
it is still wet. You can use the same
green you created earlier and simply add some lines
onto the background. See that? Otherwise,
your background will look plain and empty. This way, we're
creating some texture and some life to the background. Okay. When you're painting a
meadow or a simple greenery, it is very important to create those textures
in the background. Otherwise, it will
look plain and boring. Simply add some lines onto the background, while
it is still wet. They can be some
simple random lines. It doesn't need to have any
particular size or thickness. Over here, I'm adding them in a sloping way and I have added them onto the
wet background. This way, I can smudge it and I can give
it a smooer look. Now it's time to introduce the dacotons I'm picking some
paints gray and sap cream, I'm adding that
mix at the bottom. Okay. See that along the top, we're going to retain
those lighter tones, and only towards the bottom, we're going to introduce
some taco toes to create a contrast. I'm happy with the taco toes. I don't want to introduce a lot. I will quickly Much
these lines into the background to give it
a softer and smooer look. That looks good
to me. Now, there is one more task we have to do. I'm going to keep this pressure aside I'm going to go
with a smaller brush. This one is size number two. Now with this brush,
I'm going to add a few grassy patterns onto the background,
while it is still wet. I've taken some sap cream. Now, I'm adding some teeny tiny lines onto the background. See that? Don't make it too big. We don't need those
long curvey lines. We just need some teeny
tiny lines today. Usually for all
the other meadow, I think I have gone in
with long curvey lines. But today, we don't
need those long lines, make it as small as possible. Also, we don't need
a lot of lines, we only need a little and be very careful about
the tonal value, especially when
you're adding them on the top, go with a lighter tone. I'm not going to add a
lot towards the top. I will focus mostly
at the bottom. Go the similar tonal value. When you're adding them
on a lighter background, towards the bottom, the color
can be a bit more darker. That's it. I'm not going to
add any more towards the top. Now, I will add a few
more towards the bottom. Then with that, we'll
be done with a meto. This is just to add some texture and life to the background. Otherwise, it will
look quite plain. Yeah, just add a few lines here and there, mostly at the bottom. When you add them on
a wet background, they won't be too prominent. It will look really
smooth and subtle. That's how it has turned out. Now the next step is to
paint the mountains, but before that, we'll have to wait for this
to writ completely. Okay, so the meadow
has dried completely, and now we can start
with the mountain. For the mountain, the first
color you will need is tic. Then you will need
some Sap cream. Those are the two
colors you will need. First, take out these
two colors onto your palette and
keep them ready. Now, the brush I'm using
here is size number eight. I'm starting by picking
a medium tone off into. Now, let's add that on the
top part of the mountain. That's the kind of tonal value I'm going with.
It's not too dark. As we used lighter
tunes for the sky, the sketch is still visible, so we can apply a medium tone of indico following that sketch. Start with a medium to.
That seems a bit dark. Go the similar tonal value and apply that on the upper
half of the mountain. Okay. Now towards the right, we can make the color
slightly lighter. Pick some water, and then
make the side lighter. We have a medium
tone on the tip of the mountain and towards the right, it is
slightly lighter. Now with the same brush, I'm
going to pick some scream, and I will mix that with indigo. See that? That's a
color I have created. It's a mix of sacrene and tic. Now, I'm adding that towards the bottom part of the mountain. Simply add that color
on the remaining area. It doesn't need to be a
clean blend or anything. We're trying to
create some texture here, simply add that in. Now, just like we did
earlier, towards the right, we are going to make the
color lighter over here, use a lighter tone
towards the right. Now carefully add that
color around the cabin. Follow that outline
and fill it up. The side is done. Similarly, we need to finish off
the other side. Once you have apply the paint, keep smudging it into
each other. See that? Now, I'm picking a
slightly darker tone of indico and onto this
wet background. I'm adding some lines. Introduce a few lines in
between to create some kind of texture and shadows on
the mountain. See that? Add that only on the top, towards the bottom, you
don't need to add much. Now smudge it and blend
that into the background. Now towards the bottomost area, I'm going to introduce
much more darker tone, especially onto the
left. See that? It's a mix of sapcreen
and intco Now just add some lines and some shapes to make it look like there
are some trees over there. For the top part
of the mountain, we used a medium tone of indico. Then towards the center, we used a mix of sapcreen and intc. Now we're using the same color in a much more darker value. Now, let's carefully apply
that around the cabin. I'm really loving the
colors and textures. Let's quickly fill this part. And then maybe we can add some more trees on the
other side as well. Otherwise, it will look
like two different places. Let me finish this part. Then maybe using a lighter tone. We can add some trees
on the other side as well. All right. I have added the deeper tones. Now I'm picking some water. Now, I will make it lighter and I will smudge it
into the background, especially onto the right. See that? Over here, I'm using a medium tone. It's the same mix. I have
to stdded some water. Okay. Let's add that towards
the bottom most area. Picking some more water
and I'm smudging it. It doesn't need to
be a clean blend. You can simply
smudge the colors. Otherwise, they will look
like different patches. Go with the damp rush and smudge that into
the background. Be very gentle. Don't
put a lot of pressure. That's how it has turned out. There's a lot of gaps in
between, I will fill it up. Now, I think we can add
in some more trees. First, I will add a
few on the right side. It is the same color
mix of sap cream and Itkow I'm adding a few
trees along the bottom. It is just some lines which are adding close to each other. Go the similar tonal value. When you're adding trees on the right side, don't
make it too dark. Now, fill in that line. Now I will add a few behind
the cabin over here, and then I will go the taco
Now with the same press, I'm going to pick
some taco tune. I will just pick Itko as it is. Then I will add few trees
into the background. You simply need to
add some lines onto that wet background to make it look like there
are some trees over there. They don't need to
be perfectly shaped, simply add them onto
the wet background. That's how it has turned out.
Now, I'm going to go with a smaller brush and I'm going to add few more trees using
a taco tone of indico. Simply add some lines
onto the background. See that? It doesn't
need to be perfect. It is just some random
lines, nothing much. We could add a few on
the other side as well. And that's it. So that is our mountain and the
trees in the background. Now, the only thing left
is to paint the cabin. But before that, we'll have
to wait for this to try. Now, let's go the last step. Which is cleaning the cabin. The first color I'm going
to go with is brown. If you have brown, go
with the medium tone of brown or can go with burn sina use a medium to first and apply that onto
this side of the cabin. Go with the medium
tone. It could be either brown or burn sa. You don't need to worry about
those doors and windows. We will add them at the end. For now, simply add a solid wash of brown onto that entire wall. Next, we can add some
deeper tones and shadows. For that, I'm going to pick
a little of paints gray, and I will add that with
brown to create a dakotne. It doesn't need to be too dark, add a tiny drop of paints gray. Now add that long roof
line to show the shadows. Next, I'm creating a
much more dakotne of brown by mixing some paints
gray and brown together. I'm going to add that
onto the other side. For me, the other side
has almost dried up. I'm going to go right away. If your painting is still wet, maybe you can take a break and add the paint once it
has dried completely. You said taco to and add some
paint underneath the roof. Once you have added the taco
brush and pick some brown. Go to the metimt again and add that onto
the remaining area. We started off with a Daco to. Now we're making it
lighter using some brown. Just like I said earlier,
if you don't have brown, go with burn scena to create a dakot you can simply add
some paint screen to it. Or if you have burnt umber,
you can use it directly. Now the next task
left is to paint the roof and also to add
the windows and doors. But before that, we'll have
to wait for this to dry. Now, let's start with the roof. I'm use a lighter
tone of paints gray. I'm adding some water
and a tiny bit of paints gray. I'm creating a lighter to. Now, let's paint
that entire roof and a lighter tone of pain gray. Go the similar tonal value. Don't make it too dark. Now fill in that entire roof. Now I'm picking some
more paint a slightly darker and I will add
that to the right side. Only on this side, I'm introducing some
textures and shadows, using a slightly darker to. For now, I think
that looks fine. Maybe we can add some
more textures at the end. For now, I'm going to go
back with pin screen, and I'm going to add
the doors and windows. Besides just some
tiny rectangles. Go with any of
your smaller brush or a bridge with a pointed tip. The one I'm using
here is size number six. That's a window. Now we have two doors.
That's the first one. Here's the second
one. All right. We have the doors
and windows in. Now with the same paint,
I'm fixing this corner. The shape wasn't
proper. That's a cabin. Now we need to add the
final textures on the roof. The base layer has
almost right up. The same rush, I'm adding a few lines onto the
extreme right side. Just a few lines using a
medium tone of pain scream. Now I'm going to dip my
brush in some water. Then I will tap it
on a paper towel. With the damp sh, I'm
gently smudging it. I want those patterns
to be there. I don't want to get rid of it. Here's a closer look. Now
before we wrap it up, there is one last thing to do. Which is fixing the roof line. For that, I'm going
to go with a mix of white guash and a
bit of dark brown. First, I will fix this part. The shape wasn't proper. Now I will add the roof
line on the other side. It is just a straight line. I had some leftover white
gash on my palette. It has completely dried up. It's not a freshly
squeezed paint. See that? I simply mixed it with brown, that's the color I'm
using right now. I'm not using white actus because it will
be too prominent. Simply add some brown
into white gas or white verticl then add of line. That's it. That's our
painting for the day. I hope you all enjoyed the
process and loved the result. Now it's time to pick
off the masking tape. And here is our gorgeous
hillside cabin. You can see how beautiful
those colors have turned out. I hope you all had fun painting this gorgeous
mini landscape. Thank you so much
for joining me. I'll be back here soon with
our next mini landscape.
16. DAY 12 - Cotton Candy Sky: Oh. Hello, dear friends. Our painting for the day
is a quick aticar sky. It's a beautiful
color combination, and the best part is that, you can do this in
less than 10 minutes. Now let's quickly take
a look at the colors, and then we can start
with the painting. For the sky, you will
need three colors, two colors for the base layer, and another color
to add the clouds. For the base layer, I will
use pink and turquoise blue, and to add the clouds,
I will use violet. This one is a patel pink. If you don't have patel pink, you can add some
white aticor with rose or crimson or red color. Or can simply go with a lighter
tone of crimson or rose. The second color you will
need is turquoise blue. We'll start with turquoise blue. We'll apply that on the top, we will use a medium tone. Then towards the bottom,
we will use pink. The base layer is a blind
of turquoise blue and pink. Now onto that to add the
clouds, I'll be using violet. I won't be using violet acts. I'll mix that violet with pink
to create a pastel purple. This one is permanent
violet from Shinin. You can try and experiment
different colors. It doesn't need to
be exactly the same. Also you can use violet acts. You don't need to
mix pink with that. Te are the three colors I
will be using for the sky, pink, T requires
blue and violet. Now we need two more
colors for the mountains. The first one is Indigo. I'll be using this color for
the background mountain. We'll add a basic
shape of the mountain, using a medium tone of intco. Then using a taker tone, we will add some
textures onto that. Now coming to the last
color, that is paincray. We'll use a darker tone of paint scray for the
foc round mountain. That is a final
color you will need. If you have any of the colors that I'm using
here, don't worry. Try and experiment
the same sky with any other color combination
of your choice. For example, instead
of turquoise blue, you can go with any other blue
and maybe instead of pink, you can use a
lighter on a violet. That summarize the colors you will need for
today's painting. Here is a closer look
of all the swatches. You will need a patel pink, turquoise blue and
violet for the sky. Then for the mountains, you will need indico and paints gray. Keep all the colors ready on your palette and
let's give it a try. Okay, so let's start
with the base layer. I'm hoping you guys have the colors ready on your palette. We need a basal pink, turquoise blue, and some violet. These are the three colors
we will need for the sky. Okay, so let's start
with the base layer. To apply the paint, I
will use a flat brush. But before that, I will
apply a coat of water. Using my 1 " wash bh. Don't apply a. Just
a nice general coat of water is all we need. And run your brush
multiple times in all directions to make sure
the coat of water is even. All right. My background
is evenly wet. Now I'm going to keep
this brush aside, and I will switch
to a flat brush. You can use a flat
brush or a round rush. Both the brushes will work. Before you start, make
sure your brush is clean. Now, first pick a metium
tone of turquoise blue, and apply that on
the top of the sky. Go with a medium tone, don't
make it too light. See that? That's the tonal
value I'm going with. Now we can apply this
almost half of the sky. That is turquoise blue. Now I'm cleaning my brush, and I'm picking some pink. This one is a patel pink. If you don't have a Pasal pink, there are two things you can do. You can either add some
white vertcar with crimson or any sort of rose, or you can simply use
a lighter tone of rose or crimson
without adding white. Now I'm going to
blend these colors. We have some turquoise blue on the top and pink at the bottom. Okay, that's a base layer. Pink and turquoise blue is a
beautiful color combination. Now we can start
adding the clouds. I'm keeping this pressure aside, and I'm switching to a
smaller round brush. This one is size number six. Now, to add the clouds, I'm going to go for a
mix of violet and pink. I want a color that is not too dark and also has some
basil touch to it. That's why I'm mixing
these two colors together. See that. You can add
a bit more violet. That looks really nice. Now, you seeing this
color, I'm going to add the clouds onto
this wet background. You can add it however you like. It's going to turn out
really beautiful at the end. You can add the clouds
however you like. Now I'm adding them on
the blue background. While leaving some
cap in between, so we can see that blue color
in between those clouds. Add them while the
background is still wet. Don't wait for a longer time. Now if you want to add some
more, you could do that. When you're painting
a cloudy sky, there are a few things
you have to keep in mind. The first thing
is the wetness of the paint you're using
to add the clouds. If it's too watery,
they will spread a lot and they won't
have any shape. If you feel your
paint is to water, dab your brush on a paper towel before you add the clouds. This way, they will stay in
shape. It won't spread a lot. The same way, be very careful about the wetness
of your background. If it's too watery
and if it's too wet, wait for a few minutes, maybe like a minute or two, and then add the clouds
when the water is settled. That's how my sky
has turned out. I'm really happy with the
colors and the clouds. Painting a cloudy sky is all about choosing
the right colors. Go with some beautiful
color combination and add the clouds while the
background is still wet. Now let's leave it for drying. Oh. So that is
dried beautifully. Now to enhance the sky, we're going to introduce some elements onto
the background. First, we will add a
background mountain, then we will introduce another mountain in the foreground. For the first mountain, I'm
going to go with indico. I will pick a medium tone with my size number
six tone brush. Now I will add a simple shape first, then I will fill it up. Prepare a medium tone of indico and add a
simple mountain line. If you want to start
with the pencil sketch, you could do that, or I can right away,
go with your brush. Add a mountain a little
towards the bottom. That's the shape I'm going with. Now I'm going to fill it up
with the same tonal value. I'm not making it
lighter or anything. We can use the same
tonal value and simply fill that entire bottom
area. Quickly fill it up. We have to introduce
some texture onto this before it dries. That is the base layer. If you want to modify the
shape, you could do that. Give it a nice irregular shape on the top to make it look more natural. That's the base layer. Now with the same brush, I'm going to pick a
slightly darker tone of indico to introduce
some texture. We will be adding
them only on the top. Now, simply drop in that darker
tone onto the background. See that. Simply add some
lines or some small shapes, mostly on the top
part of the mountain. Don't add a lot. We
only need a few lines. Looks like the paint
was too watery. I'm dabbing it on a paper towel, and I'm adding a few more
lines in a sloping way. Don't add a lot of lines. The major color still has
to be that medium tone. Just add a few lines in
between and that's it. That's our fork ground mountain. Now we have to wait
for this to dry before introducing
the second mountain. That is right and you can see those beautiful textures
we have achieved here. Next, we can introduce
the foc mountain. For that, I'm going to
go with paint scray. I'll use a darker
tone of paint scray. Just like we did earlier, you can start with
a mountain line, add a line first, then you
can simply fill it up. You can start with
a pencil sketch or you can directly
co with your brush. I'm thinking of going
for a lower profile on the left and towards the
right, I will make it higher. You can go with any
shape that you prefer. It doesn't need to
be exactly the same. On the right, I'm making it a bit more higher
over the side. We have used indigo for
the background mountain, and right now we're
using paints gray. It's more like black. I'm using a really taco tone. You can make it
slightly irregular. I mean the line,
the mountain line, to give it a more natural feel. Then once you have decided on the sheep, you can fill it up. The sky is looking
really beautiful now. Earlier without any
landscape elements, it was looking quite plain. But now when we introduce the Bro mountain and
the Fucran Mountain, it looks a lot more enhanced, and that contrast is
really beautiful. To make it more attractive, if you want to add a group
of birds, you could do that. Okay, so those are our mountains and the
gorgeous cotton candy sky. It was a really quick, yet a gorgeous painting. It took only less
than 10 minutes to finish this tire painting. Now, before we peel
off the masking tape, we'll have to wait
for this to dry. All right, so here we are. The painting has
dried beautifully. Now let's peel off
the masking tape. I'm a huge fan of painting
quick aticla as skies. I think this one has turned
out really beautiful, considering the time we have
used for this painting. The only thing I'm not happy here is that paint
at the bottom. I'm going to take out some white gas and I will fill it up. This way, I can be 100%
happy about this painting. I'll quickly fill this up. I hope you all had a great time painting this gorgeous
cotton candy sky. It's a beautiful
color combination. So give it a try either with the same color combination or a different color
combination of your choice. To be honest, painting
skies is not a big task. You just need to know when
to drop in those clouds. Your background has to be still wet when you're
adding these clouds. So yeah, all you need is a good quality watercolor
paper, Hans in practice.
17. DAY 13 - Golden Sunset: Hello, my lovely friends. Welcome to day 13. Our painting for the day is
a gorgeous golden sunset. It's a quick and easy one, and you wouldn't require
a lot of colors. The first color
you will need for this painting is a
yellowish orange. The one I'm going to use
is mum yellow orange. Go with any yellowish
orange you have caught. The second one is
brilliant orange. It's a much more brighter
orange, more like vermion. Then you will need brown, and also some paints gray. We need all these four
colors for the base layer. For the top part of the sky, we will use that
yellowish orange. Then we will switch
to brilliant orange, which is a much more
brighter orange than this. That's as color. If you don't have
a similar color, you can just add some vermin into any of the yellow
you have caught. The color can be
slightly different. We just need a yellowish orange. You can also use permanent yellow orange if you
have that shade. Now the second one
is brilliant orange. Instead of this color,
you can also use vermin or any other bright and bold
orange you have caught. That's our second color.
Now, towards the bottom, we're going to introduce
more darker tones. For that, you will need
brown or burn Cena, and also some paint screen. Those are the next two
colors we will need. I will be using permanent brown. This one is from art philosophy
as a beautiful brown. That's a third color. Now the
final color is paints gray. We'll be using paint scree to add the deeper tones
at the bottom, and also for the final details. Okay, so that summarize all the colors you
will need for this. Beautiful golden hour. You will need a
yellowish orange. Then another bold
and bright orange. Then for the deeper tones, you will need down
and paint screen. Here is a closer look
of all the spatches. It's a really quick artwork
and you can finish this in less than 15 minutes.
Let's give it a try. Alright, so I have my paper
and the colors ready here. I hope you have them ready, too. So once you have them ready, you can start by
applying a coat of water onto the entire paper. Just be sure your brushes. Now dip that in clean water and apply a nice onto the paper. So my paper is evenly wet. Now to apply the
paint, I'm going to go with a medium
sized brown brush. I think I will go
with size number six. Before you start, make
sure your brush is clean, dab it on a paper towel, and make sure there is
no leftover paint on it. Now the first color
I'm going to start with is mum yellow orange. I'm picking some
paint on my brush. Then I'm going to add a circle
on the on the wet paper. When you add the circle,
the color will start spreading as the
background is wet. That's totally okay. I will start with
the bigger circle. The white part we are
leaving right now is the sun and we need
to retain some of it. If your paint is too watery,
dab it on a paper towel. Otherwise, it will spread a lot. Now if you couldn't
retain any of the paper white,
that's totally fine. Because if you have a lot of
water on your background. Also if your paint is watery, the colors will spread a lot, and it will be very difficult to control the way is spreading. Right now, I have got a
circle at the center. But then there is no guarantee that it
will stay hazardous. It will start spreading. By the time I finish the sky, maybe only a little
will be left, which is totally fine, we can fix it with some white paint. Now around that circle, I have added that
yellowish orange and you can see how that
circle is reducing its size. No mind, we will fix it. I'm adding more
paint on the top. So far, I have only
used yellowish orange. Now gradually, I will go with a darker orange and I will
add that towards the bottom. Now there is one trick you
can do which is grabbing a paper towel and gently picking up some paint from the background to
retain the circle. See that. Now I'm going to
go with brilliant orange, and I'm adding that over here. So we have a medium
yellowish orange on the top, now towards the bottom, and also a little
around the sun. We're going to add a much
more brighter orange. So keep dragging your brush from either side
towards the center. In a very gentle way, don't add a lot of paint. We need a smooth
glowing background. I barely have a sun there. I'm using my paper towel I can. I'm trying to lift
off some paint. I don't want to mess up the sky, so I'm being very gentle. I think I have somehow
got the sun back. If you couldn't retain any of the paper white,
that's totally fine. We can fix it with
some white gash. Next, I'm going to
go with some brown, and I'm adding that
towards the bottom. You can see how the
colors are looking more intense when we
introduced brown. Let's add that onto
the entire area. And then we can gradually
add some paints gray to make it more
darker at the bottom. That is yellowish orange, brilliant orange, and brown. Now with the same brush, I'm going to pick
some paints gray. And I will add that at
the bottom most area. You can see how beautiful the
background is turning out. We started out with
a lighter tune, then we vented with
a metium tone, and now the colors
are much darker. I'm going to add some
more taker tunes. I feel the darker
tone isn't enough. I'm introducing some more
brown and paints gray at the bottom. That looks fine. Now with the same
brush, I'm going to add some grassy lines
onto the background. First, we can make use of the paint in the
background itself. You don't need to
pick any new paint. Now if there isn't enough
paint on your brush, you can pick some
paint obviously. I'm using a darker toon
of brown here. See that. Now, I'm just adding
some lines onto the tip. See that. Just go for some nice curvy lines and add
them on a wet background. It's been almost
like 5 minutes or a bit more since we have
painted the background. The water content in the
background might have settled, so it won't spread a lot. Keep on adding them from
the bottom into the sky. For now, don't add any lines onto the sun, leave it act is. No matter what the shape is. Mine is looking quite weird,
which is really fine. We can come back with a
white ash and fix it. So I'm not really
worried about that. Keep on adding some lines
onto the background without disturbing the sun or that area where you
want to add the sun in. You can see the kind
of lines I'm adding. It's more like that pampas, grass or foxtail plants. Add a few simple lines first. Then onto the tip, you can
add a few more extra lines. Here is how it has turned out. We can add a few
more. The only color I have used so far is
a Daco done of brown, which is a mix of
paints gray and brown. And I'm simply adding some
lines onto the background. Some of them curves, some of the matins,
some of them match. So I'm not really thinking much. I'm simply adding
some lines onto the background while
it is still wet. Next, I'm going to repeat the same step with
some pins gray. See that? It is again, some simple lines, more like
some grassy curvy lines. You can simply start
from the bottom and drag your brush towards the top and add these lines
wherever you want to. You can see how beautiful it has turned out compared
to the other side. In a similar way, we have
to add some lines on the other side as well to
bring in that contrast. I'm going to pick more paint, and I will add some lines from the bottom towards
the top. See that. Simply dry your brush
and add these lines, your background might
be still a little wet, so they will have a blurry look, and that is exactly
what we need. You can take a few lines into the sky to make it
look more interesting, and in between, you
can add some leaves asper. That's how
it has turned out. If you're happy with the result, you can call it done or to make it more
intense and tense. You can add a few more lines only at the bottom
using a taco toon. Okay, so that is it. I'm
really happy with the result. The only thing I'm not really
happy with is the sun. So what I'm going to do is, I will take out
some white quash, and I will give it
a proper shape. So first, clean your brush thoroughly and make sure there's no left
over paint on it. Then go with some white
quash or white watercolor. And then add that circle back. Give it a proper shape. Honestly, when I started, I thought I could retain it. I wouldn't need to go with
white gah or white articular. But clearly I couldn't,
but never mind, white gah came to the rescue.
That is the base layer. We did the tA thing in one go. Now we'll have to wait for
this to write completely, and then we can add
some more lines using a taco tone on a
dried background. Let's take a short break. Okay, so that is d
right completely. Now, to give it a
more finished look, we can add some more lines. I mean, some more grassy lines. I'm using a smaller brush here. This one is size number two, and I'm using paints gray
acts. It's a taker tone. Okay. Now, in a similar
way how I did earlier, I'm going to add few more lines onto the background,
only at the bottom. Before you start, just make sure your background
has tried completely. If it's still wet, wait for
a few more minutes. Okay. Now, I'm simply adding a line, then onto the tip, I'm
adding few more lines. It's more like a red
or a foxtail plant. Start by adding a
long Covey line, then onto the tip, add a
few more lines. See that. Some of them can be longer, some of them can be shorter, add them wherever you like and
however you like. Do that. The idea here is to use different tonal values of
brown in the background. We used a medium tone earlier. Now we're using a taco tone. The patterns we added earlier
was on a wet background, and for the same reason, they all look a little blurry. They don't have a
definite shape. And right now, we're adding
them on a dried background, and you can clearly
see the difference. The lines are more
crisp and detailed. You can try the
same painting with any color combination
of your choice. You can go with purple or blue or any other
color combination. Try using a taker toon
to what's a bottom. And with the same tacoton, you can add these reeds
and grassy pattern. It's a wonderful painting. Whenever you find some
time, give it a try with any other color
combination of your choice. Now I'm going to quickly add few more lines onto
the left side. The right side is looking
quite neat. It looks finished. On this side as well, I
will add one or two lines. I will add one
here, a longer one. Now onto the tip. I'm adding
some more extra lines. The brush I'm using here
is size number two. It has got a real really
nice pointed tip. I would recommend going
with a smaller brush or a detailing brush to get the best result.
You can see the lines. They're very thin and delicate. Maybe we can add one more
towards the left and with that, I'm going to call it done. So take a look at your painting. If you feel there is a lot
more extra space in between, you can go with paint
screen or a darker tone of brown and add a few more lines. Okay, so that is done. Now, before I wrap it up, I want to add a line
closer to the sun, so I'm cleaning my brush, and I'm going with
an orangish tone. I have some yellow
and orange here. I will just mix it. It's
more like a golden shade. Now using that, I'm
adding a line here. Now onto the tip, I will
add some more lines. This one is completely optional. I was actually about to
peel off my masking tape, but for some reason, I felt
like adding one more here. That is a last one and that's our painting for the day.
Hope you all liked it. It's a really beautiful artwork, and it took us less
than 15 minutes. So give it a try if
I get to try it, and I'm very sure you're
going to love the result. You don't need to
use the same colors. You can go with any color
combination of a choice. Just like I mentioned earlier, it could be a combination
of purple or blue or red or any other
color combination. Okay, give it a try. It's a quick one, and
if you're trying it, be sure to upload them to the project gallery. I
would love to see them. Okay, so that's all for the
day. I hope you all loved it. Thank you so much
for joining me. I'll be back here soon with our next mini watercolor landscape. Oh.
18. DAY 14 - Misty Lake: Oh. Hello, dear friends, welcome to 14. Today, we're going to try
another monochrome painting with only one
single color intco. It's a quick and easy painting
with a lot of character, and it's a gorgeous one. First, we will start
with the background. We will add these trees
and the reflection, and when that layer has
dried, we will add the pot. We will do this painting in two steps and as I said earlier, the only color you
will need is intco. You can also try
the same painting with any other color
of your choice. It could be paints gray or
any other color you like. We're going to play with
different tonal values of Itco to create the depth and
character in this painting. Right now, you see
a medium tone. We'll be using that shade for the background to add those
trees and everything. Then we'll use a slightly taker tone to create the texture. Then we will use a much more
taker tone to add the port. Yeah, that is how the
painting is composed. We will use three or more
different tonal values of Itco to create the depth
and all those textures. To me, I love
painting monochrome, especially when you
have tried a lot of color combinations and
different subjects. It's more like a calming
and relaxing process for me when I explore
only one single color. Anyway, we are going
to give it a try. It's a beautiful process. I'm really sure you guys
are going to enjoy it. Now before we start, there's one thing that I
want to mention. According to the brand and
the pigment they are using, your indigo can look
a little different. For example, this indigo I
have here is from Shinhan. The pigment number is different and this one is more grayish. You can have a look at
the pigment numbers here. For the Shinhan, it is P 66, and for philosophy, it is PB 27, PB 15, and P six. The pigments are different, and that is the main reason why the colors are looking so
different from each other. Those slight differences is not going to affect
your painting, so don't worry about it. Take out any indigo you have
got and let's give it a try. All right, my paper
is ready here, and the only color you will need for this painting as Indigo. You can also go with paint
scy if you prefer that. Keep your paper ready and squeeze out some color
onto your palette. Now, before I start applying
the paint onto the paper. I'm going to add a line almost at the center
of the paper. Over there, I'm just adding a straight line,
which is the horizon. This is just a reference
line for us to understand when we should
make the color lighter. Now, I'm starting by
applying a coat of water onto the tA background. Before you start, make sure
your brush is clean. Okay. Now apply a general quart of
water onto the tire paper, un brush on the tier
paper multiple times. Just to be sure the
t of water is even. Okay, so my paper
is entirely wet. I have applied a nice
even quart of water. Now, I'm going to keep
this pressure aside, and I'm switching
to a flat brush. I'm starting with a
medium tone of int Co. I'm applying that at the bottom. At the bottom and on the top, we want the color to
be slightly darker, not too dark, just
a medium tone. Then toward the center, we
will make the color lighter. I have added some
paint at the bottom. Similarly, we can add
some on the top as well. Toward the center, we
have a lighter tone. It's mostly the paper white. I haven't added any paint there. Now on the top and the bottom, we have a lighter
to medium tone of indico. That is a footstep. I have used a flatbruh here, and we have made the color
lighter towards the center. Next, we need to add
some landscape along the horizon and also
it's reflection. So I'm keeping this
flat brush aside, and I'm going with
a round brush. Before you start,
keep a piece of paper towel next to
you or a cotton cloth. Just in case if you're
painting this to watery, you can dab it on a paper towel. Now let's begin. I'm going to go with a medium
tone of Intego. It has to be darker than the color we used in the background. We have just painted
the background and it might be completely wet. I think it's a good
idea to wait for a minute or maybe
30 or 40 seconds. If you go in with
your paint right now, it will spread a lot, and it will be really difficult to control the weight of spreading. I think I can try now. See that. That's a
color I'm using. Now, write about that
line I have added, and simply adding a very
simple rough shape. It is not spreading too much, which means the water
content has settled. Along the outer borders, there is still a lot of water. Anyway, I'm going to go
ahead and add in the shape. So I've just added a
simple shape on the top. Leaving some cap at the center. Again, adding a similar shape in the opposite direction with the same paint at the
same tonal value. There is some white
space at the center. You have to retain
that as it is. Now we can add more paint or
modify the shape. See that. However, you're adding
the shape on the top, you have to try and make the
reflection similar to that. It doesn't need to
be exactly the same, but the overall shape and
the size should match. Now I'm picking a much
more taker toon of indico, and I'm going to add
in some taker toons in between to make it interesting. I'm just dropping in
some paint in between. It's a really taker tone. But I'm dropping that
on a wed background. Just to create some texture
and some tonal values. We can add similar tonal
values at the bottom as well to make the
reflection look the same. So I've simply dropped
in some paint. Now with the same brush, I'm smudging it to give
it a better look. Right now it's a mess. Next, with the same brush, I'm going to add
some small shapes to make it look like trees. If you paint is to watery,
dab it on a paper towel, and then simply add some
lines towards the bottom. I'm starting with a reflection. Then we can add similar
lines on the top. Simply drag your brish
down and add some lines. And on the top as well,
you could do the same. It doesn't need to
be well detailed. Simply add some lines onto the top and also towards the bottom to
show the reflection. Then wherever you want
to smudge the paint, you could do that
as well. See that. You can see how beautiful
it has turned out. Now, the only part which is a bit messy is the center part. To do that, first, I'm going to dab off all
the paint on a paper towel, and I'm running a dry
brush back and forth to give it a smoother
and softer feel. See that? Don't go
the watery brush. Go the brush, which is dry. If you want to add more paint, you could do that as
well, but not a lot. We still have to retain
that whiter space at the center to create
a foggy effect. Okay. If you want to introduce some more tacotons onto the background,
you could do that. My background is still wet, so I'm just making
use of the situation. I'm adding some more paint
onto the right side. I will just add
them on the right. I'm not going to
touch the other side. Now I'm smudging it. I want to create
different kind of tonal values and textures
in the background. It's a monochrome painting. The way your painting
is going to turn out, completely depend
on the way you're adding different tonal
values and textures. That's how it has turned out.
Next, with the same brush, I'm going to add some
pine trees on the top. When I say pine trees, they are going to be very simple shapes. Add a line, then on to that, add some teeny
tennis exact lines. Similarly on the bottom asple. Use a medium tune. You don't need to go for a darker tone, and then it doesn't
need to be detailed. Only at some places you can add these and whenever you're
adding them on the top, you have to add similar ones on the bottom asple to
show the reflection. See that. It is
just a single line. Then onto that, I'm adding some messy lines onto
either side. That's it. It is not at all detailed. It doesn't need to be. Just pick some random places and
add in a few pine trees. Now, just in case if
you're not comfortable, adding these trees,
that's totally fine, you can completely ignore it. We already have some sheeps and textures in the background. That would be enough. Anyway, this is how
it has turned out. Now we'll have to
wait for this to try before we go with
the final details. Okay, so that is
read completely. Next, we're going to add a boat, using a dark tone of Itco. So using my smaller brush, I'm picking a really
dark tone of intc. And I'm going to add the
boat somewhere over here. I'm placing it a bit
below that white line, which is horizon line. See that. And that's the
kind of size I'm going with. It's not to pick. Be very
careful about the size. If you make it two
pick, your painting will go out of proportion. So go the similar size or
make it even more smaller. I'm starting with the
basic shape of the boat, and I'm missing a
taco tone of indico here. That's a boat. Now I'm going to clean my brush, and I will dab it
on a paper towel, just to be sure it
is not to watery. With the medium tone, I'm going to add the
reflection of the boat. Go with a medium tone. Now add a mirror image of the boat using that
medium tone. See that? You really don't need to
wait for the boat to dry. You can go in with your
reflection right away. That's the boat and
the reflection. Now, just in case if you feel the reflection
is very prominent, you can use a paper
towel and just dab on it very gently. See that. Only if you feel
like the color is very prominent, you can do this. Otherwise, this is
completely optional. Anyway, next, I'm going to go
back with that darker tone, and I'm going to add
a tiny human being. There is a man
sitting over here. I'm starting with a head. Then I'm adding an inverted
U and I'm filling that. There is a basic shape. Now we need to add the hand. Add a small line
towards the left. Then clean your brush and
go with a medium tone of Intego and just extend
that into the boat. We have the boat and
a tiny human pain. Now we need to add
the reflection. Go with an inverted
U shape first, then a circle at the bottom. Okay. Now with the
same medium tone, I'm adding a line on the top, a very gentle line. Okay. So that's a boat
and the reflection. You don't need to
add a lot of detail. This is all we need. Now,
before we wrap this up, there is one more thing
that I want to do. And for that, I'm going to
go with some white gage. You can either use white
gage or white tic. We're going to add
some lines on to the lake to give it
some extra character. We only need a tiny
drop of paint, so I'm just going to
take it directly from the tube itself with
my smaller brush. So pick a little of paint. It could be either white
gase or white water colour. The brise I'm using here
a sized number two. Now, I'm going to
add a few lines onto the lake in a
very random way. They're not too thick, and
they're not too white asp. Some simple lines like this. It's more like a dry white line, which is not too prominent. Add them in a similar way. Don't make it too bold. I just randomly, add a few lines here and
there, and that's it. I will add one more or maybe two more towards the right side. See that? These lines are
a very simple detail, but it will add a
lot of depth to your painting. Don't skip this. But be sure not to make them
too bold and prominent, add them in a similar way. That's it. That's how
it has turned out. This was a very simple painting. We took less than 15 minutes and we only used one single
color with this indico. I think this board is
a beautiful feature. Otherwise, our painting
might look a little boring. Anyway, now it's time to
peel out the masking tape. Go to try if I get to try it. I'm very sure you're
going to love the result, and it wouldn't take you
more than 15 minutes. I think it can easily
fit in your day. I really like the background
and the reflection. Here is a closer. See that? It's a very simple painting, but you can really
see the depth and the character here. I love it. I hope you all loved it, too. Thank you so much for
joining me today. I'll be back here soon with our next mini vertical landscape.
19. DAY 15 - Summer Evening: Hello, dear friends. Welcome today 15 of painting
many verticar landscapes. Now here's the painting that
we're going to try today. It's a beautiful summer evening. So as usual, it'll start
by looking at the colors. Then we can start
with the process. So the very first color you will need is any yellow orange. The one I'm going to use
is um yellow orange. If you don't have
a yellow orange, you can just use yellow acts. It could be ambo
yellow or yellow. Okay, that is the first color. You can see that color
on the sky over here. Okay? Now, the second color
you will need is red. This one is pyrol red. I know you can't
see red acid is in the painting because I have
used it along with yellow. So it has turned into a orange. Okay. If you don't
have pyrol red, you can go with
scarlet or vermalin. So that's our second color. Now the next color you
will note is paints gray. Over here, you see a dakoton. It is actually a mix of
red and paints gray. You can either use burn
temper or can just mix some red with paints gray to
create a taco toon of brown. Okay, so those are the three
colors I'll use for the sky, yellow, orange, then red, and also paints gray. Now, coming to the full
ground and the tree, you can guess the color already, I'll using paints gray and
brown to paint the section. If you don't have brown,
go with burn Cena. Then along with that. You
will also need some paints gray to add the deeper
tones. Also for the tree. Okay, that summarize
all the colors you will need for
today's painting. Then you will also need a
little of white to add the sun, which is completely optional. All right, so that summarize all the colors you will
need for today's painting. Keep them ready on your
palette and let's get it try. Okay, let's start by
adding the sketch. The only thing you need to
add is an irregular line. To show the foreground and
to separate the background. So Go for an irregular line. It can be higher on one side
and lower on the other side. Okay for now, just add
an irregular line. We can add the tree and the remaining details
later as you paint. For now, this is all we need. Now, make sure you have
all the colors ready. We need yellowish orange, red, and paints gray. We need these three
colors for the sky. Make sure you have them
ready before you start. And when you have
them ready, start by applying a coat of
water onto the sky. Looks like there's some brown. Never mind. I will
just spread it. Okay, so apply a
cod of water onto the sky. It's evenly wet. Now to apply the paint, I'm going to go with
my round brush. This one size number eight. The first color I'm going to pick is cadmium yellow orange. As I said earlier,
it can be either yellow or a yellowish orange. Now apply that at the center. Next with the same brush, pick some red and
apply that on the top. It doesn't need to be a
clean blend. Just apply it. I just realized I don't have
enough red on my palette. I will need to take
out some paint quickly before the
background dries out. Okay. Now I'm going to continue. I'm going to go
with that same mix. I will take some red. Then I will add some yellowish
orange along with that. And then I'm applying
that color at the bottom. So this one is a much
more intense orange. So my idea is to
control the orange. At some places, I want
it to be too intense. And at some places, I want to have a dull and a light orange. I'm adding a few lines here, and I'm retaining
yellow on the left. Now I'm cleaning my brush, and then with the same brush, I'm picking some paints gray, and I will mix that with
this color we have here. We can add some more. And I'm
adding that at the bottom. So my idea is to apply a
brownish tone at the bottom. You can use burn timber acts, or you can mix some burns
or brown with paints gray. Either ways, we just need
some taco tone at the bottom. That's all. That
is a basic idea. We use some yellowish
orange, then some red. And now we are using some
brown at the bottom. Over here, I feel it's not nice. I'm just adding some more red
to give it a better look. So that's how the
sky has turned out. I'm loving the colors
and that natural blend. I need to fix it. I accidentally added some brown on the sky. Never mind. I'm going with a clean brush and I'm smudging it very gently. Okay, that's a sky. Now before we leave
this for dry, there's one more thing
that we have to do. And for that, I'm going back with a mix of
red and paints gray. This time, the color is
a little more daker. And then I'm going to add some landscape
in the background. Only on the left, because
on the other side, we already have enough of brown. So this might not be
visible even if we add it. Onto that wet background, introduce some random shapes to show the plants and
trees in the background. Okay, so that's a sky. I'm really happy with the
colors and the plant. Initially, my idea
was different. I wanted to add some more red, but then when I did a trial, I loved the way it turned out. Anyways, now let's
leave it for trying. All right, so that's
dried completely. The colors are a bit dull, but overall, I'm happy
with the result. Anyways, our next task is
to paint the foreground. And that's an easy task. We just have to
drop in some paints gray and brown onto
the background. To create a rocky
kind of a texture. Okay, so let's pick
in with paints gray. I'm picking enough
paint on my brush. And I'm randomly adding
that onto the background. Just add a few random shapes. You can go the
similar tonal value. Don't use a lighter tone. You can add the paint
wherever you like. You can add some on the top, some at the bottom,
and some in between. This was paints gray. Next, I'm going to
switch to brown. I'll clean my brush first, and then I'm picking some
brown with the same brush. I'm going to add that onto
these in between spaces. Just drop that in. This will create a
beautiful texture, and that is exactly
what we need. Try to go with the taker toon, don't add a lot of water. Otherwise, there won't
be any contrast. You can actually
go in any order. You can either go with
brown first and then paints gray or go with paints
gray and then brown. Both of them are fine, and you can add the paint
however you like. We just need some brown in
between and also a taco toon. Other than that, there's
nothing to worry here. You can add it however you like. Okay. Now, I'm going to
pick some more paint scray, and I will add that around the bottom and also
a few in between. So take a look at your painting, and wherever you feel, there isn't enough taker
toons. You can add some more. Now, I'm adding
some taco toon on the top and also giving
it a better shape. We have some more area left. Let's fill in that asp. I'm picking more paint scray, and I'm adding that over here. Also fixing the shape. Go for an irregular line to
make it look more natural. And that's it. As you're painting
an evening scene, we don't need to put
a lot of effort. Things will be quite dark. So you don't need to
add a lot of details. But if needed, you can go
back with paint scray, a much more taker tone and add some more textures
onto the background, especially onto the bottom. So I've taken a dry paint, and I'm adding some more lines to create a texture background. This is completely optional. Only if you want to add more
textures, you could do that. Otherwise, it's in a good shape. Okay. Now the next task
is to add the tree. I have taken a smaller brush, this one is size number six. I will start by adding
the tree trunk. Then on to that, we can add some smaller branches
using a smaller brush. Okay. So go the taco
toon of pain scree, and you can add the
tree wherever you like. I'm going to place
it on the top. But before that, I will
give it a better shape. Okay. Next, I'm going
to add the tree. I'm going to place it over here. First, we can add
the tree trunk. I'm adding an irregular line. Don't add a straight line. Add it as if your
hand is shivering, this weight will look more
natural and realistic. So go for a thick line first, and irregular thick line. Then we can go with
the smaller brush to add the remaining branches. So more branches, the more
beautiful your tree will be. Keep that in mind. I will add the major big branches
with the same brush itself. Then I will go with
a smaller brush, maybe size number two, to add the smaller ones. So yeah, it's a
very simple tree. There is nothing much
complicated here. You can place it
wherever you want, and you can add the
branches however you like. Next I'm going to add one branch over here towards the bottom. And then maybe I will add
one more toward the top. So you guys don't need to follow the exact same pattern
while adding the branches. You can add them
wherever you want to. Next time, adding one over here. Okay, these are the
major bigger branches. Now I'm going to switch
to my smaller brush. This one is size number two. And using this brush, I'm going to add some
delicate thin branches onto the tire tree. I will add as much as I can to give it a
beautiful character. I think it's better if I use a dakoton of brown
instead of paints gray. I think paints gray is too loud. So I just added some
brown with paints gray. See that? Now, with that color, I'm going to add some
thin delicate branches. Now, if you have
noticed, I'm adding all the branches
towards the right side. That is intentional. I wanted to make it look like
there is some wind blowing, some strong wind, and I'm adding them towards the right to show
the direction of the wind. So towards the left, I won't
be adding much branches. I will focus towards
the right side. So the brush I'm using
here is size number two. It is from silver
black velvet brush. It's a beautiful brush. I've been using this for years, and yet, it has got
a beautiful tip. You can see the delicate
lines I'm adding here. You can also use a liner
brush if you prefer that. For me, for some reason, the liner brushes doesn't work. Maybe it is because of
the longer brush hair. I feel I don't have
any control over him, but I have seen many artists
using them beautifully. So if you prefer
that, you can use a liner brush or any
brush with a pointed tip. Okay. I have added quite
a lot of branches. Now I'm going to add one
more towards the bottom. Maybe a thicker broken branch. I will add that over here. Okay. So the more branches you add, the more character
your tree will have, because this is the only
f ground element we have, because the rest is a simple
sky and a textury bottom. So I think we can add
some more branches to give it more character. But it's totally up to you. If you feel like you
have added enough, we can just leave it as it is. I'm just extending these
branches and making them longer. And you can see, I'm
adding them only to add a right to retain
that windy character. Okay. Now, I think I
have added enough. Next, there is one more
thing that I want to do. And for that, I'm
cleaning my brush. And I'm going to add a
sun somewhere over here. So let's take out
some white gage. You can use white gage
or white watercolor. Just be sure not to
add a lot of water. We want a thick
opaque paint. Okay. As I only need a little, I'm dipping my brush
directly into the tube, and I'm picking some paint
and adding a tiny circle. Just pick some white watcor or white quash and add a tiny tart. And that's our sun. I think the sun made it look complete. You can also add some
birds if you feel like a group of tiny birds. That's how it has turned out. I was actually about to
peel up the masking tape, but my husband just commented, I can add some more branches. He feels there isn't enough. For him, I'm going to
add some more branches. If you feel like you have added enough, you don't
need to add more. But I think there is always
room for more branches. So if you want to add some
extra character to your tree, let's together add
some more branches. Okay, so this is it. I have added enough.
I think I have added. Now, I'll just make some of
them a bit more thicker. And then I'm gonna call it done, especially these ones here. I think these can be a
little more thicker. These are the major branches. So compared to the
other thin ones. This can be a little
more thicker. I'm really loving the way
this painting is turning out. The only thing I regret is not going with much more
brighter colors for the sky. When it dried, it is
looking a little dull, but never mind, that's something we have to
expect with water. It always dries
one tone lighter. Anyways, this is it, I have reached my limit. I don't want to add
any more branches. Let's peel up the masking tape. Okay, so here's a
finished painting. I think it's a lovely
color compinion, and everything has
come out really nice. I hope you all enjoyed it. Thank you so much for joining. I'll be back here soon with our next mini aticor landscape.
20. DAY 16 - Calm Evening: O O There friends, welcome today 16. Today we're going to paint another simple sunset
over a gorgeous meadow. As usual, let's start by looking at the
colors we will need, and then we can start
with the process. The first color you will
need is indico and pink. Those are the two colors
I've use for the sky. If you don't want to use indico, you can go with any other
blue of your choice. It can be prescient
blue or any other blue. We just need a medium
tone for the sky. The one I'm using here is
indico from art philosophy, and that's our first color. Now, coming to the second color. It's a pistil pink. If you
don't have any pasal pink, you can just use a
lighter tone of crimson or carmine or any
kind of rose or pink. This one is brilliant
pink from Shinhan. It's a beautiful pasal pink. O can just add some white
vertica with any of the pink or red pigment to create a similar
color. All right. Now coming to the meadow, you can see different
tonal values of green and brown here. For the topmost area, I'm going to use a mix of
yellow ochre and sap green. I don't want the colors to
be too fresh and bright. That's why I'm mixing some
yellow ochre with sap green. Okay. Next is Sap green. So for the meadow, first, I will go with a mix of
yellow ocher and sap green. Then towards the bottom,
we want the color to be more darker and more textury. And for that, I will add some
burn Cena with sap green. If you prefer using
fresh greens, you don't need to mix
and create this color. You can use sap green acid. Now, I'm going to
swatch out burn cena. When you mix Sap green
and burn Cena together, you will get a beautiful
olive green color. And I think we have used that in our previous painting safer. Okay. So that is Burn Cena. Now, there's one
more color you will need to add the deeper tones, which is pens gray. Also for those focron elements, we will use paints gray, and that is our final color. So we're going to do this
painting as two steps. One is the background layer, where we will paint the sky, the meadow, and the
background elements. Then when that has dried, we will co with the
focron elements, which means before you start, you should have all these
colors ready on your palette. You should have some
indico, pastel pink, yellow ocher, sap cream, burn Cena, and paint screen. Keep them ready on your palette,
and let's give it a try. So I'm going to start
by adding horizon line. That's the only thing
you need to add. Add that a bit below the
center of the paper. Okay so the top part is
going to be the sky, the bottom is going
to be the meadow. Then along the horizon, we will add some landscape far away. Okay, so those are the things we're going to do
in the first step. We're going to paint the entire background layer in one go. Okay. So before you start, make sure you have all the
colors ready on your palette. For the sky, you will
need some intco, as well as basal pink. Those are the two colors
we will use for the sky. Then along with that
you laid sap cream, yellow ochre, burn Cena, and a little of paint screen. Keep all these colors
ready on your palette. Then when you have them ready, start by applying a coat of water onto the
entire background, using any of your
wide clean brush. I'm missing a 1 " wash brush. Now I'm picking
some clean water, and I'm applying that onto
the entire background. Make sure there's
no pools of water. We just need a shiny coat. So run your brush multiple times to be sure the coat
of water is even. If there's a lot of water
on your background, the colors will start
floating and spreading a lot, and you won't get a
decide effect. Okay. Now my background is evenly wet. Now I'm going to keep
this pressure aside, and I'm going with
my size number eight brush because I'll
make sure it's clean. And then I will pick a
medium tone of indico. It should not be too dark and it should not be
too light as well. So go with a medium tone of indico. I'm adding more water. Seems the color is quite dark. Okay. Now I'm going to apply that color on the
top of the sky. That's kind of tonal
value I'm using. Next, I'm going to clean my brush and for
the leftover area, I'm going to go with pink. Okay. Let's pick some pink. And I'm adding that
at the bottom. And then I will gradually
blend that with indico. So we have used a
medium tone of intco, then I have used paint, and I have gone with the soft blend. If you want to add in more
paint, you could do that. If you want to make pink more brighter or blue more brighter, you can add some more paint. It's totally fine. So
that's a base layer. We have some intco and pink. Next, we're going to add in some clouds while the
background is still wet. And for that as well, I'm
using the same brush. And I'm picking a
medium tone of intco. If you paint is
to water, you dab it on a paper towel
before you start. Now, simply add some lines
onto the wet background. Don't add a lot. You can
add a few at the bottom, and maybe a few onto the top. Also don't pick a lot of paint and go the paint,
which is not too watery. If it's too watery,
it will spread a lot, and they won't stay as clouds. The t background
will get messed up. Try to retain most of
the pink at the bottom. Don't add a lot of
clouds over there. You can add more toward the top. That's how the sky
has turned out. First, we used teco and
pink for the base layer. Then we have added some clouds. That part is done. Next, we can start painting the meadow. I'm going to clean my brush. And I'm going with a mix of
yellow ochre and sap green. I want a color that is more like green gold or a olive green, whatever you want to color it. I don't want to use green acts. I want a dull green. Okay. This one is a mix
of yellow ochre and sap green. That's a color. Now we can start applying
that from the horizon, and then apply that a
little towards the bottom. Okay. Now we need to make
the color more darker. For that, I'm going to
add some more sap green, as well as burn Cena
into the same mix. Okay. So the colors I'm
using here is kind of dull. I don't want them
to be too bright. That's the reason why I'm adding brown and yellow ochre
along with sap green. So Mx some sap green
and burns in a together and create a color which is more like olive green. This one has more brown in it. The green is not much visible. It looks mostly like
brown, but never mind. We can go with another
x with more green. For now, I will just add this
color into the background. My intention is
not a clean blend. I want to create
different kind of tonal values and textures. So that's why I'm adding different shades of green
into the background. Next, I'm going to
pick more sap green, and I will add that asper. Okay. Let's mix sap green with the same color,
that brownish color. And in between, we can
add that color as well. So there is no particular
rule or order here. You can simply drop
in that paint onto the wet background and
create a texture background. Okay. You can see how carelessly
I'm adding the paint. I'm not really worried about getting a clean
blend or anything. I just want to add
different kind of greens into the background
while it is still wet. Next, I'm going to go
with a smaller brush, and I will pick some indico. Now I'm going to mix a bit of dico with green to
create a darker tone. With that color, I'm going to
add the background details. See that. Go with any of your smaller brush and add some simple irregular
shapes along the horizon. We have to add this detail
along the Nt horizon line. The color I'm using here is
a mix of green and indico. Go with the similar tonal
value. Don't make it too light. Now simply add a random
sheap along the horizon. At some places,
it can be taller, and at some places,
it can be shorter. This will make it
look more natural. Have added that along
the Nt horizon line. Now maybe on either end, I will make it a bit taller. It's a beautiful
color combination, and you can see how
staning it is turning out. Early without any elements
along the horizon, it was looking quite
plain and empty. But now when we added these
details along the horizon, it is looking more complete
and more beautiful. Okay. That's the sky, the meadow, and the
horizon details. Now, I'm going to add that
left paint at the bottom. I feel the bottom most area
can be a bit more darker. So I'm just dropping
in some more paint. Again in a very
random way. See that. Maybe we can add some
paints gray into the same mix to make
it more darker. Along the horizon, I want
a color which is more like a medium tone and
towards the bottom, I want that to be more darker. Let's pick some paints gray. Let's add that as well. Only at the bottom most area. I'm not adding it anywhere else. Okay. So we have added some
textures onto the background. Now we need to give
it a better look. So I'm going to go with
my medium size brush. This one is size number eight. I have cleaned it, and I'm
dabbing that on a paper towel. Now with a clean dry brush, I'm just mudging these
patterns very gently. I'm not putting a
lot of pressure. See that. Now those patterns are getting a blurry
and a soft look. Earlier, they were a
lot more prominent. Okay. So once you have
applied the paint, if you feel they are very rough, you can just smudge it
with a clean dry brush. It can be dry or it can be a
bit tamp, but not to watery. Okay. So that's how the
background has turned out. You can see those different
tonal values of grain. And just because we dropped
in the paint very randomly, we have created a
beautiful texture here. The major part of the
painting is done. We have the sky, the meadow, and the background details. Now, the next step is to
add some final details. We'll be adding some
fcrowd elements. But before that, we'll have
to wait for this to dry. All right, so that
has died completely. Next, we're going to go
with the final details. And to add those details, I will use a smaller brush. This one is size number two. Go with any of
your smaller brush or a brush with a pointed tip. Now, the color I'm going to
use here is paints gray, go with the taco toe. Now we're going to add some
plants onto the background, so we can begin
by adding a line. A simple irregular line. Now onto that, I'm going
to add some branches. Just to make it look
like this branching out. Now onto this, we
can add some leaves. You can add as many
leaves as you want. I'm going to add one over here, then another one
there. See that? It's not perfectly shaped. You can add that
in a similar way. Just turn your brush and create a wavy line and add some
thickness at the bottom. That's it. We can add one here. That's a first step.
Now onto this, I'm going to add a flower. It's not a complicated flower. You have to add some lines
on to the tip first. There's some simple lines. O. Two, three, and
maybe one more. Have added four lines. Now onto the tip,
I'm just adding some tiny dots and some
small sheaps. See that. You can add them close to each other and create a
group of flowers there. Just keep on adding some
dots and some small sheaps. Using the tip of your brush. Maybe we can add one
more in between. Onto that as well, I'm adding some dots and some small sheats. See that. That's how we're
going to add the flower. It's a simple detail, but you can see how beautiful
it has turned out. Now, following a
similar process, you can add as many flowers and as many plants as you want. We have another empty branch. We can add a flower here. First, from this point, I'm adding some lines. It can be three or four or five. Then onto the tip, add
some small sheets close to each other. Simple right. You just need to keep on adding these dots and small sheaves, and it will look like
a group of flowers. That's the second one.
Now in a similar way, we're going to add a
few more plants and flowers until it looks complete. Right now, we have
only added one, there's a lot more space. Maybe we can add three or
four more extra plants. Start by adding the
stem and the branches. You can add as many as you want, and F all of them, you don't
need to add the flowers. Maybe you can go for
a different detail. You can add some tiny
tiny lines on the top. Let's do that for this
one. Onto the tip, I'm just adding a
grassy pattern. Okay. Now let's go
with another one. Let's add that over here.
First add the stem. Then you can add some
branches onto that. Just keep on adding
some irregular lines. Try to go the smaller brush so that you can get
those crispanin lines. Now onto the tip, I'm adding
few lines towards the top. Then I'm adding those
tiny tiny patterns, and I'm filling it up. I hope you guys are
able to follow. It's a simple plant actually. You can use the same in
your other paintings as well as a full ground element. Next, I'm going to add
a few more leaves. Another one there. Now we can add some
more branches and leaves and flowers to
make it look complete. So pick some more
paint screen on your smaller brush and add irregular lines
and also some leaves. Add as many as you want. There is no limit here.
The more the merrier. Let's add a few onto the left. Over here, it looks empty. It is just some simple lines. There is nothing much
complicated here. But try to go the smaller
brush to get the best result. Now onto this, I'm going to add that lines on either side. I'm not adding a flower here. Go with any kind of
detail that you prefer. It doesn't always
need to be a flower. It could be just ref
for some other element. Now I will add some
leaves very randomly. One there. There may
be another one here. These are longer leaves. I'm just trying to
fill in all the gaps. According to your painting, you can add them
wherever you want to. Keep on adding some leaves or
grassy pattern or flowers. I think I will add one
flower on the left. Yeah, first add the lines, then add those tiny tiny
tarts and patterns. Then you could add
some more leaves to make it look complete. And that's it. That's our
painting for the day. I really like the way
a has turned out. Now, take a look
at your painting. If you feel there's a
lot of gaps in between, you can introduce another plant or leaf or something else. Also, maybe you
can add some birds onto the sky if you prefer that. That's all for the day. Now it's time to peel up
the masking tape. And here we are. Look at
that beautiful painting. I love the textures
and the final details. It's a beautiful
color combination. Give it a try if
I get to try it. I'm very sure you're
going to love it. Alright, so thank you so
much for joining today. I'll be back here soon with
our next minicor landscape.
21. DAY 17 - Summer Evening: Oh. Hello, dear friends. Welcome to Day 17 of painting
mini aticor landscapes. Our painting for the day
is a beautiful petal sky. It is a soft summer evening. Anyway, as usual, let's have a look at the
colors we need. The first color you will
need is a patel pink. Pasal pink is not
a common color. It's actually a mix of red
pigment and a white pigment. If you don't have a patel pink, you can easily create a similar
color by adding white at coor with crimson or
carmine or even red, or you can go the
lighter tone of crimson or any kind of rose. This one is called
brilliant pink. It is from the branch inan. Along with pink, you will also need some
indico for the sky. I'll using a really
light tone of indico. But instead of indico, you can use any other color
of your choice. In any other blue color. You can use choise blue, Prussian blue, Cabal
blue or any other blue. For the mountain asphalt, I'll be using indico. That's our second color. Now let's talk about the colors you will
need for the meto. It's a very dry summary land. The first color you will
need is yellow ocher. This one is again from Shinhan. I hope you all
have yellow ochre. Now the second color you will
need is brown or burn Cena, I'll using permanent brown
from art philosophy. Both the colors will work.
If you don't have brown, don't worry, just
go with burn scena. Finally, to add
the deeper tones, you will also need
some paints gray. You can see I have used
yellow ochre on the top, and towards the bottom,
I have made the color. So paints gray is the
last color you will need. Okay. So for the sky, you will need two
colors, indico and pink. Then for the summery meadow, you will need yellow ochre, brown or burn Cena, and then also some paints gray. Okay, so that summarize the colors you will need
for today's painting. Here is a closer. Okay, so keep the colors ready
and let's give it a try. Okay, so let's start
by adding the sketch. First, you need to
add a sloping line to separate the sky
and the meadow. So I'm starting that from here. Then I'm taking that to the top. Simply add a sloping
line like this. Now on the top, we
can add a mountain. It doesn't need to be a
huge majestic mountain. Go for a simple one. That's a sketch.
We have the sky, the mountain, and
the Summary meadow. Now we can start with the sky. Just like I mentioned earlier, you will need two
colors for the sky, Basel pink and intc. First, make sure you have these two colors ready
on your palette, Basel pink and intc. Now, once you have them ready, start by applying a coat
of water onto the sky. Always apply a general coat
don't add a lot of water. My sky is evenly wet. Now we can start
applying the paint. The first color I'm going
to go with a intco. First, make sure
your brush is clean. Now, pick a lighter
tone of intco. As I mentioned earlier, it
doesn't need to be intco. You can go with
any other blue of your chos, but go
with a lighter. That's a tonal value.
I'm going wet. Now, I'm going to randomly add this to the wet background. A little there, a
little at the bottom. Onto the wet background, fran I'm laid dropping
in some intco. No matter which blue I
using, go in a similar way. So there are some
gaps in between. Now onto those gaps, I'm going to introduce pink. So clean your brush and
switch to the second color. Now, wherever you
have those white spaces, introduce some pink. You can go the lighter
tone or a medium tone. Simply drop in that paint. It will turn out really
beautiful. Trust me. When the background dries up, it will look really
soft and beautiful. Now there is nothing to worry. You simply adding pink on
to the remaining area. You don't need to put a lot
of effort in blending or smudging or anything.
Just add that paint. At this point, your sky might
not look very impressive, but trust me, the magic
is about to happen. Be patient until it
completely dries up. Now I'm going to pick
a bit more paint. Then I will add that in between. Just to make some
area more attractive. Let's add a little here. Then somewhere to the top
and maybe to at the bottom. Wherever you want to add in
some pink, you could do that. I'm not going to go
back with indico. Whatever I have in the
background is well anchored. We don't need to add them again. That's how the sky
has turned out. I know it looks a bit
messy, but don't worry. By the time it dries up, it is going to turn out
really beautiful. So let's take a short break and come back when
this has dried completely. There we go. You can see the calm and
peaceful sky we have created. That's why I said earlier. At the beginning, it
might look quite messy, but by the time it dries up, everything will look
soft and beautiful. Now let's start with
the Summary Mato, you will need yellow ochre, brown, and Pen screen. First, I will pick
some yellow ochre, and I will add that
along the top. Then as I come
towards the bottom, I will introduce
more taco tones. Go with any of your
medium size brush. The one I'm using here
is Size number eight, and I'm applying yellow ochre almost onto the entire area. I accidentally drop some paint
onto the sky. Nover mind. Let's go back with
the yellow ochre and apply that onto
the background. Rating that sloping line, add the paint
following that line. Next, with the same brush, I'm picking some brown, and
I'll add that at the bottom. If you don't have brown,
just go with burn cena. It's not a problem, and you don't need to go
for a clean blend. Simply add that
paint at the bottom, and also go toward the center. Now, with the same brush, I'm picking some paints gray, and I will add that along the bottom most area to
introduce the deeper tones. So we have yellow
ochre on the top. Then we have some brown, and towards the bottom, we have made the color much more darker. Now, I'm going to
clean my brush, and I will pick some
more yellow ochre. Then I will just
match this area. So just like I said earlier, it doesn't need to
be a clean blend. You can create some texture in the background by adding some medium tones
and darker tones. We're going to add
some grassy pattern onto the same background. So if we have more texture, it will look more
beautiful and realistic. All we have some medium
tones in between, some darker tones at the bottom. Now I'm going to keep
this pressure side, and I'm going to go
with a smaller brush. This is the one
I'm going to use. It is size number
two. Now I'm going to pick some pain screy
and also some brown. Just create some
taco tone of brown by adding some pain scray
with brown or burn Sina. Now with that paint,
we're going to add some grassy pattern
onto the background. Focus majorly at
the bottom part, where we have the
medium tones and darker tones, and
towards the top, closer to the mountain, we don't need a lot of patterns because that area is quite far and the grassy lines
won't be visible. So just add a few over here. You can add more at the bottom, where we have the taco tones. Now keep adding
those grassy line. Our background is still
a bit wet. That's okay. You can go ahead
and add them in. At the end, we will add
some more grassy line when the background
has dried up. For now, don't worry a lot. Simply add them using a smaller brush on
a wet background. Make them nice and curvy. So yeah, go with the
taco tone of brown and add some grassy pattern onto
the anterior background. Until you're happy
with the result. When you're adding them
in the background, closer to the mountain, go with a metium tone or a lighter tone, and
towards the bottom, you can make the color more
taco. Let's add a few more. Okay, so I have added enough, and that's how it
has turned out. Now, we have to wait for this to try before we go the next step. Okay, so the summery meadow
has dried completely. Next, we can paint the mountain. For the mountain, I'm going
to go back with intco. I'll use a slightly taker tone. Okay. So with my medium size presh I'm picking some intco. It is not too d and it is
not too light as well. Go with a similar tonal value. Once you have the color, we can apply that onto
the ante mountain. As you're applying
intco on top of pink, the color will look
slightly different, and that's totally fine. You can simply apply that onto the te mountain,
following the outline. You can see the tonal
value I'm going with. It is not too light. It's
more on the darker side. Now carefully apply that
onto the entire mountain. Towards the bottom, I'm going to make the color a
little more darker. For now, simply apply that paint onto that
shape we have there. Then towards the bottom,
using a taco tone, we will introduce
a grassy pattern. That is our next task. I'm picking some more
indico with the same brush. Then I'm adding some teeny
tiny lines along the horizon. We have tried the same technique for a few other
paintings as well. It's the same thing.
Go with any of your smaller brush and go
with a taco tone of indico. Now simply add some teeny tiny
lines close to each other. The simple detail will add a lot of realistic character
to your painting. It is so much better than
going for a straight line. Go with any of
your smaller brush and keep adding some
teeny tiny lines. They don't need to be perfect. Just keep adding them
close to each other, and gradually it will
create a pattern. Only at the bottom along the horizon, introduce
this detail. Looks like the mountain has already started to
dry. Never mind. Now, I'm going to go the
slightly darker tone. The pattern I added,
it's not really visible. So I'm just going to
go for a daker tone, and I'm repeating
the same step again. I'm quickly adding
some tiny patterns. The same way I did earlier, that wasn't really visible. I had to do that again. This one is actually a
very simple technique you can use in your paintings. Whenever you're adding
details along the horizon. Instead of going for a
straight clean line, you can introduce
some tiny tiny lines. It will look like those
grassy pattern far away, and it will surely have an
impact on your painting. Yeah, next time when you're
doing a painting on your own, instead of going for a straight horizon line, try this detail. Anyways, I'm turned with a step, but I'm not really happy because the color is looking
like a separate patch. It hasn't really blended
into the background. Because the color I applied for the mountain has
dried up already, so I'm picking a
medium tune again. And I'm smudging it to
give it a better look. Initially, I wanted a
medium tone on the top. Then towards the bottom, I wanted some more taco toon. That was my plan, but
this one dried up. I have to introduce another layer to give it a better look. Then maybe I can add some more
taco tones at the bottom. Anyway, let me quickly finish this and
let's see how that's going to turn out.
That's a mountain. I'm quite happy with the
way it has turned out, but I want to add some
more taco tone at the bottom, only at the bottom. I'm just adding some taco
tones along the horizon, the rest, I'm retaining actus. We have the sky, the summery
meadow, and the mountains. We're actually done
with our painting. But if needed, you can add some more grassy pattern at the bottom, using a taco tone. I'm picking some paints gray. And I'm just adding few more
lines using a taco toon. This one is completely optional. If you feel it is
already looking decent enough, you
can skip this step. For me, I wanted to add
some more crisp lines. Earlier, we added them
on a wet background, so the lines are not
very crisp and perfect. That's why I thought of
adding some more lines. Okay. I'm adding them
only at the bottom. I won't be adding
much towards the top. That's how it has turned out. Now I'm going to clean my brush. Now, there's one more
thing that we can do, which is again optional. It is adding more grassy
patterns using yellow ocher. So pick some yellow ochre on your smaller brush or any
brush with a pointed tip. Now, add a few grassy
lines at the bottom. This is just to give it
more summary character. Right now, we have
different tonal values. Only if you feel
like, it's needed, you can go ahead and add some grassy pattern
using yellow ochre. Otherwise, you can just
completely skip this tip. I'm a huge fan of this brush. It's serving me well
for the past two years. Ever since I have this brush, I love adding these
grassy lines. I get nice curvy free hand
lines using this one. I've tried many other brushes, but this is the only
one that worked for me. So I keep it like a treasure. Anyway, this part is also done. I have added some more grassy
lines using yellow ocher, and that's how our
painting has turned out. I hope you all enjoyed it. Now it's time to peel
off the masking tape. And here's the
finished painting. It's a beautiful
color combination. I really like the Sumery
meadow and the pink Pasal sky. They're going very
well together. So if you guys have to try it, give it a try, and let
me know if you liked it.
22. DAY 18 - Foggy Meadow: Oh. Hello, dear friends. Welcome to day, 18 of painting mini
watercolor landscapes. Our painting for the day
is a gorgeous meadow with a fence and to
compliment the painting. We'll be adding some
teeny, tiny white flowers. It's a beautiful painting
with a beautiful process. So let's start by looking
at the colors we will need. Then we can go straight
into the process. The very first color you
will need is indico, I'll using a really light
tone of indico for the sky. You can see it's a
very light tone. It doesn't need to be indico. You can go with any
blue of your choices. You can even go with
a lighter tone of gray if you want to
create a moody sky. This one is Indigo
from art philosophy, and that's my first color. Next, you will need
a lighter green and also a medium green. For the lighter green, I will mix some lemon yellow
with sap green, and that's the
color you see here. If you have any other kind of lighter green, you
can use it directly. We only need a
little of this color to add along the horizon line. So that's a second color. Next one is Sap green, which is the medium
green I'm going to use. It's a common color, so I'm
guessing you all have it. This one is from Shinhan. Okay, so we have Indigo,
a lighter green, which is a mix of Sap
green and lemon yellow, and then we have
Sap green actus. Now, the final color
is paints gray. We'll use that color to add the deeper tones and
also to paint the fence. Okay? So for this painting, you will need fur color, indico, lemon yellow, sap
green, and paints gray. And I forgot, you will also
need some white watcor or white case to add those
tiny, tiny flowers. Okay, so that summarize the colors you will need
for today's painting. It's a beautiful painting with a very limited color palette. So if you guys are ready with the colors, let's give it a try. For this painting, unlike the
other ones we have tried, we need to add the sketch. First, I'm starting by
adding a horizon line, which is almost to the
center of my paper. Add a very light pencil line. Don't make it too dark. This is just for a reference. Next, we can start
adding the fence. You can add the fence wherever you like and however you like. I'm going to go for
a very simple one. I'm simply going to add some vertical lines and
also some horizontal lines. Some of them can be taller, and some of them can be shorter. Also they can be leaning
onto one of the side. Not all of them needs
to be straight. Now I'm adding the
horizontal lines. I have three verticals
and two horizontals. Now on the other
side, I will simply add two or three vertical
lines, that's all. For now, you just need to locate them and indicate the positions. We can add the rest of the
details, aspere painting. That's where the
fence is going to be. For now, we just need to
indicate the positions, you don't need to
put a lot of effort. This is mainly for
us to understand where we should put
the darker tones. Now, just in case, if you want to add one more wooden post, we can add that aspere painting. That's how the sketches. Now we're about to start
with the painting process. First, we will begin with a sky. Then we will go with
the grains and we will paint the tire
background in one single go. Keep all the colors
ready on your palette. You will need some indico, some sap green, some lemon
yellow, and paints gray. When you have them
ready, start by applying a coat of water onto
the tire background. As I always see, we just
need a gentle coat, don't add a lot of water, and on your brush multiple times to be sure the coat
of water is even. The background is evenly wet. Now to apply the paint, I'm going to go
with a flat brush. The first color you will
need is a lighter tone of indico or any blue or even gray. Now I'm applying that
on the top. See that. Don't go with a taco tone, go with a medium tone
or lighter tone. I'm applying that in
a horizontal way. I'm almost reaching
that horizon line. It's a simple sky. There is no clouds or no other details. We are simply applying
an even tone of Itko. Next, with the same brush, I'm going to pick some grain. I have some lemon yellow here. I will mix that with grain
to create a lighter tone. Now I'm going to apply that
color right next to indico. Be sure the color
you're going with is a lighter tone. Don't
make it too dark. We'll make it darker as
we approach the bottom. That's the tonal value I'm going with. It's a lighter tone. Apply it right where you
have stopped indico. Then gradually,
as you come down, pick more sap green, and add that at the bottom. We have a lighter
green on the top. Now we're using sap green acids, and we're adding that
onto the background. Okay. Now, I'm going to wipe of the excess amount of
paint on a paper towel, and I'm picking some
lighter green again. And I'm just adding
a few lines over here to give it some texture. I'm not looking
for a clean blend. Next, with some paint screen, I'm doing the same
step at the bottom. I want to introduce some taker
tones, only at the bottom. The top, I'm going to leave act. I just want some
lighter tones there. I don't want any taker tones. I'm still using a flat rush. I think I should
switch to a undreh. I'm picking my size number six unreh and I'm going to add some more greens into the background to
create texture. Keep smudging the paint, it doesn't need to
be a clean blend. All we need is some
texture in the background, to make it look more
natural and realistic. If it's a clean blend, we will have to introduce
some grassy pattern. For this painting, I'm not
adding any grassy pattern. I just want to create
some texture there. There is no particular
order or anything, simply dropping your taker
tones onto the background. Now I'm picking some
more daker toon and I'm adding that right
where I have the fins. I want the sa to be more darker, so that it will be really nice when we add those white flowers. On either side, where
we have the fins, I'm adding some taker toones. Now I'm dabbing my bush on a paper towel. And
I'm smudging it. See that? It's not at
all a clean blend. We are creating some
texture in the background. I think it is turning
out really pretty. I hope you guys are
entering the process too. If you want to add some more
tacotons at the bottom, you could do that, or maybe closer to the fence
or wherever you feel like. Only retain those lighter
tunes along the horizon. The rest is totally up to you. You can add more taker tunes or medium tones. It doesn't matter. But along the horizon,
closer to the sky, we need some lighter tones. Now with the same brush
to create more texture, you can add some tiny,
tiny grassy pattern. It doesn't need to
be too prominent. Use the same brush
and the same color, and just add in some
textures like that. You actually don't need
to pick any new paint. You can just make use of the paint you have
in the background, and just keep on adding
some patterns like this. Just some lines
close to each other. That's all. Keep in mind, they don't need to be too
big and too prominent. All you have to do is add
some tiny lines. See that. Go with any of your smaller
brush or a brush with a pointed tip and keep adding these tiny lines
onto the background. Mostly on to the area where
you have taker tones. We're not going to
add any more lines when the background
has dried up. This is it. This is your time. If you want to
create more texture and more character
for your background, keep adding these teeny tiny lines wherever you feel like. I think I will add
some more using a taker tone closer
to the fence, and then we can call it tone. All this while, I
didn't take any paint, but right now I have taken
some darker green on my brush, and I'm adding some more teeny tiny lines on to the background. Okay. Mostly at the bottom, I'm not adding any on the top. We can add a few
closer to the fence, and also at the bottom where
we have those talker toons. But again, don't make
it too prominent. They don't need to
be too pig thick. Go for smaller lines. Okay, that's it. I think it's in a good shape. I don't want to add anymore. Now, we'll have to
wait for this to try. Then we can paint the fence and add the teeny,
tiny white flowers. All right, so the background
has tried up completely. Next, we can start
with the fence. For this step, the only color you will need is paint screen. So I'm starting with a
medium tone of paint screen. We'll apply a medium
tone onto these first. Then we can introduce
a darker tone to give it more texture. Okay? Pick some paint screen on
your medium size brush. The one I'm using here
is size number six. I think I will start
with a horizontal ones. Earlier, we had
only added a line. Now we need to give
it more thickness. So go with a medium tone
and add a line like this. That's a one on the top. Now we have another one at the bottom. I'm adding that asp with
the same tonal value. The color I'm using here is a
medium tone of paints gray, and I'm introducing
the shape first. Now with the same brush, I'm going to pick a
slightly darker tone, and I will simply add
that onto this shape. Mostly at the bottom. So go with the tackle toone and introduce
that here and there. This will create a texture. Okay. Now in a similar way, let's add some taco toone
on the other one as f. The base layer is still wet, and when you're adding
these taco toones, it will nicely spread and
create a texture there. Okay. So just add some patterns and some
sheeps using a taco toone. Okay. That's all
you need for now. Let it dry. In the meantime, we can start with the left side. We have some vertical wooden
posts on the other side. So I'm going back with a
metium tone of paints gray. And then I will add
the shape first. Then we can introduce
the darker tones. So Go the irregular shape to
make it look more natural. The color I'm using right
now is a darker tone, so I'll pick some water, and then I will make
the rest lighter. I will pick some
more taker tone, and I'll add that at
the bottom over here. Now let's go with the other one. You can either start
with a medium tone and then add a new taker tones, or you can go the other way. You can add the
taker toes first, and for the rest, you can
introduce a medium toe. I'm adding the third one here. As I'm going away, I'm
making them shorter. For now, I'm going
to leave them acts, and I'm going back
with a taco toone, and I will add the verticals
on the other side. I'm picking a taco toone, and I'm going to add
the verticles on the other side. That's
the first part. Now the center,
and then the top. The color I'm missing
right now is a taco toe. Now in a similar way, let's add another one
right next to that. Oh Add that as three parts, wherever you have the
horizontal division, break it, and then
add that on the top. I think there is
space for one more. The color I'm using here, it is just one tone
darker than the color I used earlier. It
is not too dark. We will be adding some
textures onto these using a darker tone when
the layer has dried. Now I'm going to add
the next one over here. If we use the same
tonal value for the horizontal division
and the vertical division, it won't have an impact. Try to go the
color, which is one tone darker than the
color we used earlier. That is the third
one. Now, maybe we can add another smaller
one towards a right. I feel there's some
space over here. So I'm just adding
a smaller one. Those are the wooden post. We have just added the
shapes using a medium tone. We haven't added any textures
or details onto this. That is our next task, but before that, we'll have
to wait for this to dry. That is d completely. Next, I'm going to
go with a taco tone of p sc with my smaller brush. I'm picking the paint
without adding much water, and then I'm dabbing it on a paper towel to
create a dry paint. Now using that, I'm
just going to add some lines and some textures
onto these wooden post. I'm starting from the left. These are just simple
lines and some textures. You can add them
however you want to. Go with the smaller brush and try to stay within that shape. That's. The patterns and the
textures doesn't matter. You can add them
however you like. I'm just adding some lines and some tiny tiny shapes
using that dry paint. It's a very small
and simple shape. We don't need to add a lot. Just a few here and there,
that's all we need. See that? Simply add some
lines and some dry textures. Now we have a few more. Again, I'm picking some paint. And I'm adding some lines and some dry textures to
give it more character. Don't add much water,
C with a tri paint. If you feel your
paint is watery, dab brush on a paper towel
before you add these patterns, and also try to go
with the taker to. Otherwise, it won't show up. You can see those patterns
and the difference they need. It's a very simple detail.
You can do this quickly. You don't need to think a lot, but it will instantly add a realistic character
to your painting. Now we have one more left, and also the
horizontal ones let's add similar patterns
onto those as well. It's just a matter of
adding some lines and some shapes and tri
patterns onto that shape. It doesn't need to be perfect. You can simply add them. It's a quick task and a
simple task. Don't skip it. It will really add
a lot of beauty to your painting.
That task is done. Now the next task is
to add the flowers. We will add some
flowers very randomly. For that, you will need either white quash or white watercolor. Squeeze out some paint
onto your palette. We need an opaque paint. If you're using watercolor,
don't add a lot of water, try to go the thick
creamy paint. I have cleaned my brush. Now I'm picking some white
paint with a smaller brush. Now, the flowers that
I'm going to add onto the background, they
are not well shaped. They are simple tiny dots. Go with any of your
smaller brush or a brush with a pointed
tip and keep on adding some teeny tiny
dots close to each other to make it look
like a group of flowers. First, I'm adding them
closer to the fence, where we have those
tucker tones. After this, I will add some
onto the background as well. Just to give it a continuation, also to make it look like there are some flowers
in the background. Just take some white paint. It can be either guage
or white watercolor. Don't add a lot of water. You can see those white dots here, so they have to show up. If you add a lot of water, your paint will look transparent and that white color
won't be prominent. No matter whether you're
going with ga or watercolor, try to go with a thick
and creamy version of the paint. Don't
add much water. Now I'm going to
add more flowers. You can see the way
how I'm adding it. I'm just adding some teeny, tiny dots close to each other. I'm adding them as
different groups. See that. That's a right
side. Similarly, we have to add some flowers
on the left side as well, and then some in the background. If you want to try a different
color for the flower, maybe a purple or a yellow or
a pink, you could do that. But to me, honestly, I think white would
be the best color. Let's keep it simple and clean. But if you ask me,
my next preference would be violet,
a passel violet, you can just add some
white watercolor or gage with a violet or purple, and you can use
that color asple. A very light pastel violet, even that will look nice. Anyway, I'm going to
continue with white, and I'm going to add some
more flowers over here. Just like a sido, it is just a matter of
adding some teeny, tiny dots close to each other. You can go with any
of your smaller brush or a brush with a pointed tip. Then without lifting your hand, keep on adding these
dots. That's all. I'm focusing mostly on the area closer to the fence and
also the background. If you want to add some flowers at the bottom, you
could do that. Now I'm going to quickly
add some more flowers, and with that, we'll be
done with this step. Oh Okay, so that is it. I'm done adding the flowers. Now, before I pull
up the masking tape, I'm thinking of adding
some birds on the sky. I'm cleaning my brush, and I'm going with a
medium tone of pain scray. Now I'm going to add some simple birds onto the right side. I think I will add four or
five of them. See that? It's a very simple bird. You can add as many as you want. I'm just going to
add a few using a medium tone of pain
scray. It's not too dark. Next, I will add
some smaller ones. Maybe we can add one more,
and maybe another one. I'm going to add
one more over here. I have simply added
some birds onto the sky to make it a
little more attractive. That's our painting for the day. Now it's time to peel
off the masking tape. All right. So here is
the finished painting. You can see how beautiful
it has turned out. I love the foggy effect
and those little flowers. And I think the
color combination is also really beautiful, especially those green textures, I really loved it,
and even the fence. So if you haven't tied it yet, you know what to
do, give it a try. And let me know if you liked it.
23. DAY 19 - Orange Sunset: Oh. Hello, dear friends. Welcome to Day 19 of painting
mini acor landscapes. Our painting for the day is
a gorgeous moody evening. We will do this
painting as two steps. First, we will paint
the background. We will start with
a pastel orange, a pastel red, a muddy brown and some taco tones
at the bottom. That's going to be
the first step. Then when the base
layer has dried up, we will add all the
remaining details. That's how the process
is going to be. Now let's take a
look at the colors. The very first color you
will need is a basal orange. What I'm doing here
is I will make some white watercolor with orange to create
a pastel orange. Okay. So go with any orange, it could be even vermalin, mix a little with
white water color, and that's a color
you see on the top. Here it is. If you have a pastel orange in your
collection or any similar color, you can use it directly. You don't need to mix
and create this color. Okay so that's the first one. Now, coming to the second color, it's a mix of red
and the same orange. That's a color you
see at the center. Into the same color, I
have added some red, and that's a second color. So you will need a pasil
orange, also a pasil red. Now, the next color you see over here is actually a
mix of this color, and also a little of indico. So into this mix, I'm
adding some indico. See that? If you
make it more darker, the color will look
more brownish. So we have some pasal
orange on the top, then a pasal red at the center. Then towards the bottom. I'm using a grayish color, a muddy gray, and then
towards the bottom, I will introduce
some paints gray. For the tree sphal I'll
be using paints gray. That is our final color. Okay. It's a beautiful
moody evening, and the color palette
is very interesting. We're going to paint the
entire background in one C. Then we will come back and
add the remaining details. That's how the painting
is going to be. Here's a closer
look of the colors. You will need white tic, orange, red, indigo,
and paints gray. Okay, so keep all
the colors ready on a palette and
let's give it a try. First, make sure you have
all the colors ready. We need orange and white, then red, then some
intego and paints gray. You need these many colors on your palette before you start. We're going to
paint the anterior background layer
in one single go. When you have the colors ready, go with any of your clean white
brush and apply a coat of water onto the
anterior background and make it evenly wet. Don't add a lot of water. We just need a shiny coat. All right. My background
is evenly wet. Now let's start
applying the paint. This is the pressure
I'm going to use at size number eight. Now, I'm starting with orange. I'm picking some white and
I'm mixing it together. This one is brilliant orange. You can go with any
orange you have caught. Now let's apply that
color on the top. It's a very simple mix
of orange and white. I have a similar color with me, but I thought of mixing and creating as most of you
may not have this color. Apply some pasil
orange on the top. The orange I'm using here
is brilliant orange. You can go with any
orange you have got. Next into the mix,
I'm adding some red. Looks like it is too bright. I'm adding some
white and orange. The colors might be
slightly different according to the amount of
red or white you're adding. That's totally fine. Just
go the similar range. It can be a bit different. Next, I'm adding some
intco into the same mix. I haven't cleaned my brush. Now I'm adding that
paint at the bottom. So we have some orange on
the top, then a pasel red. Now we used a muddy brown, which is a mix of
pasal red and intco. I think the red is very
less. I'm adding that again. Start with the pastel
orange, then patel red, then into that pastel red, add some intco, and apply
that towards the bottom. That's what we have done so far. Now I will fill
up this remaining area in this muddy brown. Then gradually we can
add more darker tones. Now with the same brush,
I'm picking some more intco to make it more
darker at the bottom. We need to introduce some
textures and darker tones. Add more intco, and drop that onto the background,
only at the bottom. Now we have to make
it even more darker. For that, let's pick
some paints gray, and we can add that at the bottom moost area
closer to the masking tape. You can see how the
colors are starting to get more darker and intense, and that is exactly
what we need. We started off with
a lighter orange. Then we introduce some red, then a muddy brown, and
some taker tones now. Now, simply drop
in some shapes and some random lines onto the background to
create some texture. Do this only at the bottom. The rest can remain actus. Now, before we leave
this for trying, there's one more thing
that we have to do, which is adding some
landscape in the background. You see that same muddy
brown we created earlier. This time, it's a
bit more darker. Now simply add some shapes
over here. See that? They will look really blurry when the background dries out. Don't wait for a longer time. We need to add this when the
background is still wet. At some places, you
can make it shorter, and at some places you
can make it higher. Towards either side,
I'm making them a bit more higher
compared to the center. Simply add a shape,
while it is still wet. Now, if you want to add
some more darker tones, you could do that
right now while the background is still wet. Don't wait for a longer time. Introduce some taker tones,
wherever you feel like. That's how it has turned out. Now we have one more task left before we leave
this for trying. O just adding a sun
right at the center. Clean your bridge thoroughly, then dab it on a paper towel. Now go with some red
paint. Just a little. Don't pick a lot of paint. If you feel like your
paint is too watery, dab it on a paper towel
before you start. Okay. So take very little
amount of paint on your brush. Now, right at the center, introduce a shape, go a bright red and simply
add a shape over here. It doesn't need to be too pick. Then gentamuge it
into the background. It doesn't need to
be a perfect blend. Simply add some red
paint over there, and it doesn't need to
be in a perfect shape. Okay. On top of this, we're going to add a sun when the background
has dried up. What we're adding right now
is the glue around the sun. Simply add a shape like this
with a brighter tone of red. When you're doing
this, be very gentle. Don't put a lot of pressure and disturb the
background layer. Use the tip of your brush and gently add some
paint over there. Okay, that's how
it has turned out. Now we can leave
this for drying. That has dried completely, and it is looking so beautiful. Now our next task
is to add the sun, have some left over paint here. It is just white waterc. You can go with white
waterc or white case. Go with an opaque paint. Only if you feel it is too dry, you can add a drop of water. Now add a tiny circle
at the center. Place your white circle
on top of the red part. It has to be super tiny.
Don't make it too. It has to stay within
that red area. Okay. That's a glowy part and
the sun. Beautiful right. Whenever I'm using Pasal
colors for the sunset sky, I love to add a red
glow and white sun. I feel it instantly add a lot
of beauty to our painting. Anyway, that's how
it has turned out. Next, we can start adding
the trees around the sun. I'll clean my brush first. For the first few trees, we can go with a lighter
tone or maybe a medium tone. I have some Pasal red
there into the same mix. I'm adding some paints gray. Let's start with
a grayish color, and for the rest of the trees, we can go for a darker tone. Now, I'm going to add the
first tree over here. I'm starting by adding
an irregular line, and I'm stopping it over here, where I have the darker tone, so that I don't need to show the roots and the
remaining details. You can place your trees
wherever you want to. It doesn't need to be
in the exact same way. Start by adding an
irregular line, go with that muddy brown first, and then stop your tree right where you have
those taker tones. Now onto this, simply
add some small branches. Try to go with any
of your smaller brush to get the best result. The one I'm using here
a size number six. It has got a really
nice pointed tip. I can add these
branches quite easily. But maybe I will go
with a smaller brush at the end to add those
tiny tiny branches. That's a tree trunk
and the branches. Now onto this, I'm going to
start adding the foliage. Simply keep on adding some
dots using the tip of your brush and create
a shape there. The color is a muddy
brown or a muddy gray. You can go with any
color of your choice. Preferably a medium tone. For some of the trees, we
can work with a medium tone. Then for some, we can use a lighter tone to create
that moody effect. If you use a darker
tone for all the trees, you won't be able to feel
any depth in your painting. It's really important to play with different tonal values, especially if you're trying
to create a foggy atmosphere. For the rest of the branches, I will use my smaller brush. I'm picking the same color, and I will add some tiny
branches. See that? You can add them
wherever you want to. You don't need to follow
the exact same shape or pattern for the tree. Add them wherever you want to. If you want to add
some other tree, you could do that, maybe some pine trees
or something else. Or you can just go with
some empty branches. You don't need to
add the foliage. Those things are
totally your choice. As a teacher or an instructor. My intention is only to
give you directions. You can use them
however you like. Now I'm going to go
with the next tree. Again, I'm adding
an irregular line, and towards the bottom, I'm just merging
it with my finger. I don't want to show the roots and the rest of the details. Now we can add some tiny, tiny branches. It's
the same color. It's that muddy brown.
For these two trees, I have used a medium tone. I will add some
more foliage here. Then I will add one
more tree on the left. We have added one tree with foliage and one with
only empty branches. Now I'm going to add another
one towards the left. I have taken some
water on my brush. Now for this, I will use a lighter tone of the same color we used
earlier. See that? This one is much more lighter
than the previous one. Now we can add some branches. Try to play with
different tonal values to create that foggy
effect in your painting, and also de create a depth. You can see the color
I use right now. It is much more lighter than
the color I used earlier. Now with the same, I will
add another one here. I think I should have
started with this color, then moved to a medium tone. Anyways, I will just add it now, better late than never. Now I'm adding the foliage. Now, for the next one, I think we can go
for a darker tone. We use a lighter tone as
well as a medium tone. Now we can add one or two
trees using a darker tone. That's our next task. I'm thinking of adding
a bigger tree towards the left side, right
next to this one. But take a look
at your painting. Wherever you feel,
there's a lot of gap, you can add a tree over there. I'm picking more paints gray, and I'm making the color darker. Then I'm starting by
adding an irregular line. And I'm stopping the line when I'm touching
those darker toones. Okay. Now onto this, we can start adding
the branches. Go with any of your smaller brush to get the right result. Otherwise, they will
go out of proportion. We can add a few more branches, then we can add the foliage. These are very thin
delicate branches, add them in a similar way. I'm extending that
a bit down into the darker tones so that I don't need to show the roots
and the rest of the details. Now let's continue adding
the branches on the top. Now on to the foliage. Simply keep on adding some tiny, tiny dots and patterns
using your brush, preferably a smaller one. Don't lift your hand,
just keep on adding them. When you keep on adding those patterns close
to each other, it will end up looking
like the folate. Go ahead and add them in. In the future, if you're
trying a similar painting, maybe interrupt this tree, you can go for pine trees. Even that will be really nice. You can create a moody
atmosphere with some pine trees, maybe with a different
color combination. That's how it has turned out. I think we can add one now
branch towards the left, a slightly longer branch. I think with that,
we can call it done. I'm picking some more paint
to add another branch. I will add that over here. There's a lot of space here. Add a nice long branch
onto any side you prefer. Now onto this, I'm
adding the foliage. This one is going
to be my last tree. But if you want to
add another one, you could do that.
That's not a problem. Take a look at your painting. Wherever you fail,
there's a lot of gap, you can introduce one more tree using a medium tone
or a lighter tone. That's our painting
for the tree. If you want to, you
can add some birds, maybe a group of small
birds flying away. Anyway, now it's time to
peel up the masking tape. And so finished painting. It's a beautiful
color combination, and I think it turned out
really beautiful as well. I hope you all liked it. My favorite part is
that glowing sun. So yeah, if you
haven't tried it yet, give it a try and let me
know if you liked it. Okay, so thank you so much
for joining me today. I'll be back here soon
with our next landscape.
24. DAY 20 - Rainbow Sky: Hello, dear friends. Welcome to Day 20 of painting mini
aticor landscapes. Our painting for the day is
a beautiful rainbow sky. We'll be using four
colors for the sky. I don't think we have
used these many colors in any of the sky so far. Anyways, let's have a
quick look at them. The first color I have
used for the sky is blue. This one is the blue from Car. You can go with any
blue of your choice. It can be prussian blue, Cabal blue, ultramarine
blue, or any other blue. Or you can just keep blue
and use violet asphal. So that's the first
color you will need. We'll be using that on
the top of the sky. Now, after blue, we will
use rose for the sky. The one I have used here is
permanent rose from Shinhan. This is the one I will be using. If you don't have
rose, you can use crimson or carmine or
any other similar color. You can also use Opera rose. It will make the sky more
dramatic and bright. So that's a second color. Now, after rose, the next
color you will need is orange. This one is brilliant orange. You can go with any
orange you have caught. Or you can just add
some yellow with vermin or scarlet to create
a similar color. Okay. So we have
blue, rose, orange. Now, the last color you
will need is yellow. We'll only use a
little of yellow to make the sky
more interesting. It can be any yellow,
primary yellow, or gambollo, or
any other yellow. This is the orange
and yellow I'm using, brilliant orange, and
cadmium yellow light. Okay, so those are the four colors you will
need for the sky. An blue of your choice, rose or crimson, orange, and then finally a yellow. Now, there are two more colors you will need for this painting, which is sap green for the
meadow and for the landscape. And then for the darker
tones and final detailing, you will also need
some paints gray. So this was sap gray. It's again from Shinhan. Now, the final color you
will need is paints gray. If you don't have paints
gray, just go with plaque. We'll be using that to
add the deeper tones. That summarize all the colors you will need for
today's painting. You will need four
colors for the sky, a blue of your choice, rose, orange and yellow. Then for the meadow
and the landscape, you will need sap
green and paints gray. Keep all the colors ready on your palette, and
let's give it a try. Alright, so let's start. Our sky for the day is
a bright, colorful sky. So to begin with,
I'm adding a line, the horizon line to separate
the sky and the mid. Okay. Now we'll have some
landscape over here. You can just go for a simple
sketch like this for now. We can alter the shape
later as to painting. Okay, so that's a sketch. Now we'll start with blue, then rose, then orange, and some yellow over here. So I'm hoping you have all the colors ready on your palette. We need all these
colors for the sky. So here's the blue
I'm going to use. Then I have permanent rose, orange, and some yellow. I have all the colors ready. Now, I'm going to
start by applying a coat of water onto
the entire sky. Apply a nice even at of water. Make sure the water has
reached everywhere. My sky is evenly wet. Now let's start applying
the colors onto the sky. To apply the paint,
I'm going to use a round presh this s
is size number eight. First I will clean it. I'm going to start with a
medium tone of blue. The one I'm using
here is Theil blue, go with presim blue or any
other blue of your choice. Now, apply that on
the top of the sky. We can add a bit more.
Okay, so that is blue. Now I'm going to clean my brush. And I'm going to go
with my second color, which is permanent rose. If you don't have
permanent rose, you can use crimson or carmine
or any kind of rose color. Okay. Now let's clean
the brush I can. Maybe we can add in some
more rose, a brighter tone. Okay, so we have
applied blue and rose, and we have blended there. Now let's clean the brush
and go with orange. This one is brilliant orange. I'm adding that over here, leaving some gap at the center, and over there, I'm going
to introduce some yellow. You can see the way I
have left some cap. Over there, we can add yellow. Let's clean the brush and go the last color which is yellow. For this sky, we are
using four colors. We started off with blue, then rose, orange,
and now yellow. My paint is a bit ottery, so I'm tapping it
on a paper towel, and I'm gently smudging them
to give it a better blend. That is the base layer. Now, I'm going to keep this brush aside, and I will go with
a smaller brush. This one is size number six. First to make sure it is clean. Now, to add the clouds, I'm going to go with
a purple color. I'm going to mix and created. So I'm picking some rose, and I'm adding that with blue. Okay? Now, using that color, I'm going to randomly
add some clouds onto the sky. Mostly on the top. If your paint is do watery, dab it on a paper towel
before you start. Now, add your clouds,
however you want to. As I mentioned, I will be
adding them mostly on the top, where I have blue and rose. I won't be adding much
towards the bottom, where I have orange and yellow. Because violet and orange
and violet and yellow, they are complimentary colors. If you use violet or purple
over orange and yellow, they will end up
creating a muddy color. That's why I'm focusing
more on the top part. Maybe we can add a bit towards
the bottom, not so much. Only on the orange to
give it a continuation. I'm picking a little more paint, and I'm adding some small clouds over here, and that's it. Now I'm going to add
a few on the top. On to the blue area. I'm loving the colors
and the blend. Now, how will at your painting? If you want to add some more
clouds, you could do that. But try not to add
any on to the bottom where you have yellow,
leave it acid is. You can add some more on the top or maybe over here
where you have orange. Okay. I'm not adding much here. I just wanted to give it a
continuous look. That's all. All right. That's how
the sky has turned out. I'm very much impressed. Now let this dry.
In the meantime, we can start with the meadow. I will clean my bigger brush. And I'm going to use sap cream. Pick a metium tone
of sap green on your brush and apply that
onto the entire area. O while you're
applying the paint, leave a tiny cap in
between the sky and the meadow so that the paint won't smudge
into each other. Go with the similar tonal value. I think I accidentally
touch the sky. Now, some yellow is coming
onto the green. Never mind. I will just pick a paper
towel and I will pick it off. Because anyway, I'm going to add some landscape over there, so it's not going to
affect the painting. Okay. Now I'm going
to apply paint again. So go the similar tonal value.
Don't make it too light. Now with the same rush,
I'm going to pick some paints gray to
add the deeper tones. You can pick some green and mix that with paints gray
to create a darker green. Now, I'm going to apply that
at the bottom over here. And also I will add a few
lines onto the green part. Just to give it some texture. I'm not going to add any
grassy patterns or anything. I will only add these
darker tones and that's it. First apply a medium tone off sap green onto the entire area. Then go the darker tone. You can apply that
at the bottom. And also you can add some lines onto the background to
give it some texture. So the sky and the
meadow is ready. Now we'll have to
wait for this to dry before we go the landscape. That has dried completely. The colors are looking
really beautiful. Now the next task we have is to paint the landscape
along the horizon. And for that, you will
need three colors. At the center where
we have yellow, we will use a lighter green. Then for the rest, we will use
sap green and paints gray. I'm going to start with Sareen. Go with a medium tone, don't add a lot of water. Now, first, I will add a line. See that? It's a
simple straight line. Then gradually, I will
give it a proper shape. Okay. I'm just adding some
paint on either side. I'm not adding much at the
center where I have yellow. So I'm focusing on
either side now. Towards the center, I want
to introduce a lighter tone. For now, I have just
added a basic shape. Now I'm cleaning my brush, and I'm picking some yellow. The same yellow I
use for the sky, and I will mix some green with it to create a lighter green. Now over here, I'm going
to add that lighter green, only at the center, where I have yellow in the background. On either side, I'm
going to make the green more darker and
only at the center, I will introduce
a lighter green. This is just to
make it look like the sunlight is hitting
on those trees or plants. Only at the center, go
with the lighter tune, and then on the top, add in some tiny tiny patterns to
make it look like leaves. Now I'm going to
continue with sacrem. I will add that at the bottom. Only on the top, I want to
retain that lighter tune. Towards the bottom, I will
introduce more taco tone. Next, I'm picking
some paints gray. I'm going to add that
onto the extreme sides. We can add some on the top in between and also at the bottom. Simply keep on adding some
dots and some sheets onto that background and
smudge it into the green. Only at the center, you
ret in those medium tones. On either side, we can
add more taco tones. Keep on adding that paint, and making it higher
on either side to make it a bit
more interesting. Now, I'm adding some ten
tiny shapes on the top, to at the bottom as well. I'm adding some broken lines. See that. At the bottom, you can keep on adding
those teeny tiny lines. Like how we did for
the other paintings. It doesn't need to be perfect. You don't need to
put a lot of effort. While you're adding
those darker patterns, along with that, add some
teeny tiny lines, that's all. This side is nearly done. You can see those
different tonal values and the weight is looking. Similarly, I'm going to continue adding
those darker toons, as well as those
lines at the bottom. Now, let's continue
till the other end. Over here, the paint has dried. Never mind, we can fix it. We can come back with some sap
cream and smudge it again. In a ways, we are not
looking for a clean blend. We want a textury background, so we can keep on adding a
paint even when it has dried. Okay. First of all, add these lines over here. You can see how quickly and
carelessly I'm heading them. As I said, it doesn't
need to be perfect. Now I'm cleaning my brush, and I'm going back
with green Sap green. Now with green, we are
going to smudge this. Simply run your brush over those taco patterns
and smudge it. In my case, it has
dried completely. If yours hasn't dried yet,
you don't need to do this. You can see the way
how it has turned out. I'm gently smudging those patterns to give
it a better look. We can add some more taco
patterns at the bottom. But on the top, retain those medium tones
and lighter tones. Only at the bottom, you can
introduce darker tones, and also on either sides. But at the center where we
have yellow in the background, retain those lighter tones. Now, I'm going to go back
with some more paint screen, and I'm going to introduce some taco tones on either side. And also I will give
it a better shape. I think I can make it a bit more higher on the
left and right. That's what I'm
going to do next. With the same brush, I'm
picking some more paint, and I will alter the shape
on the extreme sides. This one is completely optional. I just wanted to make
this area higher. I'm just adding some more
paints gray, and on the top, I'm adding some tiny patterns to make it look like leaves. Similarly, I will do the same
on the other side as well. Okay. Be adding any paint at
the bottom or the center. I'm leaving it assts. I'm quite happy with the
weight as turned out. I'm adding these
taker toones only on either side to give
it a better shape. In a similar way, I'm adding some taker toones
on the left asph. It's a really beautiful sky. Maybe you can try the
same on a bigger scale. If you're trying it
on a bigger scale, maybe you can add some
more details on the meto. We haven't added any grassy
pattern or anything. We simply added some taco
toones on a green pack ground, but maybe you can go for
some grassy patterns. Also you can add some birds on the sky to make it
more interesting. Okay, so that's all for the day. We had done with
our rainbow sky. It was a really quick painting. I hope you all enjoyed it. Give it a try if
I get to try it. I'm very sure you're
going to love it. If you want to make
the sky more dramatic, you can add more
clouds or can just go for a blend of four
colors without any clouds. Anyways, let's take off the masking tape and have a
closer look at the painting. All right, so here's our
painting for the day. It's a beautiful sky. I think the composition
is really beautiful. I smudged some
paint on this side. But other than that, I'm really
happy with the painting. If you get to try it,
do give it a try. I let me know if you liked it. Oh.
25. DAY 21- Beach Sunset: Hello, friends. Welcome to day 21 of painting many
at coor landscapes. Our painting for the day
is a quick seascape. My favorite part about this painting is the
color combination. So let me introduce you
to the colors first. For the sky, I will be
using three colors, two colors for the base layer, which is silo blue from Sen. And then John Brilliant
number two from Shinhan. This one is nothing
but a Pasal orange. You can see the
pigment number here. P O means orange pigment, and PW means white pigment. So it is nothing but a
simple Pasal orange. I can show you how to
create that color. All you have to do is just add some white watercolor with any of the orange you have got. You should add more white
and less orange in the mix. It can be any orange. Okay, so let's write
out. I already have some orange on my palette. Now, I'm squeezing out a
little white watercolor. Now let's try mixing
them together. You can go to any
orange you have got, pick a little, just a little. Now with the same sh, pick some white vertic and
mix them together. See that. It looks 100%
same to the other color. See that. All you have to do is just mix some white vertic with any of the
orange you have got. You should only be adding a little of orange and more white. Now, according to the
orange you're using, the color can be a
little different, which is totally fine. We just need a pasal orange. Now, I'm going to swatch out
John Brilliant number two. You can see how similar
they are looking. They are almost the same. That's the first color you
will need for the sky. Now, along with that, you
will also need a blue. The blue I'm going to use
a salu blue from senilar. You can go with any
blue have card. It could be Precim
blue, cobal blue, ultramarine blue
or any other blue. We need a medium toe
for the sky as well as for the sea. That's
our second color. Now, to add the clouds, you will need a Daco blue. I wanted to work
with minimal colors. I thought of mixing some
paints gray with thalo blue. If you have some indico on your palette, you
can use it directly. It doesn't need to be a mix
of paints gray and alo blue. Just by mixing these two colors, you will get a color which
is very similar to intc. See that? That's a color I
will be using for the clouds. You can see the color. It is
so much similar to Intego. If you have some indico on
your palette, use it directly, or you can mix some
paint scree with any of the blue you
are using for the sky. Paint scree the next
color you will need. We'll also be using
this color for the grassy land to
add the darker toons. So for the sky, you will
need a pastel orange, teal blue or any other blue, and also some paints gray. Now for the grassy land, you will need yellow ochre, and also some sap green. For the grassy land, the
color you see on the top, it's a mix of sap green
and yellow ochre. As you're painting
an evening scene, I don't want to use
bright and bold greens. I want a dull green
for the background. That's why I thought of mixing some yellow ochre
with sap green. Okay. Maybe I can quickly show you how to
mix and create that color. So pick some yellow ochre
and mix that with Sap green. This mix will give you
a beautiful green, which is more like olive green. See that? Now, that's a color I'll be using
for the grassy land. Along with this, I will also use some sap green and also paints great to add
the deeper toons. Okay, so that summarise all the colors you will
need for today's painting. It's a really quick and
a beautiful painting. So yeah, keep all the colors
ready on your palette. You can pre mix basal orange
to make the process easier. Okay, so quickly
keep all the colors ready on your palette,
and let's give it a try. Okay, I'll start. I have my paper and the
colors ready here. Now, I'm going to start
by adding the sketch. It's not a complicated sketch. You just need to add a line, which is the horizon line? I'm going to add that over here. First, add a straight line, a little below the
center of the paper. Now, right below that,
add another line. This time, it's an irregular
line, not a straight one. Simply add an irregular
line like this. Okay. So the space in
between is the sea, and the bottom is the grass. Okay, so that's a sketch. We have the sky, a little of sea in between and
a grassy land. Now, we already had a
look at the colors. You will need a blue and also
a pasil orange for the sky. This is the one I'll be using. So have my colors
ready on my palette. So I'm going to
start by applying a coat of water on
to the entire sky. A nice gentle coat of water. Don't add a lot. We
only need a shiny coat. The sky is evenly wet. Now we can start
applying the colors. Just like I mentioned
D, you will need a blue and a basal
orange for the sky. Now the pressure I'm going
to use here is a flatbsh. I'm starting off with
a medium tone of blue. This one is thalo blue. You can go with any
blue you have caught. It doesn't need
to be thalo blue. It could be cobalt
blue, Prussian blue, ultramarine blue, or any
other blue of your choice. Now using my flat brush. I'm applying that on
the top of the sky. Go the similar tonal value,
don't make it too light. I've applied blue
almost half of the sky. Now I'm going to clean my brush, and I will make it
lighter over here. We have a mete tone on the top, and I have made it lighter
towards the bottom. I think the top part can
be a bit more brighter. So I'm adding some
more paint only on the top and towards the bottom, I'm going to retain that
lighter tones. That is blue. Now we can go the second color, and for that, I'm
using a smaller brush. Make sure your brushes clean. Now, pick up that
beautiful pastel orange and apply that along
the horizon line. See that. That's the
color I'm using. You can simply mix
some orange with white wacor and create
a similar color. It's a beautiful color to
use for soft basal skies. Simply add that
paint onto the sky. You don't need to put a
lot of effort in blending. Just add some lines
and leave it acts. Because right over here, we're
going to add some clouds, so it doesn't really matter
whether it's a clean blend or not. That's a base layer. Now onto this, I'm going to add some clouds using a darker tone. Into blue, I'm
adding some paints gray to make it look
more like indico. That's a lot dark. I need to
add more blue into the mix. This color is more like indico. If you have indigo on a palette,
you can use it directly. Here is the mix I have created. It's very much like indico. Now, if you paint is two wattle, dab it on a paper
towel before you start adding the clouds.
Now let's start. Right over here where we
have orange and blue. I'm going to add the clouds
using a medium tone. I'm just adding some
big shapes over here. I'm adding that
till the other end. If your paint is watery, always
dab it on a paper towel. Otherwise, it will spread a lot, and it will be very difficult to control the way is spreading. I'm adding only one
big cloud. See that. Start from either left or right and spread
it across the sky. I want a soft peaceful sky. I don't want to make
it too dramatic. I'm just adding one big cloud and maybe a few smaller
ones around it, but I'm not adding
too many clouds. Now when they dry up,
they will look really beautiful. I'm nearly done. I think I will quickly smudge the colors to give it a
bit more softer look. See that? I'm being very gentle when I'm
smudging the paint. Don't put a lot of pressure. I'm just trying to give it
a softer and a better look. Okay, so that's my sky. I'm really happy with the colors and the weight
as turned out. It's a soft, peaceful sky. Our next task is
to paint the sea, but before that, we have
to wait for this to dry. The sky has dried completely, and you can see how soft and
beautiful it has turned out. Our next task is
to paint the sea. And for that, I'm going to
go back with the same blue, Telo blue, which I
use for the sky. I will start with a metium tone, and I will apply that
onto the NTC first. Then using some darker blue, I will add some
textures and details. Go the same blue which you
have used for the sky. I'm using a similar
tonal value like this. Now I'm applying
that on to the t C, using a smaller brush. The horizon line
has to be straight. Be a bit careful when you're adding paint
along the horizon. We need a straight line here. Now towards the bottom, we have an outline there. Follow that line and fill up
some blue inside that space. The blue I'm using here is
Theil blue from senalar. You can go with any
blue of your choice. Go with the medium tune. Don't make it too
dark or too light. Also, as it's a smaller space, I would recommend going with a smaller brush when
you're adding the paint. The brush I'm using here
is size number six. Okay, so the base
layer is ready. Now, the same brush, I'm
going to pick a darker blue. I already have it
there on my palette. It's a mix of paint
scra and kilo plue. It is the same mix I
used for the clouds. Now I'm adding some
lines onto the sea, using that taco tone. My paint is a bit watery, so I'm dabbing it
on a paper towel, and then I will add
the lines again. We don't need a lot of lines. We only need a few
here and there. We only have a little
space in between. So be very careful
when you're adding the lines. Don't add a lot. Now, just like I said earlier, if you have indico on your palette, you
can use it directly. You don't need to mix
blue and paints gray. Okay. That's a C. First, we applied a layer of alo blue. Then on top of it, we added some lines
using a darker blue. Now we'll have to
wait for this also to dry before we go the next step. Okay. Now it's time
to go the final step, which is painting
the grassy land. For that, I need a dull green
and to create that green, I'm going to mix some yellow
ochre with sap green. So I'm picking some yellow
ochre and sap green, and I will mix them together to create that color which
is more like olive green. If you have olive green,
you can use it directly, or you can simply mix a
yellow ochre sap green. See that. That's a major color I will be using for
the grassy land. Then along with that,
I will also use some sap cream and also some paints great to
introduce the darker tones. Mix some yellow ocher
and sap cream together. And add that on to the top
part of the grassy land. As we come towards the bottom, I will introduce more
medium and darker grain. For now, simply add the
paint onto the background. It doesn't need to
be a clean blend. We are trying to create
some texture here, so you can add the
paint however you like. Now I'm adding some sap
cream on top of it. See that. Start with the color, which is more like willow green. Then you can add some
sap green in between. That's what I have
done on this side. Similarly, I have to apply paint on the other side as well. Go back with a mix of
yellow ocher and sap green, and I will add that over here. Then gradually
towards the bottom, I will add some sap green
and also some darker green. Okay. So that's a top part. Now with the same brush, I'm going to pick some sap cream. And I will add that
at the bottom. You can just keep on pushing
and pulling the pains into the background and create
a textury background. It doesn't need to
be a perfect blend. Okay. Now I'm going to
keep this brush aside. With my size number
six on brush, I'm going to pick
some paints gray, and I will mix that with Sap green to create a darker green. We just need a darker green. You can either mix indico or
paints gray with sap green. Now, I'm going to add that
towards the bottom part of the grassy land. See that. Simply drop in that paint
onto the background. Just like I said
earlier, it doesn't need to be a proper
perfect blend. But my background
has almost dried up. With my other brush, I'm
picking some sap green, and I will smut it a little. Otherwise, it will stay as it
is like some rough patches. Smart it with a bigger brush if your background
is drying out. Now let's add some
more tucker tones. Add them mostly at the bottom, and towards the top,
retain that olive grain. Simply push and pull
some paint into the background to create
some textures in between. And that's it. That's how the
background has turned out. Now with the same
brush, I'm going to add some grassy pattern to
give it a better finish. Now, just in case if
you don't want to add those grassy pattern,
that is totally fine. I think we already have
enough textures there, so the grassy pattern
is completely optional. Anyway, I thought
of adding a few in between to give it a
more complete look. With a darker tone, I'm just
adding some grassy patter. There are just some rough lines. I'm not putting a lot of effort, and I'm adding some
free hand curvey lines to introduce more texture. These lines I'm
adding right now, it's not very visible as
I'm using a medium tone. I think I will have to
go with a tucker tone. Let's pick some daker tone, and we can add in
some more patterns. There's just some
free hand cove lines, nothing complicated here, and they don't need
to be perfect. My background is
still a little wet. O which is completely fine. I'm not looking for crisp
and well detailed lines. I just want some texture
in the background. That's all. I have added
enough using a medium tone. Now towards the bottom, I think I should go
with a daker toon. Otherwise, it won't be visible. So with the same reh, I'm
picking some more paints gray, and I'm mixing that with green. Now I'm going to add some more grassy line only at the bottom. The rest is looking quite nice. Now you can clearly see them. Earlier, they weren't
really visible. See that? Simply add some free
hand curve lines. It can be in any direction. But try to go the smaller
brush or a brush with the pointed tip so that you
can add them very nicely. See that? Beautiful, right. I'm really loving the
color combination. Whenever I'm painting evenings, I always love to go with ol green rather than bright
green and sap green. I think those colors instantly brings out that evening
mode in the painting. To be honest, my favorite
thing about this painting is obviously the color combination.
I'm really loving it. Anyway, I will quickly add
some more grassy lines, and then we can call it. To me, the color combination and even the composition is giving me a summer
beach holiday vibe. I really like the sky as well. Anyways that's our
painting for the day, I hope you guys are happy
with the way has turned out. The basal orange and blue, they both are going
very well together. It's a gorgeous
color combination to paint a peaceful sky. So give it a try if
I get to try it. Let me know your
thoughts about it. All right. Now it's time to
peel up the masking tape. And here is our gorgeous
beach landscape for the day. I hope you all loved it. Okay, so that's all for the day. Thank you so much for joining. I'll be back here soon with our next mini vertical landscape.
26. DAY 22 - Cloudy Blue Sky: Hello, dear friends. Welcome to another day of painting
many vertical landscapes. Our painting for the
day is a gorgeous blue, cloudy sky in meadows
and mountains. It's a quick landscape, which you can finish in
less than 15 minutes. So as usual, let's start by looking at the
colors we will need. The first color you
will need is a blue. The one I'm going to use
here is cillin blue. If you don't have seran blue, you can go with Cobal blue, ultramarine blue, prussian
blue, or any other blue. So that is the first
color you will need. Now, along with that, I'll also be using one more
color for the sky. O the pain scre. We will need a lighter tone of
paint screen to add the shadow for the clouds. That's the second color
you will need for the sky. A blue and paint screen. Now the next major color you will need for this
painting is green. I'll be using sap
green for the meadow, as well as for the mountain. Okay. So the next
color is sap green. Now, to make the green lighter. Now along the top
part of the meadow, I will need a lighter tone, and to create that color, I'll be adding some lemon
yellow with sap cream. So that is our next color. On the top, we will
use a lighter green, and towards the bottom,
we will make it lighter. If you have a lighter green with you, you can
use it directly. You don't need to mix lemon
yellow and sap cream. Now there is one
more color you will need, which is Indico. For the background mountain, I'll be using a mix of
cerlian blue and intco, then for the Fucron mountain, Ave sap cream and also Indico. Okay, so that summarize the colors you will need
for today's painting. You will need a blue
of your choice, then paints gray, soap cream, lemon yellow, and intco. Okay, so keep all
the colors ready on your palette and
let's give it a try. Okay, so let's start
with the sketch. For this painting, you will need to add two sets of mountain, one in the background, and
one in the foreground. So first, I will add an irregular line to
show the meadow. And now we can start
with the first mountain. This is the one in
the fue ground. Now I'm adding another one here, a shorter one, that's
in the foe ground. That's a sketch. We
need two sets of mountain and an irregular
line to show the meadow. The sketch is ready. Now I'm hoping you have the colors
ready on your palette. For the sky, you will need
blue and paints gray. It can be any blue. Now when you have the colors
ready on your palette, you can start applying a coat of water onto the entire sky. We only need a shiny coat
of water. Don't add a lot. I'm leaving out the mountains and I'm adding water
only on the top. Okay, so the sky is evenly wet. Now, to apply the paint, I'm going to use my fi
number six strong brush. First, make sure
your brush is clean. Now, I'm going to start with
the medium tone of blue. So We blue you're using. Start with the medium tone. Painting a sky can be a
bit t rocky for beginners. So I would recommend giving it a watch before you attempt it. I've taken some
blue on my brush. Now, as I'm applying the paint, I'm going to leave some
shapes in between, which are going
to be the clouds. See that. Go with any of your medium size brush and while you're
applying the paint, leave some shapes in between. Now I'm going to leave
another one at the bottom. This one is a very small paper, so we don't need
a lot of clouds. We only need one or
two bigger ones, or a few smaller
clouds, that's it. Okay. So try to co a smaller brush or a
medium size brush. This way you have better control on the way you're
adding the paint. If it's a bigger
brush, all the sheaves will end up becoming too big. I have cleaned my brush. Now, I'm going to go with a
lighter tone of paints gray, a really lighter tone. So add enough water and turn
that into a lighter tone. So that's a kind of tonal
value we have to go with. Now, along the bottom
part of the shape, add some shadows, using a
lighter tone of paints gray. You have to do this really quick while the background
is still wet. Now, let's do the same thing for the other shapes we
have left there. Over here, also, I need
to add some shadows. See that. Only when
you add the shadows, your clouds will look
three dimensional. Otherwise, it will
look quite flat. You can see the inst
difference those shadows made. If you want to make
it more prominent, you can add some more shadows. I'm adding some more paints gray along the bottom. See that? Let's do the same
for the other ones. You have to be real quick and add the shadows while your
background is still wet. Okay, so that's how
it has turned out. We have done a
beautiful cloudy sky. So when you're adding the paint, you will have to leave
some shapes in between, O, which are eventually
going to turn into clouds when we
add the shadows. Okay. It isn't that complicated, but if you're trying
it for the first time, it might be a bit rocky. Now, let the sky drise. In the meantime, I'm going
to start with the meto. To apply the base layer, I will use my bigger brush. This one is size number eight. Now I'm going to
start with sap cream. Let's pick a medium
tone of sap cream. Let's apply that
onto the background. Okay. So Right now, the color I have
used a sap green. Now into this, I'm going to add some lemon yellow
to make it lighter. I'm going to add that
on the top. See that. So add an irregular line on the top and introduce
some lighter green. Okay. Now we have to drop
in more taker tones, especially at the bottom. And for that, I'm picking
some paints gray. To get a better control, I will use my smaller brush. I'm picking some paint scream, mixing that with sap cream, and I'm going to add that at the bottomost area closer
to the masking tape. Simply drop in that onto the background to create some
darker tones and textures. Do this while the
background is still wet. Simply drop in some
darker tones here and there and smudge that
into the background. It doesn't need to
be a clean blend. Those lines can stay actus. We're only trying to
create some texture here. Okay. So that's how
it has turned out. Now with the same
brush, I'm going to add some grassy pattern to give it some more textures
and character. They don't need to be perfect. Simply add some lines onto the background, some
free hand lines. The brush I'm using here
is size number six. It has got a pointed tip. So I don't think I need to
switch to a smaller brush. But if you prefer going with a smaller brush,
you could do that. Maybe size number
two or even zero. I'm not picking any new paint. I'm just making use of the
paint in the background. I'm simply pushing
that to the top and I'm creating these
grassy patterns. See that? We need them
only at the bottom. You can leave the top at actus. I feel like the color could have been a bit more lighter
towards the top. Right now, it looks like sacren. It doesn't look like
a lighter green. Anyway, there is no going back. Yeah, I'm going to continue
adding the grassy pattern. I'm picking some more taco toon, and I will add a few
more only at the bottom. The top part is kind of okay. We don't need a lot of
patterns over there. So just add a few
more at the bottom, and then we can
leave it for trying. Okay, so the sky and the
meadow has dried completely. Next, we can paint the
background mountain. I'll clean my brush first. Now I'm going to
go with a mix of cerliin blue and
a bit of indico. The reason why I'm not using indico actus because I want the color to be a
bit more brighter. If I use indico actus, it will be a more
dull and Daco blue. That's why I'm adding some
cerliin blue with this. That's a kind of color I'll
be using for the mountain. Now, I'm going to apply
that onto this tA mountain, following that outline. Se that. Simply follow the outline and fill that in with the
color you have created. You can also use
ultramarine blue for the mountain if you want to
make it look more blush. That's a background mountain. Now, before we go with
the Focron mountain, we'll have to wait
for that to dry. But in the meantime,
I think we can add some more grassy pattern
onto the meadow. I feel those patterns
are not at all visible. So I'm going with
some paints gray. I'm only adding a few
patterns at the bottom, using that taco tone. This step is
completely optional. Or if you want to add
some more grassy pattern, you could do that. Otherwise, I can just
ignore the step. Okay. I will add a few
more towards the left, then I will leave it for trying. Whenever you're
following a tutorial, you don't need to
follow each and every step your
instructor is doing. You can take your own decisions and change your painting
according to the way you like. Okay. So I've added some more
grassy pattern over here. I think it made it look better. Earlier, it was looking
a bit incomplete. Yeah, that is done.
Now, the only task remaining is to paint
the fo ground mountain. Before that, we'll have
to wait for this to dry. Okay. Now it's time to paint
the Fu ground Mountain. That's the only thing left. For this, I will use
indigo and sap green. Okay? Now I'm going to
make some indigo and sap green together to
create a darker green. We can add some more intco
to make it more darker. Now, I'm going to apply
this darker tone on the top part of the mountain
in a very random way. Then gradually I will add some sap green as well to
create more texture. Right now, the color you see is a mix of sap green and intco. I'm adding that on the
top part of the mountain. I'm simply fooling the
outline we have there, and I'm adding that darker tone. See that? Just
randomly add that in. Now, clean your brush
and go with sap green. And apply that on
to the background. See that. We have a
dakoton on the top. Now we're using sacren acid is. Now, towards the bottomost area. We have to introduce
that daker green again. But before that, I will squeeze out some sacren onto my palette. I don't have any pain left. The paint. Now I'm going
to go back with Sac. I will add some more paint. I feel what I have
added is really light. There wasn't enough paint
on my palette. Okay. So I started off
with a Daco green, which was a mix of
indico and Sabcren. And right now I'm
using Sab grin actus. Now, towards the bottom line, I want to introduce a Daco too, so I'm picking some more
indico. Mixing that with green. No, I'm gently adding that along the bottom
line of the mountain. Otherwise, you won't be able to differentiate between
the meadow and the mountain as the colors
are almost the same. Along the bottom line, add some lines and some
tiny, tiny patterns. Then smudge that
into the background. See that. We're just trying
to create some texture here. It doesn't need to
be a perfect plant. Add a Daco toon fooling
that outline of the meadow. Then drag your brush towards
the top and smudge it into the background.
That's all we need. We just need some greens in between and some
darker tones as well. Now if you want to modify
the shape of your mountain, you could do that right now. Over here, I'm thinking of
making it a bit more higher. The rest is looking quite fine. So, take a look
at your painting, if you want to drop in
some more darker tones. O if you want to modify the
shape of your mountain, you could do that right now. That's how my painting
has turned out. My favorite part about
this painting is the sky. I really loved the weight
it has turned out. Anyway, now it's time to
peel up the masking tape. So here's the
painting for the day. It was a really quick one. We finished this in
less than 15 minutes. I hope you all enjoyed the process and the
painting you have created. If you're here to
try it, give it a try and let me know if you liked it. Oh. Oh
27. DAY 23 - Opera Clouds: Hello, dear friends.
Welcome to Day 23. Our painting for the day is a beautiful sky with
some Opera pink clouds. So as usual, let's start by looking at the
colors we will need. The very first color you
will need is a Pasal pink. This one is brilliant pink. Pasal pink is one of the major color you will
need for this painting. If you don't have a pasel
pink, it's totally fine. You can easily
create one by adding some white aticor with red
or crimson or carmine. Okay, so that's the first
color you will need. Now the next color you
will need is orange. I won't be using orange acts. I'll be mixing orange with pink to create a peach
kind of a color, which is the color you see
on the top of the sky. I will swatch out orange first, then I will show you how to
mix and create that color. The one I'm using here is
called brilliant orange. It's again from Shinhan. It's a beautiful, bright orange. Okay. If you don't have
any kind of orange, you can use armalin,
instead of this color. Now, I'm going to mix
some orange with pink. According to the color you like, you can add them
in any proportion. Okay. See that? That's a mix of pink and orange. If you add more
pink into the mix, the color will be more pinkish. On the top of the sky,
I'll be using this color, then towards the center,
I will use pink. Now, towards the
bottom of the sky, I'm going to use a color which is more like a pasil purple. And to create that color, I will mix some
violet with pink. That means the next color
you will need is violet. This one is again
from Shin hein. It is called permanent violet. Just like orange, I won't
be using violet actus. I will mix that with pink. See that. Pick some violet. Mix that with pink. See the color. It's
a Pasal purple. According to the proportion
of colors you're adding, if you add more violet, it will look more voletish. And if you add more pink, it will have a more
purple kind of a tone. Okay? So those things
are totally up to you. It doesn't really matter. Now, the next color
you will need is opera pink or Opera rose, which is a very
bright Nonish pink. This one is also from Shinhan. So first, we will create our base layer using
pastel orange, Pasal pink. And Pasal purple. Then onto that, we will add some clouds using
this bright pink. The next color you will need is indico for the mountain
in the foreground. We'll be using a mix
of indico and violet. That is the final color you
will need for this painting. According to the colors you have with you, you can
change the colors. If you want to skip using
orange, that's totally fine. You can just use pink
and violet for your sky, and then you can add the clouds. Te are the colors you will need. You will need a
pasil pink, orange, violet, Opera rose, and Indigo. Keep the colors ready on your palette and let's give it a try. All right, so we already
had a look at the colors. I'm hoping you guys have
it ready on your palette. For this painting, you
don't really need a sketch. We can add the mountains
as we're painting. Okay, so let's
start with the sky. Once you have the colors ready, start by applying a coat of
water onto the entire paper. Go with a clean brush and gently apply a coat of
water onto the tire paper. Run your brush multiple times just to be sure
the coat of water. Okay. So we just need a
shiny coat, don't add a lot. So my sky is evenly wet. Now I'm going to go with
my size number eight on brush to apply the paint. The first color I'm going
to start with is pink. I'm going to apply pink almost
at the center of the sky. Okay. So right over
here, I'm applying pink. Now, toward the
top, I'm going to introduce a more orangish color. Okay. So with the same brush, I'm going to pick some orange, and I will mix them together. This one is more
like a peach color. Okay. Now let's apply
that on the top. So towards the center,
we have a pink, and at the top, we have a color which is
more like a peach. Okay. Now I'm going
to clean my brush, and I'm going with the third
color, which is purple. I will apply some more pink, and then I will gradually add some violet along with pink. Pick some violet,
mix that with pink. This way, we can
create a pasel purple. That's a color I'm using. Now I'm going to apply this
along the bottom part. On the top, we have
a peach color. Then we have some pink, and now we're applying
a pasel purple. I don't have enough
pink on my palette. So I'm squeezing out a bit more. So as I mentioned earlier, this one is brilliant
pink from Shinhan. If you don't have basal pink, you can mix and
create one easily. Just add some white aticor with any of the red
or pink pigment. It could be crimson or
red or rose or any color. Just add some white
aticor along with that. And you'll be able to create a color very similar to this. Okay, so I'm running my
brish back and forth to blend the colors. That's
how it has turned out. Now, onto this, I'm going to add some clouds using opera pink. Opera Pink or opera rose
is a bright Nonish rose. If you don't have that color, you can just use
crimson or carmine. Now with the same brush, I'm
picking some opera rose. And I'm going to add some
clouds onto the top. See that. It's a very
bright and bold color, more like a neon color. I won't be adding
a lot of clouds. I'm planning to add them
only onto the right side, but you can add as many
clouds as you want. See that. You can add the clouds
however you like. You just have to add them while the background is still wet. That's the only thing you
have to be careful about. Also, the paint should
not be too watery. Now I'm picking a much
more bolder tone, and I'm adding a few more clouds to make it more interesting. Okay. You can see how
beautiful that color is, and it is going very well
with that peat color we have in the background.
I'm loving it. Maybe I will add a few more, and then I will call it done. If you want to make your
sky look more dramatic, you can add more clouds. You can add some on the top, some at the bottom,
wherever you feel like, you can add as many as you want. For me, I want to add
some only on this side. I want to retain most of the
background colors. Okay. So I'm going to add a few more using a much more brighter tone. See that? Now, the color is
more vibrant than earlier. So yeah, keep adding the clouds, however you like, while the
background is still wet. If it is starting to dry, I think it would be a good
idea to stop it there. Okay, so that's how my
sky has turned out. I'm really happy with the color combination and the clouds. Now we'll have to
wait for this to dry before we go
with the next step. All right, the sky
has dried completely, and the colors are
looking really beautiful. Next, we are going to start
adding the mountains. We'll be adding three
layer of mountains, two in the background and
one in the foe ground. For the backer mountains, we will use medium tunes, and for the one on the F ground, we will use a darker tune. You can go in directly
with your brush or you can start with
a pencil sketch if that is more easier for you. So I'm going to add
a simple sketch of the mountain, the one
on the background. I'm adding that
where I have purple. Okay. So go with a simple
sketch of a mountain. To make it easier, I'm attaching the finished
painting here so you can follow
the same sketch or can modify it accordingly. Then that's the next mountain. Then we have one in between. I'm not really sure you
can see the sketch. In a way, you can take
a look at the picture here and add in your
sketch before you start. Now, for the first mountain, I'm going to use the same
color we used earlier. Mix of pink and violet. This one is the one
in the background. Onto that mountain, I'm
going to apply this color. Okay. So simply
follow the outline and add in that medium tone. If you want to go
for a different color, that's totally fine. This one is a mix
of violet and pink. The same color we
use for the sky. Okay, so that is
the first mountain. You can modify the
shape as you like. It doesn't need to
be exactly the same. Now, once this has dried, we'll be adding another one
right in front of this, and then we'll have
to wait for that also to dry to add the
Fok cron mountain. Okay, so let this dry and we can come back
and add the next one. The first mountain
has dried completely. Now let's go the second one. And for that into
the same color, I'm going to add
some more violet and a bit of indico to make
it a little more darker. You don't need to
add a lot of indico, just a little is all we need. Okay? So that's a kind of color I'll be using for
the second mountain. If needed, you can start
by adding an outline with your pencil and then fill in
that space using this color. So the color we're
using right now is a bit more darker than the
color we used earlier. For that, we didn't
add any indico. It was just a mix
of violet and pink. But in this, we have added some more indico to
it to make it darker. Like I said earlier, the
color can be a bit different. It doesn't need to
be exactly the same. It can be more
darker or lighter. Okay. So that's my
second mountain. So for this painting, we're using three different
layer of mountain. For the one in the background, the color has to be lighter. Then for the next one, you
can go with a medium tone. And for the final one, the one
that is in the foreground, you can use a much darker tone. Okay. So once you
have added the paint, you can pick some water
and make the rest lighter. That's our second mountain. Now we'll have to
wait for this to dry, and then we can
go the final one. I'm not going to fill in paint onto the entire
area on the left, because over there, I'm going to make the
mountain more higher. That space will be covered up. I will just leave it as it is. Anyway, with that, our
second mountain is done. Now we'll have to
wait for this to dry before we go
the final layer. Okay, so that is
right completely. Now we can go the final layer. And for that, into the same mix, I'm going to add more indico. Only if we play with
different tonal values, we can create a depth
in our painting. Otherwise, it will
look really boring. So pick more indico and add that with the
color you created earlier. This one is much more darker than the color we used earlier. Now with that darker tone, let's add the final layer. You can go with any shape
you prefer on the left, I'm making it higher, then towards the right,
I'm making it lower. Then I'm just filling that
in with the color I created. I'm not going to add any
textures or anything. I'm simply filling that in. Go with an irregular line
to make it more realistic. Okay. Now I will
simply fill that in. Maybe I can use some water
and I will make it lighter. Just a little lighter. That's
our fo ground mountain. If you want you can drop
in some darker tones using indico to
create some texture. Otherwise, you can
just leave it acts. The only thing I'm
not really happy with is the second mountain. I'm not at all happy with the way I have
applied the paint. You can clearly see an
outline on the top. I mean this part on the top. You can see an outline there. It should have been
a better blend. Anyways, I'm happy
with the rest, so I'm just going to ignore it. Now we can leave this for
drying and after that, we can peel off
the masking tape. Okay, so that has
tried completely. Now we can peel off
the masking tape. Maybe you can add some birds as well to make your painting
look more interesting. You can add a group
of tiny birds flying off to their nest. All right. So that's how the
painting has turned out. There is one more thing
that you can add on to this painting to a right. Maybe you can add one or two pine trees using paints gray. Anyways, here's a
closer look of the sky, which is my favorite part
about this painting, especially those
Opera rose clouds. Anyways, that's all for the day. Thank you so much for joining. I'll be back here soon with our next mini vertical landscape.
28. DAY 24 - Sand Dunes: Hello, dear friends.
Welcome to Day 24. Today, we're going to paint
a quick desert landscape. It's a quick painting, and
the process is really fun. Anyway, let's have a look at the colors we will
need before we start. The major color you will need for this painting
is yellow ochre. That's a color we will use for the sand tunes.
It's a base color. Then on to that to add the
deeper tones and medium tones. We will use brown
and paints gray. So the very first color and the major color you will
need is yellow ochre. Okay. The one I'm using
here is from Shinhan. Now coming to the next
color. It is brown. If you don't have brown,
you can also use burn sa. This one is permanent
brown from art philosophy. That's our second color. I'll be using this color to add the medium tones and
also the deeper tones. Now, there's one
more color you will need, which is paints gray. I won't be using
paints gray acid is. I'll be mixing a little of that with brown to create
a darker tone. These are the three colors we will need for the sand tunes, yellow ocher, brown
or burn cena, and also a bit of paints gray. Okay. Now, the next color
you will need is blue, which is the color I
have chosen for the sky. If you want to go for
a different color for your sky, that's
totally fine. I thought of going
with a blue sky. You can go the soft Pasal sky
or even a bright sense sky. So those things are
totally up to you. I'm just going to
stick with blue, and this one is Cilian blue. That summarize the colors you will need for
today's painting. For the sand tunes, you
will need three colors, yellow Ochre, brown or burn
Cena, and paints gray. Then for the sky, I
will be using blue. You can go with any
color of your choice. Keep all the colors
ready on your palette, and let's give it a try. All right. So I have my paper ready here and even the colors. Now the first step is
to add the sketch. We need to add a big sane. So start by adding a simple
mountain, a pointy mountain. Okay. Now from this tip, we have to add an
irregular line. This line is really important. It has to go in a very
nice curvy shape, a free flowing line. Okay. Now I'm going
to add another one in the background.
That's a sketch. When you're painting a san tune, this irregular line
is really important. It is according to that line, we're going to add our deeper
tones and medium tones. Onto either side,
as we're painting, we will add some deeper
tones and medium tones. The sketch is really important. Take your time and
add in your sketch. Now, the first
thing I'm going to start with is a sand tone. The sky we can paint later. Now to apply paint
onto the sand tune, I'm going to go with my
size number eight ronruh. First, I'm making
sure it is clean. Then I'm going to start
with yellow ochre, then I will add brown, and
also some paints gray. Now we have to
paint the sand tune as two different sections. First, we will go with this one. Then once that has dried,
we can go the other two. First, I will pick
some yellow ocher on my size number
eight ron brush. I'm going to apply that
onto this entire section. Go with the medium tune. Don't make it too
light. Now, carefully follow that shape and
add in your paint. The base layer is yellow ochre. I'm applying a medium tone. Onto that entire shape. Now, gradually, I will start
applying some medium tones. Onto this side, I'm just
adding some medium tones. I won't be adding
any taco tones. This is my lighter side, and on the other side,
I will introduce more taco tones. That's a plan. That is yellow ocher. Now I'm going to keep this
pressure aside. I will clean it properly, and I'm keeping it aside, and with my size
number six to press, I'm picking some brown, a medium tone of
brown, not too dark. Now, onto this wet background, I'm going to add a few lines. So from that irregular line, you need to add these
taco tones towards the bottom in a sloping
manner. See that? So simply add a few
lines while your bags on the still wet, then
clean your brush, pick a little of
yellow ocher again and smudge it to give it a
softer and smoother finish. You can see those lines are
looking much more softer now. Earlier, they were quite rough. Now, if you want to add
some more ducker tones, you could do that,
but not too dark. Maybe we can add a
few lines on the top. The rest is looking fine. That's how it has turned out. First apply yellow ocher
onto the entire background. Then add some sloping lines
onto that background, either using a medium
tone of brown or burn sa. Now we'll have to
wait for this to dry before we go with the
other two sections. The first section has
dried completely. Next, we can go the other two. I will go the top one first. Just like I did earlier, I'm going to start
with yellow ochre. This one is my size
number eron fresh. I'm applying yellow ochre
on to the entire area. Just like how we
did the first one. But for this one, I will add more deeper tones.
That's only difference. First, your task
is to apply yellow ocher onto that shape. Then with either
brown or burn cena, we have to add
some medium tones. That's a base layer. Now
let's pick some brown. I'm using the same brush. Now I'm going to add a few lines onto that wet background. You need to add these lines while your background
is still wet. You should not beat
for a longer time. Those lines has to
be smooth and soft. To get them solved,
you have to add them. While your background
is still wet. I'm adding those medium
tones at the bottom first. Now I'm picking a little
more to make it darker. I'm considering
this side to have a lot of shadows
and deeper tones, and the other side,
which we cannot see is having more
of lighter tones. You just have to add
some more lines using a darker tone of brown
on that wet background. Once you have added
them, you can clean your brush and smudge it. I'm using my other brush.
This one is clean. Now with that clean dry brush, I'm gently smudging these lines, to give it a softer
and smoother finish. If you look at the
images of sand tunes, you can see the lines are
very soft and free flowing. To get that impression, we are smudging these lines. If we don't smudge it, they
will look too bold and rough. Once you have applied
your darker tones, which are just some lines, you can go with a clean
brush and smudge it. When you're smudging the paint, you have to be really gentle. Don't put a lot of pressure. Now, I'm thinking of adding some more taker tones
mostly at the bottom. The same brush, I'm picking
a little of paints gray, just a little, and I'm
mixing that with brown. Now I'm going to add this
along the bottom side over here to make those
shadows more prominent. I'm dragging my brise towards the top to introduce
some sloping lines. See that? My background
has almost dried up. I will quickly smudge it. Otherwise, they will
look really rough. I will add one more line here. To emphasize on those shadows. Now I will pick my other brush, and I will quickly smudge it. To make it easier, maybe you can pick a little
of yellow ocher. This will make the process
a lot more easier, especially if your
background is starting to dry. That's a second section. Now in a similar way, I'm
going with the next section, which is a much more bicker one. First, I'm going
to clean my brush. It's going to be the
exact same technique, but this side is more quicker. Maybe we have to be a bit
more quicker than earlier. I'm starting with a
yellow ocher again. I'm applying that onto the
end to your right side. Carefully apply the paint along that irregular line and fill
in that shape we have there. Then gradually, we are
going to switch to brown. We will add some medium tones. Also we will add
some taker tones. This one is our darker side where all the
shadows are falling. The other one is
the lighter side. So I have applied yellow
ocher to the entire area. Now, with my other brush, size number six round brush, I'm going to add
some darker tones. Pick some brown
first or burn Sena, which will be the
color you're using. Now, let's add a few lines all to the background
in a sloping manner. I'm starting from here. First, I will add some daker tomes
along that irregular line. Then along with that, I will
add a few lines like this. You can add them,
however you like. It can be thicker
or thinner lines. That doesn't matter, but they
have to be sloping down. That's one of the major things. The angle of these lines
are really important. See that? Now, let's add a
few towards the bottom asp. So simply keep on adding those lines onto
the wet background. At this point, it will
look really messy, which is totally fine. Now I'm going to go back
with my other brush. I haven't washed it.
Now with that brush, I'm gently smudging these
lines to give it a softer lo. So there was some leftover
paint on my brush, some yellow ocher, and that is making the smudging
task really easy. We can add a few lines
towards the bottom, as well. There isn't any
lines at the bottom. I'm picking some more brown. I'm going to add a few more
lines towards the bottom. Now, when you're
adding these lines, try to leave some
gap in between. Don't add them too
close to each other. We need to see that
yellow ocher color in between, these darker tones. Try to add your paint
in a similar way. Now we can smudge it. So I'm going to go back
with my other brush, and I'm going to
gently smudge it. I'm not putting a lot
of pressure here. I'm being very gentle. That's how it has turned out. I think we can add some
more deeper tones. It isn't enough. We have to add some more deeper
tones like the top. Okay. So I'm going
to go back with my other brush and I'm going
to pick some more brown. You can see the darker
tones on the top. Similarly, I'm going to
add a line in between. See that? This will
break over Santon. We have one section at the back and other
one at the front. Just like we did earlier, our only task is to add these lines and then
slowly smudge it. If you feel like your
background is starting to dry, you can just stop it there, or you can continue adding them, and then you can go with some
yellow ocher and smudge it. I'm picking more brown and a bit of paint gray
to make it darker. Now I'm going to add
a few on the top. As for last, what's the bottom. On the side, I want the brown
to be more and more darker. You can see my background
is not really wet. It is starting to dry.
Still I'm adding them because I think it
is okay to blend them or smudge them
using yellow ochre. We can still manage to
get a better result. I'm just keeping
this pressure aside. I'm done adding the daker tones. Now I'm switching
to yellow ochre. Se that? I'm not picking a
lot of paint just a little. Now, with a brush with
the yellow ocher, I'm gently smudging
these lines. See that. I'm only using the
tip of my brush, and I'm not putting a
lot of pressure here. Slowly and carefully. I'm smudging them. Okay. We are nearly done
with this section, and you can see how
beautiful it has turned out. All those folds and deeper
tones on the sand tunes. It is looking really beautiful. Here is a closer look.
Now, wherever you feel, the lines are looking rough. You can pick a
little yellow ochre, and you can smudge it. See that? The bottom section
is really beautiful, but we still have some
harder lines here. I'm just pushing and pulling those lines to give
it a softer finish. Okay, so that's how
it has turned out. That's our beautiful sand tunes. I cannot tell you how much
I'm happy with the result. Now we'll have to
wait for this to dry, and then we can go with the sky. So let's take a short break and come back when this
has dried completely. Okay, so we're done
with the sand tunes. Next, we're going
to go with the sky. Before you start, make
sure your brush is clean, because we have used
yelluw and brown. With the same brush,
if we pick blue, it will become a muddy color. Okay. So first,
I'm going to apply a coat of water onto the sky. I will apply only on the top. I'm not adding any water
closer to the mountain. I mean, the sand tunes. Okay. So the top part is wet. I have left some
gap at the bottom. Now, with my fi
number eight brush, I'm picking some cylin blue. Just like I mentioned earlier, you can go with any
color of your choice. It doesn't need to be blue. Now, in my case,
as I'm using blue, I'm applying a medium tone
on the top of the sky, as I'm coming down, I
will make it lighter. So I've applied some
paint on the top. Now I'm picking my paper towel, and I'm dabbing my brush on it to remove the excess
amount of paint. Now with the same brush, I'm adding some lines
onto the background. So I want some lighter
tones in between, which is a paper white. I don't want to apply
blue everywhere. In between, you can
see some white spaces, which will make my sky look
more realistic and beautiful. Now with the same brush, I'm going to apply
a lighter tone of blue along the bottom. Then I will blend
that into the sky. Over here, we haven't
applied any water. It is completely dry. Be careful when you're
applying the paint. Run your brush,
along the outline. It's a lighter tone of blue, and I will blend that
into the background. Initially, I had plans of
going with a different sky. Then I thought of
keeping it simple. But now after I
have applied blue, I feel like I should have
used yellow and pink. Anyways, I have
applied the paint. Now I'm gently smudging
that into the background. That's how it has turned out. Now, there's one more
thing that I want to do. I'm going to lift
off some paint using a clean brush to give my
sky a more natural look. Right now, I couldn't retain a lot of white space in between. With a clean brush,
I'm lifting off some paint in a linear way. See that? This step will add some linear
clouds onto the sky. Technically, we are
taking off the paint from the background and leaving
a vital space there. I will add one or
two lines here, and then I will continue
lifting off the paint. This step is
completely optional. You don't need to
lift off the paint if you're not really up for it. Now I'm cleaning my brush again, dabbing it on a paper towel. Then I'm going to lift
off some more paint from the top to add those
linear clouds. This one is a very
interesting step. You can give it a try, maybe
on a scrap piece of paper, and you can use it in
your future paintings. It will give you those
natural looking clouds. In a way, that's it. I'm done with our
painting for the day. Now let's wait for this to dry. Okay, my dear
friends, here we are. We are done with our
gorgeous sanunes. Now I'm going to peel
off the masking tape. I'm really happy with the sky, and even the santuns, the colors are looking
really beautiful. I hope you guys love the
painting you have created. If you're here to try
it, do give it a try. And if you want to try
a different color for your sky, feel free to do that. Okay, so here is our
gorgeous santunes. You can see those shadows
and deeper tones. Lovely. All right, so that's
all for the day. Thank you so much for joining. I'll be back here soon with the next mini watercolor landscape. Oh.
29. DAY 25 - Sunset by the Beach: Hello, my lovely friends. Welcome to day 25. Today, we're going to try
a beautiful beach sunset. This one is one of my favorite
from the tire series. I love how simple
and beautiful it is. Anyway, let's start by
having a look at the colors. As you can see for the sky, I have used three colors. The very first one
is Naples yellow. This one is more
like a Pasal yellow. Let me show you the
swatch of this color. So this color is
a combination of yellow pigment and
a white pigment. That is why it is looking
like a patel yellow. But if you don't have
any Pacel yellow, you can use any other
yellow you have caught. To me, I wanted the
colors to be quite dull. I don't want them to be bright. That's why I used
a Pacel yellow. This one is Indian yellow. It's a bit more brighter
than Naples yellow. Now, if you compare Indian yellow and Naples
yellow together, only Naples yellow has a white pigment along
with yellow pigment. This one is just
a yellow pigment, which means just by adding some white aticor with any of
the yellow you have caught, you can create a Naples yellow. That's the first color. Now
coming to the second one. You can see a little
of red on the top. That one is spiral red. I won't be using red actus. It's a very bright and bold red. I will be mixing some Naples
yellow along with that. To create a color
which is more like a pastel red or a peach color. See that? That's a mix of
Naples yellow and red. That's the second color I'm
going to use for the sky. Again, if you don't want
to add white watercolor, you can just use any
yellow you have caught, and then the second color can
be a lighter tone of red. You don't need to mix
that with Naples yellow, or you can go for a different color combination for your sky, even that is totally up to
you. That's a second color. Now, the third color you
see on the top is indico. I will be using a
lighter tone of indico for the top of the sky. Also for the s, I'll
be using indico. This one is indico
from art philosophy. That's the third color you
will need for the sky. If you want to try a different color combination for your sky, you are absolutely
welcome to do that. Now the next set of colors you
will need are some browns. For the sand part,
I will be using a mix of burn Cena
and paints gray. I'll mix these two
colors together to create a color which is
more like burnt amper. You can also use
burned Amber acid is. This one is burn scena. Now for the rocky mountain
in the background, I will be using brown. For me, I love using
brown for the mountains. But if you don't have brown, just go with burn scena. You can see the difference
between these two colors. Burn Cena is more yellowish, whereas brown is more reddish. That's only difference.
Now the last color you will need is paints gray. To add all the deeper tones, we will be using paints gray. That summarize all
the colors you will need for this beautiful
beach landscape. It's a quick one. But compared to the other paintings
we have done so far. This one has a few
more extra steps, but I'm going to
guide you through the NTA process.
Don't worry at all. For now your only task is to keep all the colors ready
here on your palette. You will need Naples yellow
or yellow, some red, indico, burn Cena or brown, and also some paints gray. Keep all the colors ready on your palette and
let's get it try. First, I'm going to
start with the sketch. We can add a horizon line a little below the
center of the paper. Now I'm going to add
a irregular line here to separate the
shore and the sea. We are only showing
a strip of the sea, so don't make it too broad. Next, we are going to add the mountains. That's
the first one. Now next to that, I'm
going to add a bigger one. Go the irregular shape to
make it look more natural. Now we can add another tiny
one right next to that. Try to go the similar size.
Don't make it too peck. The sketch is ready. Now I'm hoping you guys have the
colors ready on your palette. We will need some Naples yellow, then some red and also
some indico for the sky. Keep those three colors
ready on your palette. And when you have them ready, apply a code of
water onto your sky, using any of your clean brush. Just apply a general coat, don't add a lot of water. The sky is evenly wet. Now I'm going to switch
to my other brush. This one is size number eight. This is the first color I'm
going to use Naples Aal. I already have it on my palette. Now I'm going to apply that towards the bottom of the sky. Along the horizon, apply Naples Salon or any
yellow you prefer. Okay. Next with the same brush, I'm going to pick some red, and I will mix that
with Naples yellow. You don't need to
clean your brush, pick some Naples yellow,
then a bit of red. Mix them together. See that. It's a beautiful color. Maybe more like
coral, not peach. If you add more yellow,
it will become peach. Now it is more like coral. That's a mix of
Naple ello and red. I'm adding that right
next to yellow. Now we can clean our brush
and we can go with indico. I'm using a medium tone. It's not too dark
and not too light. Now onto the top, I'm
adding this color, and I will gently
blend that with red. It doesn't need
to a clean blend. Just go for a rough blend. There can be some lines or some irregularities,
which is totally fine. We have some indico on the top, then a patol red and some
yellow at the bottom. Now, using the same brush, I'm going to add one
or two streaks onto the sky to create some clouds. It's again a metian
tone of indico. I'm just adding one or
two lines over here. I'm adding them only
on the red part. I'm not adding any
onto the yellow side. That's a top part of the sky. Now I'm going to clean my brush, and I'm switching back to red, the same mix of Naples
yellow and red. Now, using that color,
I'm going to add a few clouds towards
the bottom. See that. Just add a few lines onto the
sky while it is still wet. Don't get rid of the
anterior yellow. We need some yellow in
between. That's a sky. I'm pretty happy with the
clouds and the blend, and even the color combination. If you want to add some
more drama into your sky, you can add a few more clouds. But only when your
background is still wet. If it is starting to dry, it's a good idea to
stay away from it. In a way, that's how
the sky has turned out. Next, we are going to
paint the sand part. In the meantime, the sky will
dry, so we can continue. The color that I'm
going to use is a mix of burn Cena
and paint scray. I'm going to create
a color which is more like burnt umber. If you have burnt umber,
you can use it directly. Okay. So pick some
burn enough first, then mix that with
some paints gray. T create a dull crash brown. Okay. Now I'm going to apply that onto the tier area
we have at the bottom. You can start with a medium tone or don't make it too light. That's a color I'm using. It's a mix of paint
screen and burn scena. Now, simply fill in that
i area in this color. Then gradually, we can start adding more textures
and details onto that. For now, you just need a
solid wash. Now onto this, I'm going to add
some deeper tones. I'm picking a bit
more paint screen, mixing that with
burn scena, I can. Now, if you paint is too watery, dab it on a paper towel,
that looks too dark. That's okay. I will
quickly smart it. With my other brush, I'm
just going to smug it. We just need some darker tones and some textures
in the background. Otherwise, it will
look plain and empty. Simply as some lines and some textures onto
the background. It can be some dots
and some lines. You have to do this while
your background is still wet. See that? They don't
need to look perfect. Just keep on adding them
on the wet background. That's how it has
turned out. Now, maybe we can add some more textures
using a darker tone. I'm picking some more paint
screen and burn scena, and I'm mixing them together. It's a much more darker tone. Now with that color, I'm adding some more lines and some more
dots onto the background. Mostly onto the top area. See that? I think this one
is looking quite good. We don't need to add anymore. Now, before we leave
this for trying, there is one more thing
that I want to do. I'm picking the
same color again. It's a medium tone. Now, I'm going to add a strip in between. Maybe I will just fix the sheep first. Now, write about that. I'm adding a long
strip like this. Using that brown
color. See that. In between the sea
and the shore, simply add an irregular
line like this. It doesn't need to be perfectly shaped or it doesn't
need to be straight. We just need an
irregular line there. All right, so that's
how it has turned out. Now we'll have to
wait for this to dry. And after that, we can paint
the sea and the mountains. Okay, that's how
it has turned out. Next, I'm going to
go back with indico. I will go with a medium tone. That's a color I'll be
using for the s. Now, I'm going to apply that onto these in between
spaces we have here. Simply apply that color
onto this section. It's a medium tone of Indic. Carefully apply that. Following
the lines we have there. Now, for the bottom section, I'm going to start
with the red first. Then onto either side,
I will add some indico. When I say red, I'm not
going to use red acts. I just need that dull
red I created earlier, which is a mix of Naples
yellow and a bit of red. I'm just going to pick
that color again. It's a very thin strip, so try to go with
the smaller brush. Now apply that onto that
little area we have there. It's a lighter red. Now
with the same brush, I'm going to pick some indico. Just a little bit,
and I will add that onto either side. See that. We have some red at the center, then some indico on either side. That's it. Now we'll have
to wait for that to dry. Give it some time and
let it dry completely. Now I'm going to go back with a medium tone of indico again. I'm going to add some
lines onto the background. Just some messy rough
lines. That is really dark. I'm adding some
water. With that, I'm again adding some more
lines onto the background. Just some rough messy lines. It doesn't need to be perfect. In between, if you can, try
to lay some lighter blue. That's how it has turned out. We can add a few onto either
side as well, and that's it. That's a c. First, we applied a lighter tone of
indico onto the background. Then we added some
messy textures using a brighter tone of indico. Now the next task is to
go to the mountains, but before that, we'll have
to wait for this to dry. For the mountains, I'm
going to use brown. You can use brown or burn scena, start with the metium tone
or a slightly daker tone, and apply that onto
the bigger one first. See that? It's a very
beautiful color. I love to use this
color for mountains. This one is from art philosophy. It is called permanent Brown. As the shapes are quite small, I think we can paint
all of them together. Adding the same color onto
the other one as well. And this one too. It's
a solid wash of brown. Now with the same brush, I'm going to pick
some paint scray, to add some textures
and deeper tones. Simply add some lines
and some shapes onto that bed background,
and that's it. See that. We just need to
create some texture there. It doesn't need to be well
detailed or it doesn't need to be perfect. They are
in the background. They are very far. We just need to add some shadows
and deeper tones. That's it. If you want to add some more deeper tones
or if you want to modify the shape,
you could do that. Maybe we can alter
the shape a little. Try to go for an irregular shape to make it look more natural. If you want, you can add some
more deeper tones as well. I'm loving the weight
is turning out. Earlier, it was boring. But now when we
added that mountain, it is looking a lot more better. There is a beautiful contrast
here. That's a mountain. Now with the same color, I'm going to add the reflection
of the mountains. Right after the sea, we have a strip of land in
between a wet land, and that's where I'm going
to add the reflection. I'm using the same color again. It's a mix of brown
and paints gray. Go within of your smaller brush. Now, simply add some lines
onto these in between space. So irregular line. Some of them can be longer. Some of them can be shorter. See that? Just add some exact lines.
That's the second one. Now for the next one as well, I'm adding a little of
reflection over here. See that. It instantly made
a lot of difference, right. With all these little details, our painting is starting to
look more and more beautiful. I'm loving it.
That's a reflection. Now I'm going to clean my brush, and I'm going to dab
it on a paper towel. Now with that little
leftover paint, I'm going to add some more
textures at the bottom. This one is completely optional. If you already have
enough textures there, you can completely
ignore this step. So with that little paint, I'm adding some dr textures
to give it more character. Okay, so that's Denton. Now I'm cleaning my brush again. And there is one last task left. For that, I'm picking a
little of white ache. You can go with white
watercolor or white ache. We just need a little and go with any of your
smaller brush. Then add an irregular
line over here. It doesn't need to be perfect. It can be a broken dry line. See that. Just to introduce some more texture and
character to the sea. We're adding some lines
using white paint. Go an opaque paint, don't add a lot of water. Okay, that's it. That's how
our painting has turned out. My favorite part
about this painting is the mountain and
the reflection, and I really hope you
guys enjoyed it too. Anyways, that's our
painting for the da. Now it's time to peel
off the masking tape. And here's the
finished painting. It's a lovely beach landscape. Give it a try if
I get to try it. It's a quick one, and I'm very sure you will
love the process. Alright, so that's
all for the day. Thank you so much for joining. I'll be back here soon
with our next men vertical landscape. Oh.
30. DAY 26 - Turquoise Sky: Hello, my dearest friends. Welcome to Day 26 of painting mini vert
coolor landscapes. Our painting for the
day is a simple, a beautiful sky with a
tiny little cottage. My favorite part about
this painting is a sky. It is beautiful, and it's
really easy to paint. So the first color
you will need for this sky is a patel orange. I will be adding some
white vertica with orange to create this
color. See that? So that's a simple mix
of orange and white, and that's a very first color
you will need for the sky. It's a really light
basal orange. In your mix, add more
white vertica than orange. Okay, that's a first color
you will need for the sky. Now, along with
this, the next color I'm going to use
is turquoise blue. For the major part of the sky, we're going to use blue. Then towards the bottom, we
will add this petal orange. To add the cloud Taple we'll
be using patel orange. The second color you
will need a tycise blue. We'll go with a medium tone, and we'll apply that almost
to three fourth of the sky, and then we will go
with basal orange. That's a second
color. Now, coming to the next set of colors, which are some greens. We have a meadow
in the foreground, and also some greenery
in the background. For that, I will go with two
different types of greens. One is a lighter green, and the other one
is a medium green. To create a lighter green, I will mix some yellow
ocher with sap green. That's the color
you see on the top. That's our next color. I will swatch it out on a
scrap piece of paper. That's a mix of yellow
ochre and sap green. Depending on the amount of
yellow ochre you're adding, the color will look a little different and that's
totally fine. I want the green to
be a little dull. I don't want that to be too bright as we're painting
an evening scene. Just go the mix of
yellow ochre and sap green to paint your meadow. That's a color I'm
going to use for the top, towards the bottom, I will use some sap green actus, and for the really deeper tones, I'll be using paints gray. So the meadow is a
combination of three colors, yellow ochre, sap
green, and paints gray. For those trees and
plants in the background, I'll be using the same colors, but that will be mostly medium
tunes and darker tones. The next color you will
need is paints gray. If you have colors like
green gold or olive green, you can use them directly. You don't need to make
yellow ocher with green. Okay. So those are
the colors you will need for the meadow
and the greenery. Now, there's one more
color you will need for the tiny roof here,
and that is brown. You can go with crimson or vermilion or any other
color you prefer, or you can just go with
brown or burn Cena. Okay. It's a super tiny cottage and we don't need a
lot of paint for that. Don't squeeze out a lot. Okay, so that summarize all the colors you will
need for today's painting. You will need a pastel orange and turquoise blue for the sky. Then for the meadow
and greenery, you will need yellow ocher and
sap green and paints gray, and then a bit of
brown for the roof. Keep all the colors ready on your palette and
let's get it try. Alright, so I have
my paper ready here. Now, I'm gonna start
with the sketch. For this painting, I'm placing the horizon line some here. So the major part of this painting is
going to be the sky. Next, we can add some irregular
shapes along the horizon. W is not really necessary. We can add them or modify
them as we're painting. Now, the major reason why I'm
adding these landscape is because I'm going to add a
tiny cabin at the center. In between, I'm leaving some space and that's where
I'm going to place the cabin. It's a tiny tiny
one. It's very far. So you don't need to
add a lot of details. We just need that roof
line and a simple shape. Around that, we'll be adding some more landscape.
Okay, so that's a sketch. Keep it ready, and I'm hoping you have the colors ready
on your palette as well. For the sky, you will
need some pastel orange, and to create that,
I will squeeze out some white watercolor
onto my palette. The second color you will
need a sircise blue, which I already
have on my palette. So that is white watercolor. The rest of the colors are
already there on my palette. So I'm starting by applying a
coat of water onto the sky. Before you apply the water, make sure your brushes clean. Now apply a nice general coat of water onto the entire sky. As I always say,
don't add a lot. We only need a shiny coat. Okay. You can leave the house, and you can apply water
onto the rest of the area. So that is evenly wet. Now, to apply the paint, I'm going to go with my
size number en brush. First, I will wash it off and I will make
sure it is clean. Now, first, I'm
going to start with a medium ron of turcise blue. I will apply that onto
three quarter of the sky. Then gradually I will
go with pastel orange. Okay. So go the medium tone of turquoise blue or
any blue you prefer. Now apply that to
the top of the sky. Go the similar tonal value. Don't make it too
light or too dark. Okay. So that's a medium tone. Now I'm going to clean my brush. Towards the bottom, I will
make it even more lighter. And that's where I'm going
to introduce basal orange. Maybe we can add a bit more cleaning again and
making it lighter. The major part of the sky is
going to be turquoise blue, and we're going to only add a little of orange
towards the bottom. Now, clean your brush again, then pick a bit of orange and mix that with
a lot of white. We need a very light
one of basal orange. Now apply that at the bottom.
It's a beautiful color. I love to use that
for soft basal skies. Okay. Now let's blend
that with blue. I mean, turquoise blue. Be very gentle. Don't
put a lot of pressure. Maybe we can add a
bit more orange. I will add that again. So
the base layer is ready. Now we're going to
add some clouds onto the same background.
While it is still wet. To add the clouds asphal, I'm going to go
with basal orange. If your paint is
to water, dap it on a paper towel
before you start. Now, you see that color simply add some clouds onto
the background. You can go with any kind
of shape that you prefer. You can see the color is turning a little into a muddy color. W is totally fine. By
the time it dries up, it will look really beautiful. If you're using orange actus, it will be more
like a muddy green. But right now, we're using
a mix of orange and white. It will be more like
a grayish orange. It wouldn't turn a lot
into a muddy color. That's how I have
added the clouds. Maybe we can add a few more
to make it more dramatic. So I'm just going to
add some more bigger clouds onto the blue part. I won't be touching
the bottom part. I'm just going to leave it acts. I just want some plain
pasil orange there. Now onto the top,
I'm going to add some more clouds again
with the same color. So I'm picking some more orange, mixing that with white. Now I'm going to add
a few more clouds. So depending on the
color you want, you can add a bit more
white or a bit more orange. That's how
it has turned out. It's a really soft
and simple sky. Now when it dries, it will
look even more beautiful. So let's take a short break, can come back and this
has dried completely. Okay, so that is dried, and you can see how beautiful those clouds
have turned out. It looks very soft and fluffy. Okay. Next, we're going
to go with the meadow. And to paint that, I'm
going to go with a mix of yellow ochre and sap green. I want a dull green. So let's pick some yellow ochre first. And to that, I'm going
to add some sap green. You can mix them in any
proportion, don't think a lot. We just need a color
that is similar to this. Now I'm going to add that
onto the anterior meadow. There is a color
called green gold, which I believe is
in Daniel Smith, and that is very
similar to this, or you can also go
with olive green. Just make some yellow ocher with sap green and create this color. Now, almost onto
the anterior area, you can apply this color, only towards the bottom. We're going to introduce
some sap green and also some daco green. The rest is all this color. We have used the same color
for many other paintings. It's a beautiful color to
use for evening meadows. Now, towards the bottom, I'm going to apply
some sap cream. Then gradually I will introduce some paints
gray asphal to make it more darker. Don't
test the top part. Leave that yellowish
color as it is, only towards the bottom, you
can apply some sap cream. Maybe we can add in
a few more lines to bring in more texture. I a few random lines like this. Otherwise, it will look
very plain and empty. See that. Simply add some
lines onto the wet background. It will automatically mix into each other and create
a natural blend. Okay. So that's how
it has turned out. I think now it's time to introduce some
more darker tones, and let's pick some
pains c for that. I'm mixing that with green. Now, I'm adding that along
the bottom most area. Only if you introduce those
tonal values, I mean, different tonal values, your painting will
look more beautiful. We started off with
a lighter green, then we introduce
some sap green. Now we're using a much
more darker green. You see the difference,
even the sky is looking a lot more beautiful now when
we have that contrast. So every painting is a play of lighter tones
and darker tones. Only if you have that balance, your painting will
look more beautiful. I'm adding somewhere
at the bottom. For this painting,
I'm leaving it clean. I'm not going to add
any grassy lines or any extra textures. If you want to add
some more texture or lines onto the background,
you could do that. I'm adding a line along the
horizon closer to the house, and maybe one or two extra
lines as well. Not so much. That's it. No more grassy
lines or extra textures. This is how it has turned out. Now we can leave
this for drying. Okay, so the entire
thing has dried. Now, our next task is
to paint the cabin. And for that, I'm going to
go with a smaller brush. I'm not planning
to paint the wall. I'm going to leave
that in paper white. But for the roof, I
will use some brown. We have a tiny roof there. Now apply some brown
following that roof line. As this one is super tiny,
and it's really far. I'm not going to add
a lot of details. I will simply paint the roof, and maybe at the end, we can add the door or
the window opening. Okay. I'm just going
to add only that much. The rest we will cover
in the landscape. There will be some greenery
leaning onto the cabin, so we can cover up the
rest, using that greenery. For now, this is all you need. Now, let that dry.
In the meantime, I'm going to start with the
landscape, and for that, I'm going to go
back with the mix of yellow ochre and sap green. Let's pick some sap green first. Then I'm mixing a little
of yellow ochre with that. To create that dull green. To make the color
slightly darker, we can add some brown
asph or burn sina. This will give you
a color which is very similar to olive green. Now, using that color
I have created. I'm adding a line
first. See that? So it's a mix of yellow
ocher and green. If you feel your color
is really light, you can add a bit
of brown or burn scena to make it a
little more darker. Now, at the random shapes over here to resemble the trees
and plants in the background. See that? Go the similar size. Don't make it too
big. Now let's add some more yellow ochre and
apply that in between. I hope you can see the
color difference here. The first color I used
was a bit more darker. Now I have added more
yellow ochre into the mix, and the color is
slightly lighter. I hope you guys are able
to see the difference. Now, I'm going to continue
with that lighter tone, which is a mix of yellow
ochre and the green. In between, we can introduce
some darker tones as well. Play with these
different tonal values. Towards the bottom, you can
introduce that medium tone. Then along the top,
switch to a lighter tone, which is a mix of
yellow ocher and green. When you play with
different tonal values, it will look more
natural and beautiful. Now I'm going to pick
some paint screen, and I'm going to add
some more deeper tones into that same area. So I'm just adding some
dots and tiny patterns into the background to introduce
a darker tone. See that? You can add them
wherever you want to. There's no particular
order or role here. All we need is different
tonal values of green. That's all. Let's add
a few at the bottom. And also in between. I'm not really sure
if you guys are able to see the different
colors I have here. Let me bring the camera closer. Okay. Here is a better look. Simply keep on adding
some darker tones. It can be some tiny dots or some small shapes and
introduce those taco tones. Now, in a similar way, we have to paint the other side as well. We are done with the right
side. I'm starting from here. The roof has dried up already. First, I'm going to go
with that taco tone, and I'm adding that
landscape around that tiny house,
enveloping that. See that. That's
why I said earlier. It's totally okay if you don't
have a proper shape there. When we add the landscape, we can cover up those as. Right now, the color
I'm using is a mix of paints gray and green.
It's a darker tone. Now gradually, I will go with a medium green and
then a lighter green. Yeah, this one is just
about introducing those different tonal values. You can start with
a lighter green or a darker green. It
doesn't matter. Right here, I'm using
a darker green first, and I'm adding a line
along the horizon. Along with that, I will
add some tiny tiny shapes. Then I will go with
a medium cream, and then towards the top, I will add a lighter cream, which is a mix of yellow
ocher and sap cream. This doesn't need to be perfect. It's a very small shape
and it's far away. I will clean my brush, and I will go with
a medium green. You can use sap green actus. Or if you prefer a dull
green like the earlier ones, you can add some yellow
ochre and brown into Sap green and use that instead. Now I'm going to go
with that medium green with a mix of yellow
och Sap green, and a bit of brown, only a little bit, and I'm going to add some
shapes along the top. This one is a very simple step. There's no rule or anything. Simply adding your paint. We just need some darker tones and medium tones in between. To create those realistic
looking textures, if you go with a
single tonal value, it will look quite boring. To introduce those
textures and character, it is always good to play
with different tonal values. I've added those medium tones. I will add a little
more to it to left. Then I will continue
with a taco tome. So with the same brush, I'm
going to go with a taco toe, and we'll add some paint
screen to the same mix. And with that, I'm
again going to add some tiny tiny shapes
onto the background. So you just need to keep on
tapping your brush against the paper and add these tiny dots,
wherever you feel like. Don't cover up the
tire greens in the background, leave
them in between. This will make your painting
look more beautiful. Okay. So that is done. Now we have one last task left, which is adding the window
openings for the house. And for that, I'm going to
go back with paint screen. And I'm going to
add two tiny lines onto the wall over here. That's all. You can make a square opening or
a rectangular opening. I'm just adding two tiny lines. These are far away, so we don't need to put
a lot of effort. That's all you need.
Any waves with that, we are done with our
painting for the ta. Now it's time to peel
off the masking tape. And here we are. That's our tiny little and a beautiful sky. I love this color combination. It's a very simple,
peaceful sky. There isn't a lot of details. But I think it turned
out really beautiful. So if you haven't tried it yet, you know what to
do, give it a try and let me know if you liked it.
31. DAY 27 - Glowing Sunset: Hello, dear friends.
Welcome to Day 27. Our painting for the
day is another sunset. I think this one is a
sunset color palette, which we have witnessed
many times as a simple, but really interesting painting. Anyway, let's start by
having a look at the colors. I will start with the sky. So the color you see on the top, it's a light tone off indico,
then towards the bottom. I have used to pastel orange. So Let's start with indico. This one is bluish indico and
it's from art philosophy. We just need a lighter
tone of indico and we'll be applying that almost to
three fourth of the sky. And then towards the bottom, we will introduce
a basal orange. The very first color you
will need is indico. Now, coming to the second color. Just like I said,
it's a Pasal orange. Now I'm going to make some
white watercolor with orange to create a pasel orange. We did this for other paintings as well at the same process. Just mix some orange
with white waterclor, and create a pasel
orange of your choice. It has to be a lighter tune. Into your mix, you should be adding more white
and less orange. Okay. So that's a second color. So on the top, we
have some indico, and towards the bottom, I'm going to apply
some pasil orange. Now, to make the sky
more interesting, I will also be applying
some orange acids. This is the orange
I'm going to use. It's called brilliant
orange from Shinhan. I will swatch out
that color acids to see the brightness
of the color. You can see that
color over here. This one is brilliant
orange from Shinhan. Go with any bright
orange you have got. If you don't have
any such color, you can just use ermalin. Okay. So that's the next color. Now, towards the
bottom of the sky, I will also be adding some
red to make it more intense. This one is pyl red. You can go with any red or
you can just use scarlet. Okay. So those are the colors
you will need for the sky. We'll start with a
lighter tone of indico, then a Pasal orange and
towards the bottom. We will add some brighter
orange and red as well. Now the next color you will
need is brown or burn cena, which is the major
color you will be using for the landscape as
well as the bottom part. For a change, we're not going
to use any greens today. The next color you will
need is brown or burn Cena. Now, to add all the
deeper tones, obviously, you will need some paints gray, and that is our final color. Okay, so that summarize all the colors you will need
for this glowing sunset. It's a really
beautiful painting, and the process is
really exciting as well, especially that glowing
part and the sun. So ya, keep all the colors
ready on your palette. Here is a closer
look of the colors. You will need a little of
indico, some pastel orange, a bright orange, red, brown or burn scena,
and paint gray. Okay, so grab all the colors, and let's get it try. Alright, I have my paper ready. I'm starting by adding
a horizon line. I say below the
scent of the paper. Now we'll have some
landscape over here. We can add them as
we're painting. Now, along with that, I'm also adding some wooden
post in between, just to make it a bit
more interesting. I'm adding one there and
another one right next to that. Maybe we can add one
more towards the left. I'm not going to
adding the horizontal. I'll just add these
vertical lines. That's it. Now over here
when we're painting, we'll add some darker
toons and all that. That's a k. It's a
pretty simple one. Now let's prepare the colors. I will need some white watercolor
to make pastel orange. The rest of the colors are
there already on my palette. So first, let's start by taking out a little
of white watercolor. Now, I'm going to
start by applying a coat of water onto the sky, using a bigger brush, and to apply the paint, I will use a medium
sized s brush. So apply a nice general coat of water onto the entire sky. The sky is evenly wet. Now I'm going with
my size number eight brush to apply the paint. First of I'll make
sure it is clean. The first color I'm going to go with is a lighter
tone of indico. Don't use a darker tone. Go with a lighter tone. Okay. Now let's apply
that to the sky. I'll be applying this color almost three fourth of the sky. Go with the similar tonal value. Don't make it too
dark. Okay. I think we can bring it a bit more down. Okay. That is a lighter
tone of indico. Now I'm going to clean my brush, and I'll dab it
on a paper towel. And then I'm picking some orange and I'm mixing that with white. See that. It's a lighter tone. There is more white in
the mix than orange. Now I'm going to add
that along the bottom. Start from the bottom and
go towards the top and then blend that with
indico. See that. It doesn't need to
be a clean blend. Don't put a lot of pressure. Anyway, we're going to
add some clouds on top of it. This is all you need. Next, I'm picking
a brighter orange, and I'm adding that
along the bottom. So the bottom part, I want
it to be too intense. Right now, I have
added some orange. Now, I'm wiping off my
brush on a paper towel, and I'm picking a bit
of lighter orange, and I'm smudging the colors
to give it a softer look. Okay. That's how
it has turned out. Now, there's one more task
we need to do for that. I'm picking some
red, a brighter red. If it's too bright, you
can add some orange. Now add that along
the bottom line. See that. I'm actually applying the paint below
that horizon line. I'm pushing that down so that I won't get
rid of the orange. Anyway, I think we can
add some more orange. There isn't enough in the sky. So I'm picking some
more bright orange, and I'm adding that one
more time into the sky because I want the
bottom part to be more intense
compared to the top. This is where we have the sun. This area will be more
brighter and prominent. That's how it has
turned out. Next, we're going to start
adding the clouds. For that, I'm going to make
some orange with indico, more orange and less indico. Now, using that color, I'm going to add the
clouds onto the sky. If you paint this
stow water, you dap it on a paper towel
before you start. Otherwise, they
will spread a lot. Now I'm going to add the
clouds using that color. So the color I'm using
here is a mix of a little of indico
and a lot of orange. Now you can start adding the
clouds however you like. I'm adding them on the area
where we have basil orange. Then I'm going towards
the top. See that. When I'm adding them, I'm deliberately leaving
some gaps in between, your sky will look
more natural and more beautiful if you have that
blue color in between. Don't add a lot of them
close to each other. Whenever you feel your
paint is too watery, dab it on a paper towel. Otherwise, they won't
have a proper shape. They will spread into
the background a lot, and it will be very difficult to retain the shape of the clouds. So I have added quite
a lot of clouds, and I'm really loving it. You can see how beautiful
it has turned out. Maybe we can add a bit
more towards the bottom. And that's it. So
that's a gorgeous sky. Now we can leave
this for trying. And after that, we can
start with the bottom part. So the sky has dried completely. Now our next task is
to paint the ground. For that, I'll be
using two colors, brown and paints gray. I'm starting with brown. I will go with a
medium to darker tone. And I will apply that
onto the top part. Then towards the bottom, I will introduce
more darker tones. If you don't have
brown, just go with burn Cena, both the
colors will work. You can see the tonal
value I'm using here. It's quite bright.
Okay. So that is brown. Now with the same brush, I'm going to pick some paints gray, and I will apply that
along the bottom. It's again a dakoton. It's not too light. I want the colors to be very
dark and intense. That is brown and paints gray. Now, if there is a lot
of paint on your brush, dab it on paper towel, and then add a few lines from either side towards the center. We want to retain some
brown at the center, and the bottom part on either
side has to be more darker. Maybe you can add a bit
of orange at the center. I'm using my other brush and
I'm picking some orange. I'm adding that on top of the
brown, only at the center. It doesn't need to
be too orangish, add a little over there because that's where we're
going to add the sun. So there might be some sunlight reflecting on the
ground as well. Just add some orange
only at the center. The rest can be all
brown and darker tones. You can see it is
not to oranges. We just need to make it
a little more lighter. That's all. That's a base layer. Now, I'm going to apply some more taker tones onto the areas where I'm going
to introduce the fence. With the same brush, I'm
picking some paints gray, and I'm randomly adding some
taker tones onto the ground. We have two wooden posts there
and one on the other side. That's it. Those textures
can stay as it is. You don't need to
smart it to blend it. Let it be that way,
and let it dry. Okay, so that is
dried up completely. Next, we're going to add the
landscape in the background. And for that as well, we'll be using mostly brown
and paints gray. At the center, where we're going to place the
sun over here, we will introduce some
orange and reddish colors. Then for the rest of the area, we'll simply go with
brown and paints gray. So go with any of your medium size brush or a smaller brush. We don't want these
landscapes to be to. We want a low lying landscape. So first time I'm
picking a little of orange with my size
number six sun brush, and I'm going to add a
shape right at the center. Just a small irregular shape. On the top, you can add
some teeny tiny shapes and patterns to make it look like there are some
leaves or something there. Now I'm picking some red and I'm adding that
towards the bottom. So on the top, I
have some orange and towards the bottom
and onto either side. I'm adding a bit of red. Okay, that's it. Now
we can go with brown. Now I'm going to add
that onto either side. Only at the center
where we have the sun, we want the colors to be
more reddish and orangish. Then onto either side, we're going to go with brown
and paints gray. We can add a bit towards
the bottom as well. Only at the top, we want to retain that red
and orange shade. The rest is all brown. Now let's tabu brush
on a paper towel, and let's gently smudge it
to give it a better finish. That's the center part. I'm
pretty happy with the colors. Now I'm going to go back with brown and I'm going
to fill up the rest. I think along with brown, I will also add some
paint s cray to make it darker and I will use that tucker tone for
the rest of the area. Only at the center, I want that brownish and reddish tones. The rest is going to be darker, and I'm also leaving
that wooden post. I'm not adding any
paint onto that. I'm leaving some gaps in
between wherever I have those wood and post.
Now let's much it. Retain those reddish and
orange tones at the center, then onto the rest of the area, go with a darker
brown and fill it up. Here, also, we have
a wooden post. Stopping right there and
then I will continue after that wooden post.
That's the center part. This is the major part. The rest is going to be
just darker tones. You don't need to think much when you're painting the rest. First, do this part, the center, where you have that
glowing portion. For the rest, you can just
go with paints gray acts, or can go the darker brown and simply add
some shapes like this. Go the irregular shape, don't make it the same
hight throughout. At some places,
it can be higher, and at some places,
it can be lower. This will add more realistic
value to your painting. Now I'm going to continue. On the right, I'm planning
to make it a bit more higher and towards the left, I will make it lower. That's my plan. You can
add them however you like. The main reason why
I'm doing this is because I want to retain
some of the red in the sky. If I make it this high
on the left as well, I will end up covering all those reddish stones in the sky. I'm really loving the center and the weight is turning out. Now let's continue
with the left. Just like I said
earlier over here, I'm going with very
small patterns. I'm not making it higher
as the right side. I don't want to cover up the
ant or red and orange. Okay. So this one is going
to be super tiny. All right, so that's a
background landscape. I think the painting is in a
very good shape right now. The colors are very beautiful. Now the next task is to add the sun and also
those wooden post. We can add the sun right now, so clean your brush, and
after this as dried, we can add the wooden post. Now, to add the sun, I'm going to pick a
little white waclar. I already have some left on my palette, which
I use for the sky. So I'm picking that. We don't need a lot of paint just
a little is all we need. It can be white guash
or white waclar. Now let's add the sun. I'm going to place it
right at the center, and it's going to be super tiny. What's this? Go with
a similar size. I'm not going to show
the entire circle. It's more like a half circle. I'm only showing the top part. See that? That's a size
you have to go with. Don't make it tope, and we
don't need a full circle. Show only a half circle right where you have
that glowing part. Now the only task left is
to paint those wooden post, but before that, we'll have
to wait for this to dry. Now let's go the final step, which is painting
those wooden post. For this, we will start
with orange first, and we'll add that onto the
areas closer to the sun. Then we will go with
brown and paints gray. Start with some orange or vermin and add that
onto the interior side. So this is the side which
is closer to the sun. Now for the asphal, I'm adding some orange
on the inner side. Now, let's go brown. So with the same brush,
I'm picking some brown. It can be brown or burn cena. Now, let's add that
right next orange, and let's smudge it. It doesn't need to
be a clean blend. You can just give it a rough
blend or a rough smudge. Okay. So that is
orange and brown. Let's add brown onto
the other one asp. And then we can switch to paints gray to add
the deeper tones. Only for the wooden post
that are closer to the sun, you have to start with orange or red and add that
towards the inner side, which is closer to the sun. This will give an impression of the sunlight falling
on those wooden post, and obviously, it will add a lot of character
to your painting. Next, I'm picking
some paints gray, and I'm going to add
that towards the bottom, as well as onto
the exterior side. Add some paints
gray at the bottom, and also on to the right. See that. I'm modifying
the shape as well. That's the first wooden post. I need to smudge the color. But before that, I will add some paints cray onto
this one as well. Now, I'm dabbing it
on a paper towel, and I'm smudging it so that
it won't look like a line. Keep smudging the colors to
give it a better texture. That's it. The first two
wooden posts are done. Now we have one more to go. For that one, I won't
use any orange or red. I will go with brown. I will add that onto
the inner side. I mean the left, then
on to the right, I will simply add some paints gray because this one is
quite far from the sun, and there won't be much of
sunlight falling on it. First, you can add brown
onto the entire shape. Then pick some paints gray
and add that onto the bottom, and also onto the right. I'm adding some paint
scy at the bottom and also onto the right. That's it. If you want to make your
painting look more interesting, maybe you can add some
strings or rop on it, or maybe you can add some
birds flying on the sky. Those additions, you can
add onto your painting, to give it more character. Now, before I call it done, I'm going to modify the shape of the landscape on the right side. Just making it a
bit more higher. I don't know, for some reason, I just felt like doing it. This one is completely optional. If you're happy
with your painting, you can call it done or you can add some foliage
on the top as well, maybe somewhere over
here or on the top. That's all for the day. Our painting is in a good shape. I think we can call it done. Now we can peel off
the masking tape. And here is a gorgeous
glowing sunset for the day. I'm really loving the sky
and the glowing part. It has turned out
really beautiful. So it's just a matter of using the right colors where
you have the sun, go with that medium tones
and brighter tones, and they don't to either side, go with some darker tones. It's a pretty simple technique. You can use the same technique in your future
paintings as well. So if you haven't tried it yet, do give it, let me
know if you liked it.
32. DAY 28 - Stormy Sky: Hello, dear friends. Welcome to day 28 of painting
mini ticar landscapes. Today, we're going
to try a stormy sky. I know painting skies can
be a bit challenging, especially for a Binner, but this one is quite easy. In way let's start by looking
at the colors we will need. For the stormy sky, the only
color I have used as indico. We'll play with different
tonal values of Itco to create
that dramatic sky. Now, the indico that
I'm going to use for this painting is from Shinhan. This one is more like
a grayish indigo. Usually for all the other
paintings I have done so far, the indigo I used is
from art philosophy. This one is more bluish, whereas this one from Shinhan, it's more like a grayish indigo, so there is a bit of difference in the pigment they have used, and that's why the
colors are different. If you feel our indigo
is more bluish, you can add a bit of
paint screen to it. The next color you will
need is lemon yellow. You can see a lighter
green over here. It's a mix of lemon
yellow and sap green. So that's our next color. Only on the top, closer
to that greenery, we will add a lighter green. The rest is going to be a medium green and a darker green. So the next color you
will need is sacren. That's our medium green, and then to make it darker, I will be adding
some paints gray. Then to make it darker, we will also need some paints gray, so that is our next color. It's a very simple painting with a very simple color palette. We only need these four
colors, indico for the sky. Lemon yellow, sap green, and pain screen for the
meadow and the greenery. Those are the only four
colors you will need. Now, to add those tiny
tiny births in the sky, you will also need
some bolt watercor or white as, these ones here. Okay, so that summarizes all
the colors you will need for today's painting. Here
is a closer look. Indico for the
sky, lemon yellow, sap green, and paints grey
for the rest of the details. So keep all the colors
ready on your palette. Let's give it a try. We will start by adding a line to separate the
meadow and the sky. I'm going for a sloping line. From here, I'm bringing
the line a bit down. You can either go the straight
line or a sloping line. It's totally up to you. That's the kind of
line I'm going with. The bottom is the meadow, and the top part is
the sky obviously. We already spoke
about the colors. This is the indico
I will be using. It's more of a darker indico. If yours is more bluish, you can add a bit of
pain screen into it. Now, this is the only color
you will need for the sky. So when you have
the paint ready, start by applying a coat of
water onto the entire sky, using any of your clean brush. Always make sure your brush
is clean before you start. And also don't add
too much water. We only need a shiny coat. My sky is evenly wet. Now we can start
applying the paint. For that, I'm going to go with my size number eight on brush. Make sure your brush is clean. Now we're going to start with
a lighter tone of indico. We'll apply a lighter
tone on the top. Then gradually towards the
bottom, we'll make it darker. This is the indico I'm
using. It's from Shinhan. It's a slightly darker indico, not very bluish. It's
a little grayish. I think I will start
from the bottom and then go towards the top. Towards the bottom, I'm using
a slightly darker tone. See that. First, apply your
paint along that line. It's more of a medium or darker
tone. It's not too light. We can keep applying
this color and graduate towards the top.
We can make it lighter. Okay. So I'm picking the
same tonal value again, and I'm adding that
at the bottom. So towards the bottom, I want a very dark, cloudy, moody sky. And towards the top, I want
to add more of clouds. That's why I'm adding more
taco tone at the bottom. Okay, that's the bottom part. Now I'm going to make it
lighter towards the top. So picking some clean water, and I'm making it really
light towards the top. Add your paint in a similar way, lighter on the top and
darker at the bottom. Now onto this background,
we're going to add the cloud. So I'm keeping this brush aside, and I'm going to go with
my size number six reh. I have better control with
this brush than the other one. Now I'm picking a slightly
taco toe of intco, and I'm starting to add the
clouds onto the background. On the top, we have
a lighter tone. That's where I'm adding clouds. I'm leaving some space in between where you can
see that lighter tone. If your paint is to watery, dab it on a paper towel. Otherwise, they
will spread a lot. Now, in between, you can
use a much more taker toon to add the clouds to give
it more dramatic look. Every time you feel your
paint is really water, dab it on a paper towel, what the content of
your paint is really important when you're
adding the clouds, water, they will spread a lot and they won't stay in a shape. Have randomly added some
clouds onto the background. Now, I will add some more darker clouds towards the bottom. You can keep on modifying
the shape of your clouds. Do this while your
background is still wet. Don't wait for a longer time. Over here, we can
add a darker ones as we have a darker
tone in the background. Otherwise, it won't be visible. On the top, we can
go the medium tone. I'm just adding some more
paint onto this corner. And I'm introducing some
more clouds over here. Try to retem some of
that lighter space. If you cover it all, you will
end up having no clouds, be really careful to leave that lighter tone
in the background when you're adding the clouds. I'm adding some more over here. At any point, if you're
feeling happy with your sky, you can stop it there. Just because I'm adding more darker tones and more clouds, doesn't mean you
have to do the same. That is really dark.
I will just it. I wanted to make
it more dramatic, so I'm just adding
some more takatons, but I'm not really sure
if that was a good idea. It looks too dark. I will quickly smut it before
it goes out of control. So I'm just pushing
and pulling that paint into the sky and I'm
spreading it out. Now it doesn't look too bad. O, it was really dark. It looks a bit weird
at the bottom. There is a line over here, so I'm just spreading
that as well. And yeah, that's a stormy sky. I'm really happy with the sky. The only reason why I
don't use this indica too much is because it
has granulating property. I'm not at all a fan of
granulating waclars. And that is the
main reason why I always stick with the
one from art philosophy. It doesn't have a
granulating property. And because of that, I love it. Anyways, that's a sky, now let's leave it for drying. The first step is done, the
sky has dried beautifully. Now, the second step is
to paint the meadow. And for that, I'm going to
start with a lighter green, which is going to be a mix of
lemon yellow and sap green. We don't need a lot
of lighter tune. We only need a little
to add on the top. Towards the bottom,
we will go with sap green and a darker green. And in case, if
you have a lighter green with you, you
can use it directly. You don't need to mix sap
green with lemon yellow. This one is mostly lemon yellow. I have only added a very
little of sap green. Next with the same brush, I'm going to pick
more of sap cream. Then I will add that
towards the bottom. I only want to retain a little of lemon yellow on the top. The rest is going to be medium
green and darker green. Keep on adding a
darker tones and medium tones towards the bottom. While retaining a little of
lighter tone on the top, you can add some lines and some textures onto
the background. It doesn't need to
be a clean blend. You can add the paint,
however you like. Now I'm going to pick sap cream, and I'm going to add
that at the bottom. The colors are still
looking very light, we want to make it more darker. Let's pick some paints gray. Let's add that at the bottom. Only if you create
that contrast, your painting will
look more beautiful. Right now we can see if we have a lighter tone on the top, then some medium greens
and darker greens. Now I'm going to add some
lines onto the background. I will use my other brush. Now I'm picking some sap green. I'm adding a few lines
onto the background. You can dab it on
a paper towel and smudge it to give
it a better finish. Yeah, it's a pretty simple step. You have to start
with a lighter tone. Then a medium tune and a darker
tone towards the bottom. Then using your medium
green and darker green, add some lines onto
the background. If you feel those
lines are too much, if they're too
prominent, you can smudge it with a
clean dry brush. I'm adding some more lines
on the top on either side. I only want a little of
lighter green at the center. You can keep on
repeating the same step until you're happy with the
texture and the colors. If you feel, there's a
lot of lighter green, go with the medium green
and add some more lines. And if you feel there isn't enough darker tones
at the bottom, you can go with some more paint screen and add that again. So my idea is to
have only a little of lighter tones and
more of darker tones. Only along the top,
closer to the sky, I have left some lighter tone. The rest is more
of darker tones. That's how it has turned out. I'm quite happy with the colors and the
weight is looking. Now, let's leave it for drying. Okay, so that is dried up. Now let's go the landscape
in the background. And for that, I'm starting
with paint screy first. The brush I'm using here
is size number six. Go with any of your
medium size brush. Now, first, I'm going to add an irregular line
along the horizon. You can either go a straight
line or an irregular line. To me, I feel an irregular line will make it look
more beautiful, but it's totally up to you. So I'm adding a
messy irregular line as if my hand is shivering. And the color I'm using
here is paints gray. You can just add if you remember for some
of the other paintings, we started by adding some tiny, tiny lines close
to each other to make it look like there is
some grass in the background. You can follow the
same technique here, but I'm not going in
that much detail. This one is a much
more rough line. Now onto the top, introducing a random shape, using
the same color. Right after this, I
will co with sap cream, and I will add that on the
top. That's a darker tone. Now with the same h. I'm
going to pick some sap cream. Now, let's continue that
irregular shape with green. See that. At the bottom, we have a darker
tone, and on the top, we are using Sap cream. I'm not really sure if the
colors are really visible. Everything looks
like a darker green, but that's fine. Let's continue. At the bottom, we have paint
screen and onto the top. We are using Sap creen. Let's continue the same
till the other end. At some places, you
can make it higher, and at some places you
can make it lower, to make it look more realistic. It can be a bigger
pattern in between. Those things are
totally up to you. You can modify the
shape however you like. So here, I have made
it a bit more bicker. See that. Now maybe towards the other end,
I will make it shorter. I'm switching back
to paint screen, and I'm continuing to add
those tiny tiny lines. I will do this till
the other end. Then I will introduce
some shapes using paints cream first, and then I will
switch to sap cream. Okay, that is paint screen. Now I'm going to
pick some sap cream, and I will continue adding
that shape on the top. You don't need to
think too much. Just keep on adding that shape. It's just an irregular shape. You can add some tiny,
tiny patterns on the top to make it
look more beautiful. I know right now, it all looks the same,
green and paints. Everything is looking
like a darker to. We're not really able
to see the difference. But that's okay. Don't
worry about it now. Once we're done with this, we will go with a lighter tone, and we'll add some
textures onto this, to give it a more
realistic look. Okay, this part is done. Now with the same brush, I'm picking some lemon yellow, and I will mix that with green. Okay. Now, with that paint, I'm going to add some
tiny tiny patterns onto the landscape we
have in the background. You just need to keep
on adding some tt and some tiny patterns
onto that greenery. It doesn't need to be perfect, and there is no particular
role you have to follow. Just add that in between. At this point, it might look a bit messy, but
that's totally fine. It is part of the process. Now, Bera paper towel, and then with a slightly
dry brush, just mug it. This will leave a
beautiful texture and pattern there. See that. We have some lighter
tone on the top, then some medium tones in between and a taco
tone at the bottom. I think you can clearly
see the difference it made earlier it was
very plain and empty. Now there are some
realistic textures there, and that is exactly what
we're trying to do. Now, the only thing you
have to be careful is that, this needs to be done while your background is
still a little wet. If it has dried completely, you won't be able to smug it. That's something you have
to be careful about. That is it. With that, we are done with a landscape
in the background. Now, there is one more task left with just adding the birds, and that is completely optional. Only if you want to add
some more character to your painting,
you could do that. Otherwise, you can
just ignore it. Now, to add the birds, I'm going to pick up
some white watercl. You can go the white
waterclar or white quash. The birds are going
to be super tiny. So the bh I'm going to go
with is size number two. I'm picking the paint
directly from the tube. Now I'm going to add few teeny
tiny birds under the sky, using white what clar. I'm going to place
them where I have the darker clouds over here. Go with the super tiny bird. You can add as many as you want. When you add them on
a darker background, it will look really prominent. See that. It's a super
tiny simple bird. Now I'm going to
add the second one. Adding another one over
here. Maybe a few more. They are super tiny.
C in a similar size. Don't make it too
big. Usually, we use paints great
to add the birds. But for this painting as
the sky is quite dark, that won't be visible, and that's a reason why
we're using white here. I have added quite a few birds. I think it turned out good. Anyway, that's our
painting for the day. Now it's time to peel
off the masking tape. And here is our gorgeous
mini landscape for the day. I love the sky and
those tiny birds. And even the colors
of the meadow. I think it's a lovely painting. Give it a try if
I get to try it. Anyways, that's all for the day. Thank you so much for joining. I'll be back here soon with
our next mini a co landscape.
33. DAY 29 - Seaside Evening: Hello, my lovely friends. Welcome to Day 29. Our painting for the day is a colorful
sunset by the beach. It's a lovely color
combination and an EC 12. Anyway, as usual, let's start by having a
look at the colors. For the sky, I have
used three colors, a violet on the top, then some pink at the middle and some yellow at the bottom. So the sky is a color
combination of three colors. The violet I'm going
to use is from Shin. This one is permanent violet. Instead of violet, you
can also use blue, if that is what you prefer. This one is a very
beautiful violet. You can also use purple or any other color
of your choice. So that's color. Now, the second color is pink. This one is a basal pink
again from Shinhan. I have used this color
for other paintings aspe. I'm guessing you are
familiar with this color. If you don't have
any kind of pink, you can use crimson or care. You can use a brighter
tone or a lighter tone. Or you can just
add some white at cour with crimson or carmine or any sort of red or close
pigment to get a similar color. Now, the next color you
will need is yellow. The one I'm going to use
here is Naples yellow. It's again a Pasal yellow, but you can go with
any yellow you prefer. It doesn't need to
be a pasal yellow. You can use indian ellow, Cambo yellow, or
any other yellow. Okay, so those are the three colors I'll
be using for the sky. Now, for the C as well, I'll be using pink and violet. Now the next two
colors you will need is brown and pin s gray. I don't have enough paint here, but I'm just going to
add just with that. This one is permanent brown. Instead of brown, you
can also use burn Cena. Now the last color you
will need is pins gray. We'll be using this color to add all the per toons and
the final details. That summarize the colors you will need for today's painting. You can change and modify
the colors as you prefer. It doesn't need to be the
exact same color combination. As I said, instead of violet, maybe you can go with a
bright or pink or even blue. Here are the colors
you will need, violet, pink and yellow for the sky, then brown and paints gray
for the rest of the details. Keep all the colors
ready on your palette, and let's quickly give it a try. Before we start, we need to add a quick and simple sketch. You will have to add
the horizon line, which is a bit below the
center of the paper. Next, you need to add
an irregular line, right below that to separate
the ground and the sea. So go for an irregular line. You can add that
however you want. For me, I'm making it a
bit higher on the right. Okay, the space you
have in between is a s. This is all you need.
That's a sketch. Now, make sure you
have the colors ready on your palette
before you start. So you will need
any kind of yellow, then some pink and also
violet for your sky. Now, when you have
the colors ready, start by applying a coat of
water onto the entire sky. We just need a
general at of water, don't add a lot and your
brush multiple times. Just to be sure the
coat of water is even. If you're using the same
brush for painting as well, there are chances there might be some leftover paint
on your brush. So before you start, always
make sure it is clean. All right, so my
background is evenly wet. Now, to apply the paint, I'm going to go with my
size number eight on brush. First, I'm making sure
it is clean. Okay. Now, the very first color
I'm going to pick is violet. I will go with the medium tone, and I'm applying that
on the top of the sky. Use a brighter tome. Otherwise, when the
background dries up, the colors will
look a little dull. Okay, so that's a kind of
tonal value I'm going wet. Next, I'm going to
clean my brush, and I'm switching to the
second color, which is pink. You can use pink or crimson or carmine or rose or
any color you prefer. Okay. Now I'm going to add
that right next to violet. Now, we'll have to
blend these two colors. Don't run your bridge downwards, Go only upward so that
the pink will stay clean. Okay. If you want to pick some more pink,
you could do that. Now quickly run your brush, only towards a top and
we get a clean blend. Now let's clean out brush again, and then we can go with our
third color which is yellow. In my case, it is Naples yellow. As I said earlier, you can
go with any yellow you prefer, or even orange. Now I'm adding that at the top and I'm going to
blend that with pink. So that's our base layer. Now, just in case
if you want to add some more paint onto the
sky, you could do that. I'm just adding some more
yellow at the bottom. Then I think I might add
some more pink as well. The pink is not very bright. Especially on the
left over here. Now, I'm going to run my brush one more time towards the top. Okay, so that's a base layer. We have created a
blend of three colors. Next, we need to add the clouds. And for that, I'm going
to go with violet again. And before I start, I'm making sure the paint
is not too watery. I have taken some
violet on my brush. Now onto this wet background, I'm going to add in some clouds. You can go with any kind
of tonal value you prefer. It can be a medium
tone or a darker tone. And add in the clouds
wherever you want to. Please don't add any clouds onto the yellow part because yellow and violet are complimentary
colors on the color wheel. So if you mix them together, they will end up
creating a muddy x. So you should focus on the ADS where we have pink and violet. Let's pick some more paint, a darker tone and add
some clouds on the top. If you want to create a drama, it is always good to play with different tonal values when
you're adding the clouds. Over here, we have
to go the taco tone. Otherwise, it won't be visible. But onto pink, it is okay. You can use a medium tone. We can add a few more over here. It's a beautiful
color combination. If you're trying out the
same sky on a bigger scale, maybe you can start with blue. You can go with blue, violet, pink, and then yellow. Anyway, I'm going to add a
few more clouds on the top. Whenever you're adding clouds, the wetness of your paper
is really important. At any point, if you feel
it is starting to dry, it is a good time to
stop adding more clouds. That's how my sky
has turned out. Now we'll have to
wait for this to dry. The sky has dried completely. Next, we can start with the s, and for that as well, I'm going to use
pink and violet. I'm starting with pink. First, I will apply that
onto this entire area. Then gradually I will introduce some violet to give
it more textures. Go with pink or or crimson
or any color you were using. Apply that onto that small
strip we have in between. The brush I'm using
here, size number six. Go with any of your medium size brush to have
better control. Now, with the same brush, I'm
going to pick some violet. If it's de watery, dap
it on a paper towel. You can pick a medium tone. Now, simply add some lines from either side and
also at the bottom. See that? Once you have
added those lines, you can dab on a paper towel and remove the excess
amount of water, and then you can just simply
spread it or smudge it. I think we can add
a few more lines. I'm picking a
little more violet. I'm adding a few more
lines onto the background. When you're adding these lines, don't add a lot, we still need some pink
in the background. Be very careful about that. You can add them
from either side and also a few at the bottom. So that's how it has turned out. Now, our next task is
to paint the ground, but before that, we'll have
to wait for this to try. Okay. So let's take a short break and come back after this has dried completely. Okay, so we have painted
the sky and the sea. Next, we have to
paint the ground. And to paint that, I'm switching back to my size
number eight brush, and the two colors you will need is brown and paints gray. It can be burns in or brown. Both the colors will work. So I'm starting out with brown, I'm picking a darker tone, and I'm applying that
to the background. See that. So brown is more reddish, whereas, on the other hand, burn scena is more yellowish.
That's only difference. For me, for some reason, I prefer using brown
or burn scena. Only when I'm
painting a sand area, like a seashore or
a beach landscape, I prefer going with brown. Other than that, for
most of my paintings, I prefer using brown
or burn scena. Okay. So I've applied brown
onto the entire area. Now, with my other brush, size number six, I'm going
to add in some taker tones. Now, this one is a very
simple casual cay kind of a step with any of your medium
sized or a smaller brush. Pick some paints
gray, a darker tone, and simply drop in that onto the wet background to
create some texture. It doesn't need to be perfect. You can add the deeper tones, however you like,
especially on the top. See that. Simply drop in
that darker tones. It could be some small
shapes or dots or anything. We are trying to
create a texture here. So there is no rules that
needs to be followed. You can simply keep on
dropping that darker tone. While the background
is still wet, add in a few at the bottom, and also at the top, we still need to have
some brown in between. So don't get rid
of that entirely. Okay. That's how I have apply
the daker toones. We are painting
an evening scene. Try to stick with medium
tones and daker toons. Don't make it too light. I will drop in some
more taco toones, randomly adding a few more. And then once I'm
done with this, I'm going to add
some mountains in the background,
some smaller ones. First, I will pick some brown. You can either leave
a horizon line actus or to give it some
extra character. You can add some small
mountains far away. That's a size I'm going
with. It's a first one. Use burn Cena or brown and
add in the shape first. You can compose your
painting, however you like. I'm going to add them
towards the left. Be careful about the size. If it's too big, your painting
will go out of proportion. Now I will add burn
more next to that. Go the irregular shape and
go to the smaller size. That's a third one. Right now, the only color I
have used is brown. Next with the same brush, I'm picking some paints gray, and I'm going to add a few
lines onto the surface. Just a few. It's
already super tiny. Don't put a lot of effort. Drop in some darker tones in between to give it
more character. That's how it has turned out. Now, if you want
to, at this point, you can wrap up your painting, or there is one more
element we can add onto it. For that, I'm going to
go with a smaller brush. It is nothing complicated. We're going to add some
tall grassy patterns onto the right side
where it is elevated. Go with any of your smaller
brush or a brush with the pointed tip so that we can add those thin
delicate lines. I'm going to add them over here. Is just some simple
long curvy lines. I'm going to add a lot of
them close to each other. That? So some of
them are taller, some of them are shorter. They are long and cov. Add
them in a similar way. Don't make all of
them look the same. Some of them can be really tall, and some of them can be short. Add them in all direction.
That's a right side. Now, I'm going to
continue adding the same lines towards
the left side. Go with any of your smaller
brush or a brush with a pointed tip so that you
get thin delicate lines. Now, while you add
them on the top, you can add a few towards
the bottom as well. Just to give it a continuation. They won't be very prominent,
but that's still okay. You can just add a
few. Now towards the left, I'm going to add more. But towards the left, I'm thinking of making them shorter. I don't want them to cover up the sea and those mountains. Towards the left, I
will keep them short. Or in case if you don't want to add them
towards the left, you can stop it at
this point as well. Now I'm going to
add a few more in between to give it
more denser look. I'm going to fill
up all those gaps. From that bottom line, I'm adding some lines
towards the top. To fill in all those
gaps we have in between. Similarly, I will continue the same pattern
towards the left. The only difference will
be, they will be shorter. It's the same lines. As I mentioned earlier, the
step is completely optional. Only if you want to add
that extra element, you could do that. Otherwise, your painting
is in a good shape. You don't really need to add
these grassy lines. Okay. Now, I'm going to continue
the same towards the left, but they are going
to be shorter. The only thing I'm
not really happy with is the color of the sea. I think there's a lot of pink. I wanted more of violet. There wasn't a violet when
I applied those lines, but then I think
when it dried up, everything is kind of
the same tonal value. The violet is not
really prominent. In a way, no, mind. Let's continue adding
these grassy lines. So the brush I'm using
here is size number two. It has got a really
nice pointed tip, and I could add these
lines quite easily. So try to go with any of
your detailing brush or miniature brush or any
kind of similar brushes, and then keep on adding these lines until you
reach the left end. Along with these, you can also add a few
towards the bottom. Otherwise, it will look very weird and strange only to have those grassy pattern on the
top, not anywhere else. Now, I'm going to quickly add these patterns onto
this entire area, and with that, we
can call it done. Oh. Okay, my lovely friends, I'm done adding those patterns. And here is the final result. Now let's wait for this to dry before we peel off
the masking tape. Okay, so that is
dried completely. Early, we had a solid
line on the top. Now that is gone or when
everything has dried up, and it is looking
really beautiful. Just like I said earlier,
the only thing I'm not really happy with is
the color of the sea. The rest is really beautiful. Anyway, let's peel up the masking tape and take a
closer look at our painting. And here's a finished painting. I hope you all enjoyed it. It's a beautiful
color combination and a beautiful composition. If you are yet to try
it, do give it a try. Okay, so that's all for the day. Thank you so much
for joining me. I will be back here
super soon with our last mini
watercolor landscape.
34. DAY 30 - Dreamy Evening: Hello, dear friends.
Welcome to day 30, which means we are
on the final day of this 30 day aticar journey. And here's the painting that
we're trying out today. It's a gorgeous escape. I just love the way the
sky has turned out, and ENT can feel
of this painting. Anyway, as usual, let's start by looking at the
colors we will need. For the sky, the major color you will need is a pasil orange. I'll be just mixing
some orange with white watercolor to
create that color. That's a color you
see on the top. Now towards the bottom, I will use a pasil red. It's going to be the
same combination. I will use some red
and white together. First, I will start with orange. The one I'm going to use
is brilliant orange. You can use any orange
you have caught, or you can also use ermalin. Into this, we will just
add some white watercolor, and that's how we're going to
create that passel orange. That's a first color. If I make some white
water color with it, the color will turn into
a beautiful pasal orange. See that? That's the
color you see on the top. Depending on the amount
of orange you're adding, the color will
look more intense. You can see the difference. Now into the same mix, I will add some red, and that's the color you
see along the bottom. Towards the top, we
have a pasal orange. Then along the bottom, towards a horizon,
I used a pasal red. These are the two major colors
you will need for the sky, Basal orange and a Pasal red. The red I have used
here is spiral red. You can go with any
red you have got. This one is a very
bright and bold red, but we'll be using a
Pasal tone of this color. Along with these two colors, you will also need
some white watercolor to turn them into pasal colors. Along with these two, you
will also need one more color for the sky, which is indigo. Let me show you how to mix
and create that color. Into this mix, add a bit of indico to create a
muddy color like this, and that's the color you
see along the horizon. We'll be using the same mix
to add the clouds as well. The color will totally depend on the amount of indico you're
adding into the mix. Okay. So the next color
you will need is indico. We only need a
little of paint for the sky towards the bottom, as well as to add the clouds. For the sky, you
will need orange, red, and indigo, and
also some white. Okay. Now, there are two more
colors you will need, which is burn Cena
and paints gray. For the sandy area, I will go with a mix of
burn scena and paints gray to create a color which
is more like burn tamper. Then for the sea, as well as
for the landscape far away, I will go with paints gray. If you want to use burn timber,
you can use it directly. This one is burn
scena from Shinhan. Now, what the final color you
will need is paints gray. We will use a lighter tone for
the s, and then onto that. We will use some medium tone and darker tone to
create the texture. That summarize all the colors you will need for this painting. It's a really
beautiful painting. It is one of my most favorite
from the NTE collection. I'm very excited to take
you through the process. These are the colors
you will need. Keep them ready
before you start. You will need orange, red, indigo, burn
sina and paints gray. Keep all the colors ready on a palette and let's
give it a try. The first thing I'm going
to do is to add the sketch. So first, I will add
the horizon line. Okay. Now, over here, I will add an irregular line to separate the
sea and the shore. We'll also be adding
a landscape far away on the right side. So add another line a
little below the horizon. Then simply add a rough shape. We can modify this as we paint. For now simply indicate
a shape there. Next, I'm going to add a
simple aviar line over here to separate the sea and the
sandy part. Okay, that's it. That's a sketch. I'm hoping you guys have the colors
ready on your palette. When you have them
ready, stap by applying a coat of water
onto the entire sky. Make sure your brush is clean. Now gently apply a coat of
water and make it evenly wet. So my background is evenly wet. Now to apply the
paint onto the sky. I'm going to pick my
size number eight fish. First, I'm making
sure it is clean. Now I will start by picking
a little of orange, but I don't have any
white on my palette. The very first step
is to squeeze out some white ticar
onto your palette. We just need white ticar. It doesn't need to be. Now
I'm picking some orange. Mixing that with white. It's a light tone. I have added more white
and less orange. This is the color I'm starting with. It's a beautiful color. Now apply that on
the top of the sky. Gradually, pick more orange
and then towards the center. Apply that brighter
orange, give it a blend. We have a lighter orange on the top and a brighter
orange at the bottom. Now into the same mix,
I'm adding some red, and that's a color I'm
going to use along the bottom part
towards the horizon. First add a straight line. Then fill up that area, and blend that with orange. We have a lighter
orange on the top, a brighter orange at the center then some
red at the bottom. Now, towards the bottom, I'm going to add some indico. I won't be adding indico actus. I'll just pick a little, and I will mix that with this
color we have created here. It's more like a muddy
brown or a muddy gray. Now I'm going to apply
that along the horizon. I think it's better if I
go with a smaller brush. This one is size number six. Now I'm going to apply
that towards the bottom. Only over here, just to make our sky look
more interesting. Along the bottom, I'm making
it a bit more darker. Only a little, I'm
not adding a lot. Now with the same
color, I'm going to add some clouds onto
this wet background. But before that, I feel like adding some more
red into the background. The red is not really visible when I added those darker tones. So I'll just clean my
brush, pick some red again. The same color I used earlier, and I'm going to add
that right over here. The red wasn't really visible. That's why I'm doing this again. Okay. Now it looks fine. Next, we're going
to add the cloud, so I'm going back
with the same mix of violet and that red. Let me tell you the
color can be a bit different according
to the amount of indigo you're adding, and that's totally fine. Now onto this wet background, I'm going to add some clouds. At any point, if you feel
your paint is to watery, dab it on a paper towel. Otherwise, the clouds
will spread a lot, and it will be very difficult to control the way
they're spreading. That's the shape I'm going with. They are small clouds. We just need a muddy
brown, that these clouds. Now, I'm going to add a few
towards the top over here. I don't want to make
it too dramatic, but I still want
some more clouds. If you're looking
for a simple scar, you can just add one
or two small clouds and you can stop it there, or if you want to make
it more dramatic, you can continue adding more and more into
your background. Only if your background
is still wet. At any point, if you
feel your background is starting to dry, call it done. Don't add any more clouds. My background has started to
dry, especially on the top. The clouds are not
really spreading. I think it's a good
point to stop. See that? It looks like a
very rough shape. So I'm trying to blend
it with a bed brush. But that didn't work. So I think it's a good time
to stop adding more clouds. Okay, so that's my sky.
I don't want to ruin it. So I'm going to call it down, and I'm going to
leave it for drying. That is completely. Now let's paint the
C. For that as well, I'm going to go with a mix of
that basal red and indico. I will add more
intco into this mix. You can either go
with this mix or you can just use paints gray acts. You can go the medium
tone of paints gray, and add that onto the entire
C. It's a medium tone. It's not too light. Go with
the similar tonal value. Into the basal red, you
have created earlier, add some indico or just go with the medium
tone of paints gray. Don't use indico acts. We need a color which is
more like gray. Okay. Now, let's apply that color onto this little part. It's
a very small part. Okay. So right now
we have applied a solid wash. Now into this, we are going to
add some lines and some textures using
a darker tone. Right now, it is a
simple plain wash. Okay. Now, to add the lines, I'm going to go with
my smaller brush. This one is size number six. Now into the same
mix, I'm going to add more indigo or maybe
more paint screen. We just need a darker tone. Now I'm dapping it
on a paper towel, just to make sure my
paint is not too watery. Now, simply add some lines
onto this background, while it is still a little wet. Just some lines are all we need. It's just a small section. We're not going to
add a lot of details. So go with the taco toon. Maybe you can use paints cactus. Now simply add some lines
onto that background. This is just the first round. We will add one more
round of details. This left corner has dried up, so I'm picking some water,
and I'm smudging that. You can see the kind of lines
and textures I have added. It is not too much. If you want to add some more
lines, you could do that. But be sure to go
with a paint that is not too dark and too watery. We want that lines to be seen. Okay? Those slightly thicker
lines will look like waves. In between add one or
two thicker lines, not a lot. Okay. So that's how it has turned out. I'm pretty happy with the colors and the weight is
starting to look. That's it. Now,
let's leave it for drying before we
go the next steps. That also has dried. Now our next task is to
paint the sandy part. The base layer is going to be a mix of burn sina
and paints gray. I want a dull moody brown, so I'm picking some burn sina I'm mixing that
with paints gray. This one is more
like burnt umper. If you have burnt umber,
you can use it act, or you can mix and create
a color similar to this. It's quite dark. Now I'm going to apply that
onto this bottom part. See the color. Go with the similar tonal value.
Don't make it too light. Now, apply that onto the entire area,
following this line. Now gradually, we'll
have to introduce more taco tones and
textures onto this. For now, apply a solid wash. The brise I'm using right
now is size number eight. Now let's apply some taco tones. I'm picking more paints gray, and I'm adding that to what the bottom and a little in between. I'm picking that older color, and with that, I'm smudging it. I don't want them to
be too prominent, but I still want some
textures and darker tones. Just push and pull the paint and create some texture there. In between, you can add some
dots and some small shapes. Just randomly add a
few lines and dots and shapes onto the background
to create some texture. If you feel they're too much, clean your brush
and go back with your previous color
and then smudge it. You have to do this while
your background is still wet. Don't wait for a longer time. If it dries up, it won't
have a blurry look. That's how it has turned out. I think it's in a good shape. Now, we'll let that
dry. In the meantime, we have two more tasks. The first one is adding
that far away landscape, and then the second one is adding some more
textures on the sea. For that, I'm going with a
taco tone of paint screen. The brush I'm using
here a size number six. First, I will start by adding a line a little
below the horizon. The same way how we add the sketch at the beginning,
it's not visible. So I'm adding that line
again with paints gray. Now we can simply add
some shapes on the top. Towards the center,
I'm making it shorter. Then towards the right. I will make it a bit more
taller, not too much. Go the darker tone. This one is a really darker
tone of paints gray. That's why it is looking
too much like black. Now let's finish of the shape. Go with any of your
smaller brush or a medium size brush and simply add some
shapes onto the top. First, you can add
a straight line. A little below the horizon, then simply add some rough shapes on to the top like this. Using a darker tone. Okay. You can see how
beautiful it is turning out when we introduce
those darker details. Now, the same brush, I'm going to add some
textures onto the scene. For that, I need a
paint which is dry. So grab your paper towel
and dab your brush on it. Now that dry paint, add some lines onto
the background. You can add them
wherever you like. There's nothing
complicated here. Go the pain which is dry. Don't use a darker
and bolder tone. Now, just add some
dry lines onto the background to create
some more texture. If you feel your
paint is watery, dab it on a paper towel again. Then just add some lines. They can be longer or
shorter, it doesn't matter. Simply add them in, to
create some more texture. You can add them on the
top or at the bottom. Add them however
you want. If you really have got enough textures,
you can stop it there. I'm loving it already,
but I think I can add few more lines to give
it a more complete look. I'm going to pick
some more paint and I will add a few more dry
lines onto the background. To add more textures. So I'm going to pick
a bit more paint. It's already dry, so I don't need to dab it
on a paper towel. Now I will add some more
lines here and there. There is no particular order
or anything I'm following. Wherever I feel like, I'm
adding some more dry lines, using a slightly dakotn
of paint screen. Okay. That's how
it has turned out. I'm pretty happy with it. Now, there is one more
thing that we have to do. For that, I'm going to go
back with a white watercolor. I haven't added much water. It's a dry opaque paint. It's been a while, so the
sandy part has dried already. If it's still wet, you'll
have to wait for that to dry. Now over here, you have
to add a line first, using white ticar or white ga. I already had some
leftover white watercolor here. I'm just using that. But if you prefer using
gas, you can go with that. First, add a simple line, an irregular line,
using white paint. Now dab it on a paper
towel and make it dry. Then towards the top, simply
add some dry patterns. Towards the bottom,
we need a clean line. Don't smudge it just randomly. Do it only towards the top. We are smudging the paint
to create a wavy texture. Keep doing that. Until you're
happy with the result. This one is a very
small landscape. You don't need to
put a lot of effort. First add in a line,
an irregular line, then only towards the top, add in some right
textures, and that's it. That's how it has turned out. I cannot tell you how much I love this mini
watercolor landscape. I think it's a perfect one to end this 30 day
watercolor challenge. Now I'm going to pat
out the masking tape so that I can show
you a closer look of this gorgeous painting. Actually, it's a very
simple painting. There isn't a lot of elements, but I think it's a beauty
of the color combination. It turned out really beautiful
more than what I imagined. That's all for the day, give
it a try if I get to try it, and with this, we are ending our 30 day watercolor journey. Thank you so much
for painting along with me for all these 30 days, and I'm looking forward to
seeing you in my next class.
 Zaneena Nabeel, Top Teacher | Artist | Author